Animation Layers
 Tal Hershko


Animation Layers V2.1.4.6

How does it work?
When Adding the first Animation layer, the addon will create a base layer with a new action inside of it.
If you are currently already animating an action, then your current action will become the base layer and another new empty layer on top of it will be added automatically.
Each object and armature will have their own separate layers.
When you change or create a new action either from the action editor or directly from Anim Layers UI, it will update and load it automatically into your current selected Layer.
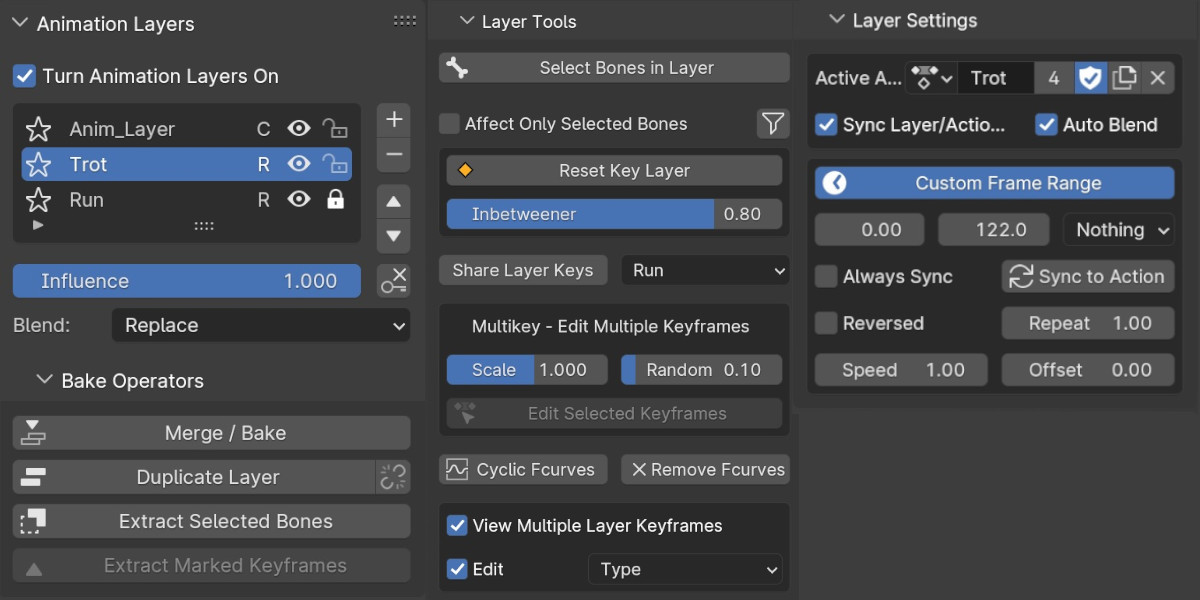
Layer Icons
 Add or remove layers.
 Move layers up or down.
 Mutes Layer. When Turned off the layer doesn't influence the animation.
 Lock Layer. When Turned on, The properties of the layer will not be visible and the layer's action will not be activated when selected.
 Solo Layer. View only the Layer with the star turned on (Mutes all other layer).
*Animation Layers are using a different solo property then the Solo property in the NLA. it is better to avoid using NLA's Solo while using Animation Layers.
Influence - Influence of the layer on the result of the animation. It is using the NLA's strip influence property. If you want to animate it then you will need to turn on the key (+) icon. 
Blend Type - How the Layer interpolate with the bottom Layers. Normally the Bottom Base Layer is using 'Replace' or 'Combine' Blend Type, and the top Layers would use 'Combine' or 'Add'. Another Replace layer on top of the other Layers will override them.
Bake Operators
Merge / BakeBake Type: Choose between using Animation Layer's Bake based on Fcurves calculations, or Blender's native NLA Bake.
- Calculates custom properties and also shapekey layers.
- Faster smart bake, bake is based on smartbake
- Can merge upwards, and can also merge layers with only 'add' blend type
NLA Bake Advantages over Anim Layers Bake:
- Can Calculate simulations
- Can calculate constraints and clear them
when using NLA's bake the addon will still also perform a few operations around it to make it easier and cleaner to use, and can be also used with smart bake

Bake Operator: Bake into a new layer on top of the selected layer, or Merge the layers, which will remove the old layers and merge them into one baked layer.
Bake Direction: Bake from the current selected layer downward or upward, or bake them all.
Only Bake Type of Anim Layers can bake upwards, and can bake/merge additive layers into a new additive layer.
When baking upward from an additive layer, it will bake up to the top or until the next Layer with a "Replace" Blend Mode.
*It is possible to exclude layers from a bake also by Muting them with the eye icon.
Clear constraints - Available only with Blender's Bake, Will include the constraints influence and remove it after bake.
Merge Fcurves Modifiers- When selected the Fcurves modifiers such as noise and cyclic will be included in the bake and turned off after the bake (but not removed). When deselected they will not be included in the bake but will be kept as Fcurves modifiers
Smart bake - use If you want to keep the same amount of overall keyframes instead of a keyframe per frame.
Smart bake will restore the keyframe values, time, interpolation and handle types of the overall Baked Layers. However it will not restore the tangent handle values.
For a better precision it is better to avoid smart bake, and instead bake on every frame, Hopefully soon it will be able to recreate the new handle values of the new curve also with smart bake.
If you are animating with Cyclic Fcurve modifiers, then using Smart Bake together with Merge Fcurve Modifiers will duplicate the keyframes along the time range and remove the Cyclic modifier.
Steps - When smart bake is turned off, Steps will appear and will add keyframes every X number of frames.
Only selected Bones- when selected then only the selected bones during the merging will be baked. When turned off, then every bone .that has keyframes in all the merged layers will be baked
Copy original merged action - Available only when merging. Creates a copy of the original base layer action before merging all the layers into it.
Bake Time Range - Anim Layers Bake is always using the time range from the Timeline editor
Duplicate Layer - Duplicates the layer and its action. Use the  link button to keep the action either linked or with a new user.
Extract Selected Bones - will create a new layer with the animation of the selected bones, and remove it from the original layer.
Extract Marked Keyframes - a tool and workflow for motion capture cleanup. Select the bones that you want to extract. Use Blender's timeline markers to mark the key/extreme poses and the important in-betweens. Use the Operator Extract Marked Keyframes, and it will create a new layer only with the keyframes that were marked. The addon will also add an estimation of the interpolation based on the motion capture layer.
Tools

Select Bones in Layer An operator, that select all the bones that have keyframes in the current selected layer
Affect Only Selected BN
Affect Only Selected Bones - The tools will affect only the selected bones when checked
Inbetween Keyframe - Blender's pose inbetweener doesn't work well with layer and nla tracks. So I've added this simple inbetweener which calculates the percentage between 2 keyframes. When using a value out of the slider limits 0 and 1, it will push the pose
Reset key Layer - adds a reset key (usually value of 0 or 1) to the selected bones or object in the current layer.
When using the hotkey alt+g/r/s in Blender to reset the location/rotation/scale, it's resetting the values for the overall layers. When using Reset key Layer it will reset only the values in the current selected layer
Cyclic Fcurves - It's possible to add cyclic Fcurves to your actions directly from the addon UI. It is similar to using shift + E in Blender's animation editors, however it works in the 3d viewport and on per selected object or armature bone. If you have other modifiers such as noise modifier, it will add the Cyclic modifier bellow the other modifiers.
Keyframes from Multiple Layers -
 adds a channel group called "Anim Layers" with a channel for each layer and its overall keyframes. It's currently available only from the Timeline and Dope sheet editors, and still not available from the graph editor. The keyframe channels are locked by default. Use Edit to unlock them and edit keyframes from multiple layers.
Type: choose how to display the keyframes from the other layers
It is possible to exclude layers when viewing multiple using the Layer's Lock icon.
Layer Settings
Active action - You can select the action directly from the Animation Layers UI, as well as from the action editor.
The active action will load automatically into the selected Layer.

Sync Layer/Action Name - Always keeps the name of the of the action and the name of the layers synchronized. If the name of the action change then the name of the layer will change and vice versa.
Auto Blend - when selecting an action it will give it an automatic 'Add' or 'Replace' Blend types.
Custom Frame Range

When custom frame range is turned off, the addon will use the scene frame range for the frame range. When Custome frame range is turned on, it's going into kind of an NLA Mode and more properties of the nla strips are becoming available in addon panel but also more simplified.
Frame range will determina only when the layer's action starts and ends to play
Extrapolation will keep and hold the last frame and/or first frame or will hold nothing
Sync to Action will sync the frame range to the action length*Speed*Repeat+Offset
Always Sync will sync the frame range always automatically it's changed
Reversed - flips the animation backward
Repeat - the animation specific amount of times using a float values. Can be used instead of cyclic f-curves
Speed - scale the distance of the keyframes to influence the speed of the action
Offset - all the keyframes forward or backward using a float value

Default Blend Type - Defines which blend type is applied by default when addin a new layer.
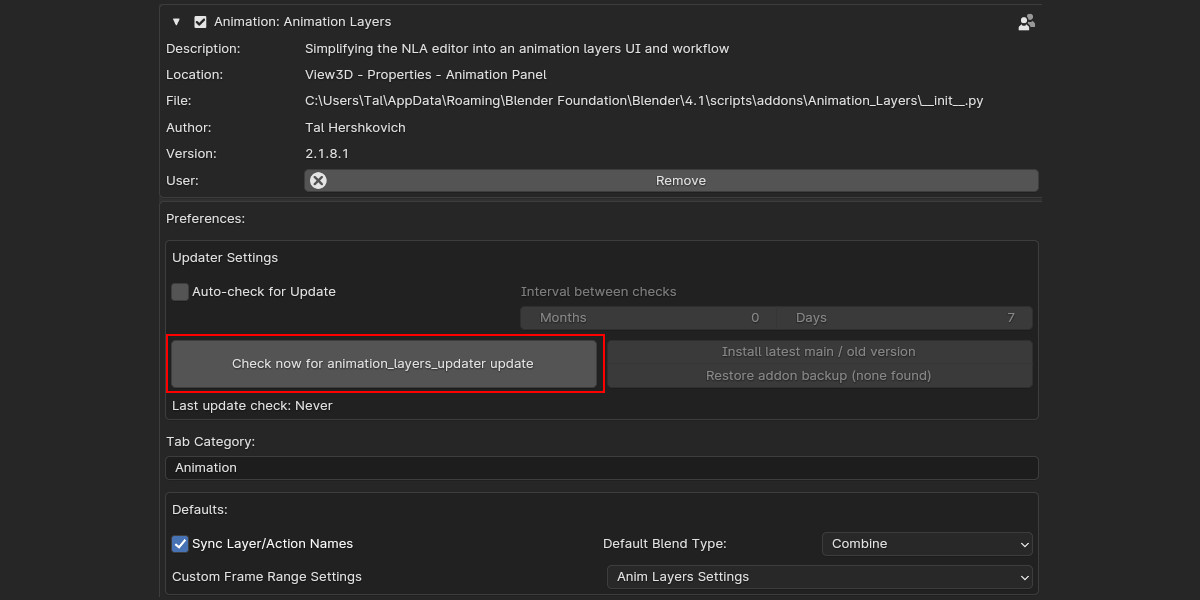
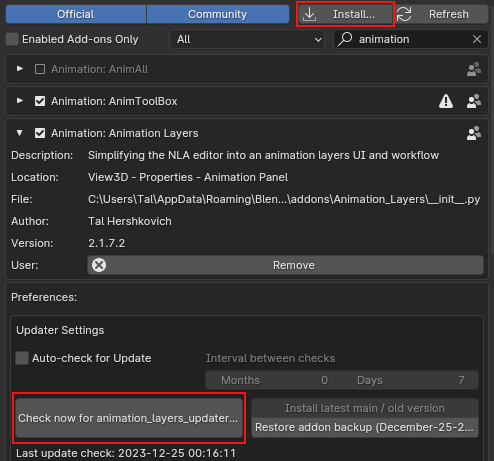
Installation
Install from Blender's preferences in the addon category. press install and choose directly the zip file (don't unzip it)
After it's installed you can update to the latest version in the auto updater if it's not the latest.
NLA in the background
If you turn Animation Layers on an object that already has tracks inside the NLA editor, a message box will appear. You can choose either to remove the NLA Tracks and have a fresh start, or to use them as Animation Layers.

Tracks that have more or less then a one strip will be always locked within Animation Layers.
Animation Layer = one Track, one Strip, one Action
Animation Layers are using NLA track's editor blending modes.

Since Blender 3.2 new feature for full stack evaluation in tweak mode. The addon is using NLA's tweak mode when selecting a layer. When the selected layer is locked then the addon will go out of tweak mode.
Active action outside of the nla tweak mode is blocked by the addon and is available only when the addon is turned off.
When a new action is selected as an active action in the action editor, then it will just load automatically into the current selected layer.
The addon is in general synchronized with the NLA . but it is still better to avoid using them both together at the same time, in order to avoid any conflicts and limitations.
The addon is currently using only one strip for each layer, if more strips are added to the same layer inside the nla, then the layer will be locked within the addon panel.
Current Known Issues and limitations.
When using Library Overrides it is better to make sure your source file (normally the rig file) is not including any animation layers or any NLA tracks as well..
If you load a completely different action on top of your animation and your character explodes , then you probably need to change the blending mode to "Replace". Only actions that were created in an additive layer can be used in additive layers.
Influence property - When deleting the keyframes directly from the influence slider (and not from the animation editors) it will update only after you moved to a new frame in the timeline.
-
$30
Single License for a single user of Animation Layers
-
$200
Animation Layers Studio License for up to 10 seats
Have questions about this product?
Login to message
| Sales | 7700+ |
| Rating | 83 ratings |
| Dev Fund Contributor | |
| Published | almost 5 years ago |
| Software Version | 4.4, 4.3, 4.2, 4.1, 4.0, 3.6, 3.5, 3.4, 3.3, 3.2 |
| License | GPL |
Discover more products like this
loveblender layers mocap bake animation spring24 NLA editor motion capture winter24 summer24 bfcm24