B-Renderon [Standalone Render Manager]
Launching it for the first time: settings

B-Renderon is portable. When you execute it it creates two files: one in which it stores your settings, and a log file for your renders info.
On first launch, B-Renderon will show you this little settings window. There, you can choose the language you want B-Renderon's interface to be shown in, it's skin, and the location of Blender in your system. This is going to be de default Blender B-Renderon will call to render. If you want to render different blends with different versions of Blender you can set that up later, after you add files to your queue.
The main interface
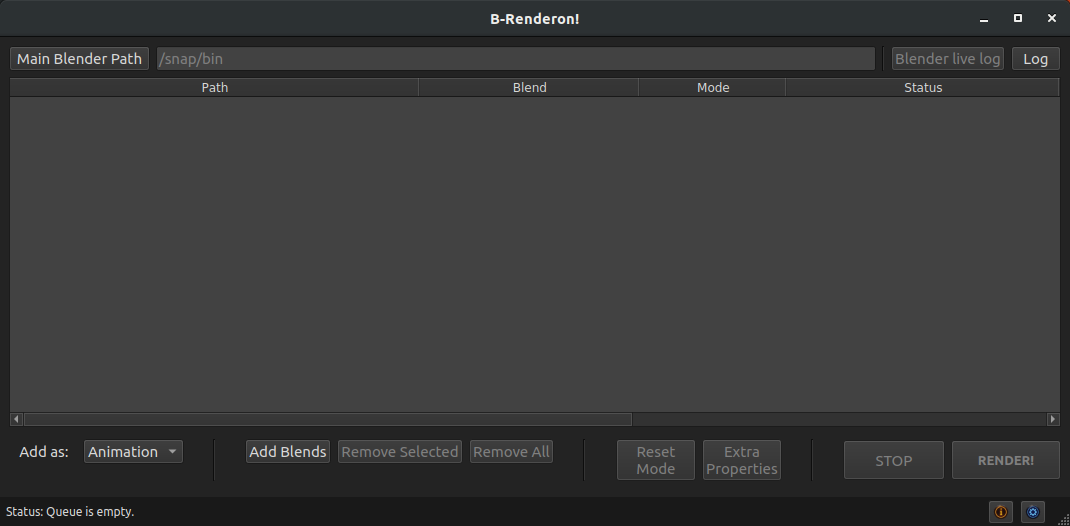
The main B-Renderon window shows your default blender location at the top, with a button to it's left that allows to change it (notice that changing it here instead of doing it in the settings window will change it for the session only, B-Renderon will not remember the change next time you launch it). To the right there's a Blender's live log button that will remain disabled until you start rendering your first file. Then it gets enabled and if you click it a vertical window will open showing Blenders live log. Then there's a Log button that opens your renders log. Right clicking on it will allow you to clear it.
Then there is the main table were you will add your blends. You add them either by dragging them from a file explorer and dropping them here, or by browsing to select them, via the button "Add blends" that I'll describe later, or with the shortcut Shift+A.
The main table has:
- A path column, that will show the path to each item in the queue
- A blend column that will show it's name
- A mode column that will show, for each item, whether it is set to be rendered as an animation or a list of frames
- A status column, that shows whether each blend has finished rendering, is rendering, was interrupted, failed, or hasn't yet started. When pertinent, it will also show the number of rendered frames.
If you scroll to the right or expand the window, you'll see that there are a few more columns:
- A Blender column, which shows the blender version (by tag) that is set to render each blend
- A Scene column that shows the alternative scene set for each blend to render, if any
- Start and end columns that will show the start and end frames that you set, if any, to overwrite the blend's ones (this only applies for blends set to render as "animation")
- An Extra Args. column that will show any extra command line arguments that you set for your blends

Below the main table, there's an "Add as" label with a selector that by default is set to animation. Here you can select the mode that your blend files will be added as, which can be either "animation" or "frames". Animation will render the whole range from start frame to end frame, the same as if you were to press "Render animation" or hit Ctrl+F12 in Blender. If you select "Frames", then for each blend you add you are going to be asked for a frame number, or list of frames separated by commas, to be rendered.
Changing the mode here will only affect the blends you add next, not the ones already added.
Then there's buttons to add blends (by browsing), remove selected and remove all.
Then there's a "reset mode" button, that allows you to change the mode of the selected blends of the queue from animation to frames or vice versa. And to the right there's a Extra Properties button which opens the Extra Properties window which I shall discuss in the "Extra Properties" section. Both of these buttons will be enabled only if you have some item/s in your queue selected.
Finally, there's a Stop button, which is disabled unless rendering is happening, and a render button which starts the queue processing. If some blends have already been rendered in the present session, when you hit render again a pop up message will ask you what to do with those, and you can choose to omit them or to render them again. Similarly, if there's blends in your queue that have been interrupted during rendering in the current session, next time you hit "Render", a pop up will ask you whether you want to omit interrupted renders, restart them, or resume them, starting from the frame after the last saved one.
At the very bottom of B-Renderon's main interface there's a status bar that communicates what B-Renderon is doing, and to the very right there's two buttons: the first one, with a little yellow i, will open an info window, with info about B-Renderon and it's license stuff; the second one, a little blue gear, will open B-Renderon settings window.
Context Menu
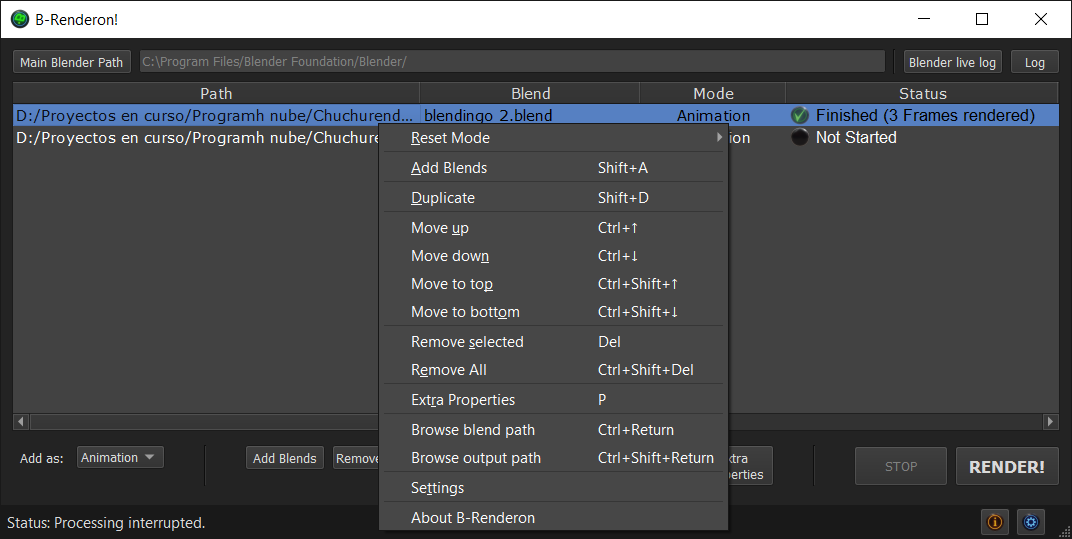
Right clicking on the main table, or hitting space bar, calls the context menu. Most options there are already shown on the interface. The exceptions are:
- Duplicate: As it's name implies, it duplicates selected items in the queue. Useful for rendering different scenes of a same Blend, or different frame ranges.
- Move up, down, to top, and move to bottom: Helpful for reordering items in the queue precisely if you prefer it over dragging and dropping
- Browse blend path: Opens a file explorer at the path where the active* blend is located
- Browse output path: This is only available after the active* item has been rendered. It opens a file explorer at it's output path.
* The active item in your queue is the one you selected last.
Extra Properties
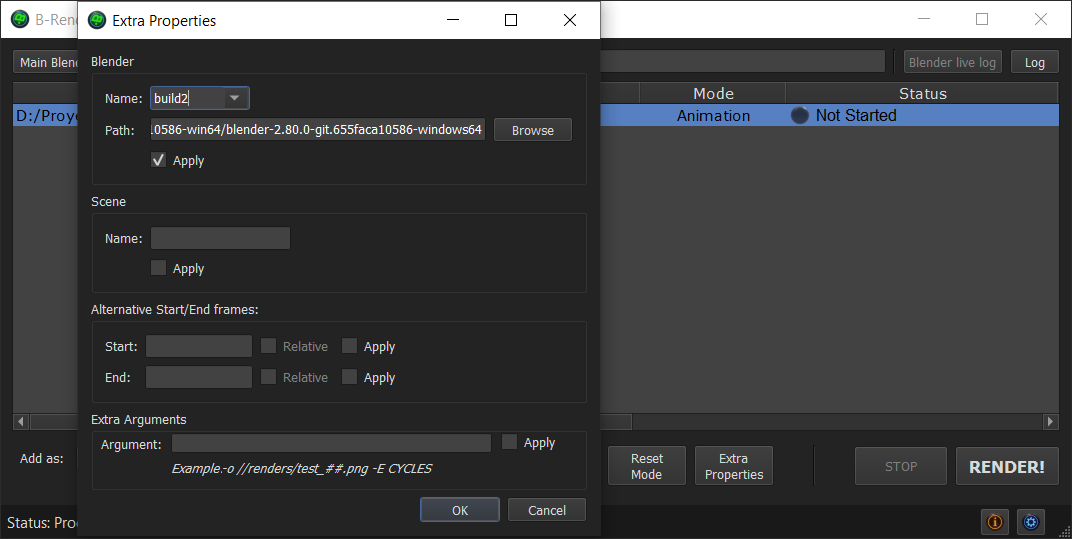
The extra properties window allows you to overwrite default values for several parameters and to add extra command line arguments.
It has four sections:
- Blender: Here you can manage alternative Blender versions to render different files. To add a version of Blender, write a tag for it in the name field, and browse to it's path
- Scene: Here you can write the name of the scene you want to render. If the name you write doesn't match any scene present in your blend, Blender will render the active scene in your Blend.
- Alternative start/end frames: This applies only to files set to be rendered as animations. Here you can overwrite the start and/or end frames to change the range to be rendered. If you enter a signed number in either field, the corresponding "relative" checkbox will become checked, communicating that blender is going to interpret the number you entered in relation to the value saved in the blend. For example if, in the "start" field you enter +5, the animation will start rendering 5 frames after the start frame in your blend.
- Extra Arguments: here you can add extra command line arguments. You can learn about it's possibilities trough blender's documentation. Bear in mind that the extra arguments are going to be added after all other arguments except the one for mode (-a or -f ) which is added last, and as you can learn trough blender's documentation, the order of the arguments matters.
Every independent property in the extra properties window has a corresponding "Apply" checkbox. It's purpose is to make clear which properties are going to be affected when you hit OK. Let's suppose, for example, that you select some items in your queue, open the extra properties window, change the blender version with which those items are to be rendered, and hit OK. Then you make a different selection of items, which includes some of the previous ones, open the properties window, and change the scene name. If the "Apply" checkbox corresponding to the scene name is checked, but the one corresponding to the blender version is not, the scene name will change for every item currently selected, and the blender version is not going to be affected, so each item will retain it's previously set blender version, if any.
Discover more products like this
render manager bfcm23 rendering spring20 bcon22 command line spring19 summer22 batch spring21 summer20 bfcm21 spring23 bfcm20 bfcm22 standalone summer23 bfcm19 spring22 summer21 loveblender bcon19 winter24 multiple files spring24