Sprite Render Kit
For a video tutorial, please check this link:
The workflow is simple:
- Open the blend file included in the zip
- Go to the first layer and Append your animated model in it.
- Play the animation, set the animation range to the proper value - the one you used in the appended file. Keep it playing while you configure your cameras.
- Select the model's armature in object mode and scale it up/down if needed, position it in Z and Y so it is centered in all 4 views.
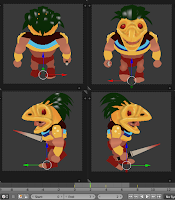
- Go to the layer of the camera controls and use the "y offset" controller to position in center your character on the bottom two views.

- Use the "heightCtrl" to set the Z angle of rendering (height) you want to see your character in.
- Use the "spriteRenderCams-globalCtr" properties (N-panel) To configure these optionally:
- Isometric angle - Rotates the camera rig on Z - this allows for isometric angle. Set to 45 to get diagonals.
- Ort scale - This can be used to zoom in/out the 4 cameras (orthographic)
- Persp/ortho - If set to 0, the cameras switch to perspective mode. It's recommended to keep at 1 (ortho)
- Persp focal lenght - This can be used to set the focal length of the 4 cameras (when in Perspective mode)
- Set your Rendering settings (Make sure you are at the a-Main scene if you aren't)
- You can enable Freestyle optionally and set your linesets
- Run the script that I have provided in the blend file ("syncScenesRender.py") - always run it before rendering. It syncs the 4 scenes. Syncs your render settings, your freestyle linesets, makes sure everything on layer one is in all 4 scenes.

- Render single frame. A new folder called "output" will be created in the same directory where your spriteRenderKit.blend file is. Inside that folder you will find a single image from all 4 angles. See if you are happy with how it looks. See if the naming is correct. The sprite pointing to the left is named "left**.png" and the one pointing up is "up**.png" - whatever makes sense to you.
- If they are not correctly named, you can rename them by selecting the appropriate output node and in it's n-panel change the "File Subpath" to the appropriate name. Keep the ##.

- Run the Sync script again and this time Render it as animation sequence. You will discover that the output folder is now populated will the frames. The script works with Blender Internal, Cycles and Freestyle.
- From here on you can use a tool such as shoebox to put all the frames in a single spritesheet. Alternatively you can use them as an image sequence - it all depends on the game engine you are using.


| Sales | 30+ |
| Customer Ratings | 1 |
| Average Rating | |
| Dev Fund Contributor | |
| Published | over 8 years ago |
| Blender Version | 2.7x |
| Render Engine Used | Blender Internal, Cycles, Freestyle |
| License | Creative Commons |
Have questions before purchasing?
Contact the Creator with your questions right now.
Login to Message