Human Activity Replication Toolbox (Hart)
Introduction
HART is a Blender add-on helping Blender users to create human animations.
Installation
Copy the entire folder to the addons directory in Blender (…\Blender\X.XX(Blender Version)\scripts\addons\) or install the add-on from Blender Preference. Enable HART in Blender Preference.
Requirements
Blender Version Requirement
- Blender 2.80+
Add-ons Requirement
- Node: Animation Nodes for Blender 2.80+ (Required for Improved Follow Path feature)
Knowledge Requirement
Users must have the basic knowledge of Blender 3D. For example, Users must know how to change or add region, find region to show objects’ propriety, switch different modes in 3DView region, and so on.
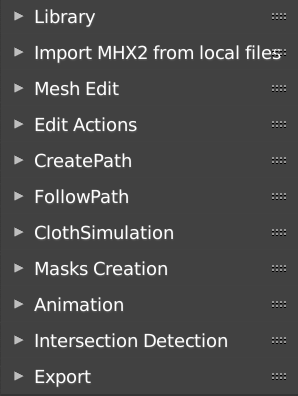
Interface
The HART interface is contained in a vertical tab—INNOVISION on the right of 3D view in Blender. It consists of different panels which can be expanded from or collapsed into the tab. The order from top to bottom of the panels implies the steps of animation creation.
Library
The HART library provides multiple components for importing, including completed animations with or without intersections, human models, cloth models, clothed avatars, motion capture data, and scene or object models. Refresh Library will load the data into the selection lists. Every time after enable HART, users need to Refresh Library to load the data.
HART contains pre-prepared animations, which are classified into two classes: with or without intersections. They all have cloth simulation physics, but most of them do not have cloth simulation cache. Cloth simulation cache records the animation of cloth for each frame, which costs much mor storage. Real-time cloth simulation in Blender costs significant resource and time. It is also unstable and easy to fail. A good cloth simulation requires a set of parameters appropriately selected and a well-organized cloth mesh. It is impossible to find one set of parameters for all animations to generate nice cloth simulation. This is a main reason for building a large animation library.
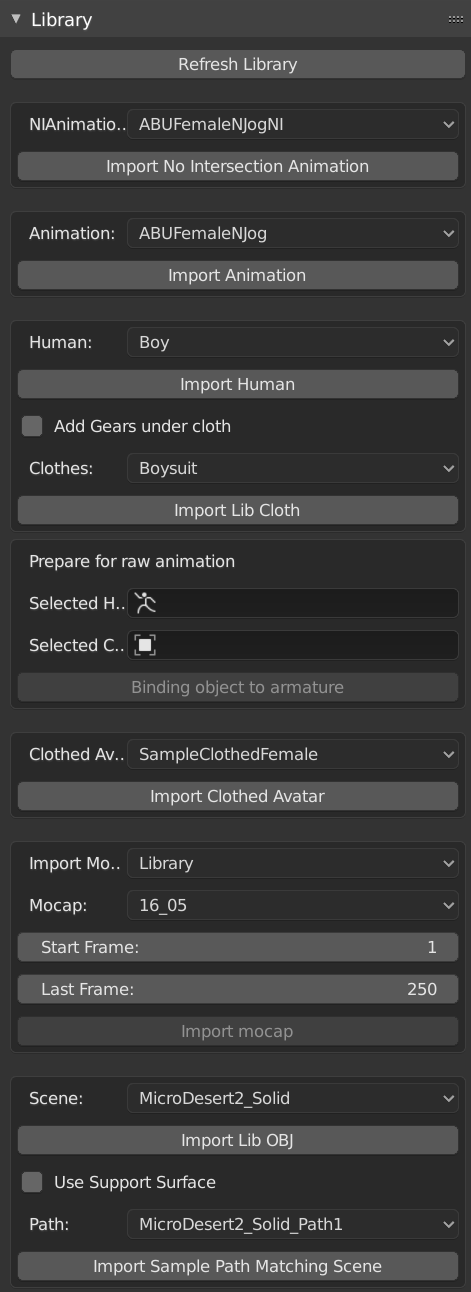
NIAnimation
NIAnimation means No Intersection Animation. The intersection between human and cloth after cloth simulation were removed when they are being exported. These animations contain cloth simulation cache.
Animation
These are the animations with intersections, but the intersections are hard to find by eyes. They look like animations without intersections.
These animations do not have cloth simulation cache. Selecting clothes and pushing down the button of eye in properties region enable the cloth simulation in viewpoint. Cloth simulation will be started as the animation is played.
Human and clothes
Some pre-rigged human models, with matching cloth models and matching gear models are stored in the library. The human models were created using MakeHuman.
Importing Gears is a special case. When Add Gears is checked, the related import setting and edit setting will show up. The details of ADD Gears are demonstrated in Tutorial 1.
After importing the models of human and cloth, users need to bind a cloth/cage to an avatar in order for a cloth/cage to move along with the avatar when the avatar is animated.
Clothed Avatar
HART can import clothed avatar generated from MakeHuman.
Mocap from Library or Local Disk
Motion capture data, which is contained in BVH files and stored in the library, can be imported and retargeted to an avatar. Users can add their mocap data to the library, but only BVH format works. Users can also import mocap data from local disk. Setting frame range of mocap to be imported is available.
Scene and path
The prepared scene and its corresponding sample paths are available. The support surfaces of a path are also available. The support surfaces help users to reduce the penetration between the feet or other parts of body and the ground. Otherwise, using the whole scene in the penetration calculation will incur a great burden to computation. HART also has a path creation helper, which is illustrated in another section.
Import MHX2 from local files
The panel allows users to import avatars created by MakeHuman from local disks rather than from the library. Comparing to the original MakeHuman importer in Blender, which has a large number of import options, the importer in HART only has one unchangeable setting available to users, because HART only sticks to MHX or MHX2 format of human models from MakeHuman. To know more about MakeHuman, please view the documentation in MakeHuman official website: http://www.makehumancommunity.org/.
Mesh Edit
Mesh Edit panel detects the intersection between two meshes. Its main purpose is to find the penetration between human and cloth/object or between cloth layers and help users to remove it. It is important to remove penetration if users want to create animation with cloth simulation. The vertex groups of body bounding segmentation for human generated from MakeHuman can be added.

Edit Actions
The panel allows users to modify the action of an avatar. After retargeting a BVH file to an avatar, this panel lets users have multiple options to edit actions. Use current action to finalize the edited action. All of functions in Edit Actions work for the avatars from MakeHuman. However, only Choose an Action, Local Edit, Loop And Repeat, Feet, Scale Action, and Use current action work for other avatars.

Choose an Action
Select an action from the action list and set it on an avatar. Update action list can show available actions for avatar. The actions are the motion retargeted to the avatar or created by keyframes inserted.
Local Edit
Edit action to clear defects on the animation such as fingers penetrating leg. The details are provided in Step 7 in Tutorial 1.
Loop and Repeat
Make an action that can be looped and repeated. The locations of body in start and end and the frame length of the looped action can be recorded.
Inverse Kinematics
Switch the avatar between FK and IK.
Feet
Keep feet above ground. Set offset on the feet.
Stitching
Select two actions and combine them to one.
Use current action
Finalize the action by adding initial state and scaling the length of action. The scaling improves the performance in cloth simulation.
CreatePath
CreatePath helps users to generate a route and its support surface from a scene mesh. Select scene object and enter the path name into the CreatePath panel. Select vertices of the scene object and click “Create Path”. The path and the support surface will be created with the name input in the panel.
FollowPath
This panel helps users to create a moving avatar on a path. The checkbox Improve Follow Path provides two available options on FollowPath: feet sliding and no feet sliding.
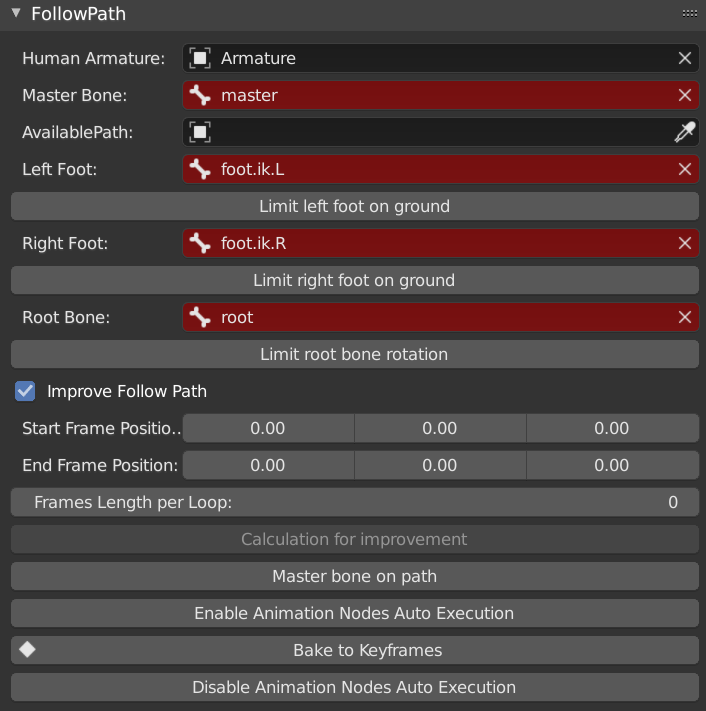
Above the checkbox, users select armature and path and set the bone constraints. Below the checkbox, users set the length to move on the path and constraint the avatar moving on the path.
The default setting only works for the avatars from MakeHuman. The advanced FollowPath instruction is demonstrated in Tutorial 3. Check Improve Follow Path for Advanced FollowPath. Advanced FollowPath only works for the avatars with IK feet.
ClothSimulation
The panel adds Blender cloth physics to clothes. The success of cloth simulation has many different requirements. Details will be demonstrated in a special section for cloth simulation.
- Add collision to human/gears: Add collision physics to human body or gears. The selection is in Mesh Edit panel.
- Add cloth to cloth: Add cloth physics to clothes. The selection is in Mesh Edit panel.
- Add pin to cloth: Add pin to cloth so that the cloth does not fall off.
- Remove collision from human/gears.
- Remove cloth from cloth.
Masks Creation
This panel add masks modifier to human body, so that the body under clothes is hidden. This feature is created for animations that are required for partial cloth simulation or no cloth simulation.
- Create mask vertex group: Turn the mesh object into Edit Mode for users to select vertices to create vertex groups.
- Add mask modifier: Add mask modifier and use the vertex groups created above.
Animation
This panel contains basic functions of playing animation, stopping animation, and setting frame range. However, users are recommended to use the animation player provided by Blender 3D.
Intersection Detection
This panel allows users to detect intersection between human and cloth in an animated avatar.
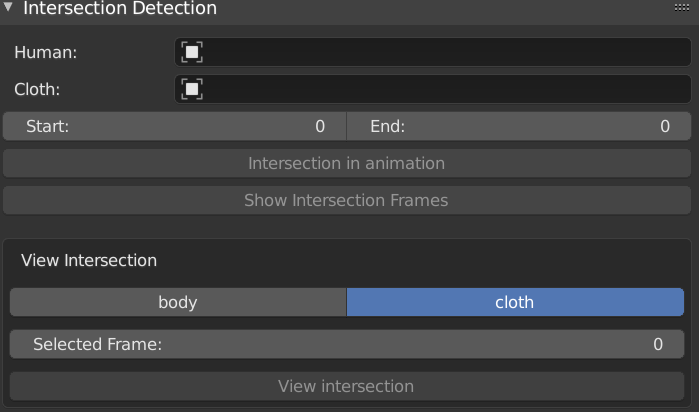
- Intersection in animation: Perform an intersection detection basing on selected human, cloth, start frame and end frame.
- Show Intersection Frame: Show the frames suffering from major intersection and minor intersection.
- View Intersection: Create a clothed avatar in selected frame and show the vertices related to the selected body or cloth.
Export
Users can export each model except scene in the animation to an obj file at each frame.
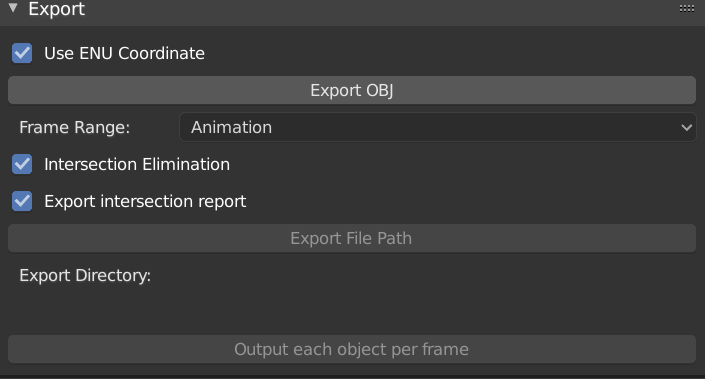
- Use ENU Coordinate: The default export coordinate is Y-upward and negative Z-forward. ENU check box provide a fast and convenient option for users to export as Z-upward and Y-forward.
- Export OBJ: Export OBJ provides various settings to export object.
- Output each object per frame: Export each object per frame, but export scene object once.
- Intersection Elimination: Export each object per frame after intersection detection and minor intersection removal.
- Export Intersection Report: Export report show details on intersections. This checkbox is only available after Intersection Elimination is checked.
- Frame Range: If Intersection Elimination is checked, the drop list will be overridden and Frame Range will use the range set in Intersection Detection panel.
- Animation: Frame Range in Time Line
- Custom: Custom Frame Range
- Export File Path: Set the export file path. It uses default file path if no export file path.
- Output each object per frame: Export every object file in each frame.
Discover more products like this
mocap physics Export import cloth simulation Human rigid body