Vonnbots Rig

Name: Rivet
Video explanation: https://cgcookie.com/lesson/vonnbots-rig-demo/
Character Overview
This is one of the ‘VonnBot’ characters that were created for the animation boot camp course.
Rivet is a full bipedal character with limited controls for ease of use, but still has excellent flexibility which makes him a robust character to animate.
Rig Features:
Limited Facial Controls
Stretchy/bendy Limbs
Stretchy Torso
IK/FK Arms
IK/FK Legs
IK Parent switching
Rig UI:
- Bone Layers
- Custom Properties
- Visibility toggles
Rig components:
The rig consists of 2 main parts.
The Rig (for animation)
The character geometry (body mesh and separate arm mesh - for visibility functionality)
RIG UI
The file includes a python script that will display the rig UI in the properties panel (n panel). If the UI does not show automatically in pose mode you can manually run the script.
Manually run UI script:
Switch to text editor > open the “animation_vonnbot278.py” script > press “Run Script”.
Also try enabling “Auto Run python scripts” in your user preferences to get the UI to show automatically.
Install the UI as an add-on:
The script is also included as an external python file in your download. You can install this script as an add-on and you should not have any issues with it not showing when the rig is selected in pose mode. (This single script is used for all the Vonnbot characters)

Name: Torque
Video explanation: https://cgcookie.com/lesson/vonnbots-rig-demo/
Character Overview
This is one of the ‘VonnBot’ characters that were created for the animation boot camp course. Torque is a fun bouncing ball character with limited body parts for ease of use
Rig Features:
Limited Facial Controls
Squash and Stretch
Separate spin controls
Rig UI:
- Bone Layers
- Custom Properties
- Visibility toggles
Rig components:
The rig consists of 2 main parts.
The Rig (for animation)
The character geometry (body mesh and separate antenna mesh - for visibility functionality)
RIG UI
The file includes a python script that will display the rig UI in the properties panel (n panel). If the UI does not show automatically in pose mode you can manually run the script.
Manually run UI script:
Switch to text editor > open the “animation_vonnbot278.py” script > press “Run Script”.
Also try enabling “Auto Run python scripts” in your user preferences to get the UI to show automatically.
Install the UI as an add-on:
The script is also included as an external python file in your download. You can install this script as an add-on and you should not have any issues with it not showing when the rig is selected in pose mode. (This single script is used for all the Vonnbot characters)

Name: Stomp
Video explanation: https://cgcookie.com/lesson/vonnbots-rig-demo/
Character Overview
This is one of the ‘VonnBot’ characters that were created for the animation boot camp course.
Stomp is a fun character with limited body parts for ease of use, but still has excellent flexibility which makes him a robust character to animate.
Rig Features:
Limited Facial Controls
Stretchy/bendy Limbs
IK/FK Legs
IK Parent switching
Rig UI:
- Bone Layers
- Custom Properties
- Visibility toggles
Rig components:
The rig consists of 2 main parts.
The Rig (for animation)
The character geometry (body mesh and separate antenna mesh - for visibility functionality)
RIG UI
The file includes a python script that will display the rig UI in the properties panel (n panel). If the UI does not show automatically in pose mode you can manually run the script.
Manually run UI script:
Switch to text editor > open the “animation_vonnbot278.py” script > press “Run Script”.
Also try enabling “Auto Run python scripts” in your user preferences to get the UI to show automatically.
Install the UI as an add-on:
The script is also included as an external python file in your download. You can install this script as an add-on and you should not have any issues with it not showing when the rig is selected in pose mode. (This single script is used for all the Vonnbot characters)
VonnBot UI:
The VonnBot UI panel is used to toggle the visibility of the controls as well as the antenna geometry and has a handy shortcut to the X-ray feature and scene simplification. (explained below)
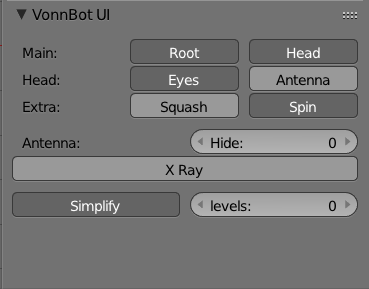
CONTROL LAYERS:
Main:
Root - Master control for the entire armature.
Head - Main controls for the head.
Head:
Eyes - Show the eye controls.
Antenna - Show the antenna controls.
Extra:
Squash - A squash control at the top and bottom of his head.
Spin - A spin control that will separate the rotation from the Head control.
Hide Antenna:
The Hide property with toggle the visibility in the 3d viewport as well as the rendered output.
A value of 0 will mean it is not hidden.
A value of 1 will mean it is hidden.
X Ray:
This toggles the visibility of the controls so they will always remain on top of the character geometry.
Simplify:
This is just a handy shortcut to the scene simplification which lets you limit the maximum subdivisions on all subsurf modifiers in the scene. A value of 0 will effectively turn off all the subsurf modifiers in your scene and will speed up your animation playback in the viewport.
Visibility:
This option will hide the visibility of the antenna in the viewport as well as the rendered output.
Rig Linking:
The file is ready to be linked into any file for animation.
Open a New File or the file you want to add the character to. (File > New)
Link the character (File > Link)
Navigate to the blend file and choose the ‘Group’ called “Torque”.
Then create a “Proxy” (Ctrl Alt P) and choose or type “Torque_rig”.
Torque is now ready to animate.
One this to note with linking is the visibility of the eyes. Blender cannot display transparent materials in solid mode for linked objects. So the glass material will obscure his eyes in the 3d viewport. Switch to ‘Material’ view to see transparency.