Surface Displacement [Geo Nodes]
3DN-SurfaceDisplacement - Documentation
Installation
Download the "3DN-SurfaceDisplacement" .blend file and save it somewhere memorable. In Blender, go to File -> Append -> locate the .blend file -> Collections. Then selected the "3DN-SurfaceDisplacement" collection and press "append". Alternatively, you can use the same process but import the geo node group instead.
Controls
Mapping
"Geo UV Map": The UV unwrap of the object the modifier is applied to.
"Displacement TX": The displacement image or any image you want to displace the geometry
"UV Scale": Allows for UV tiling if you're using seamless textures (add "uvScale" attribute to match the texture scale in the shader editor)
"UV Rotation": 3 Axis rotation controls (add "uvRot" attribute to match the UV rotation in the shader editor)
Displacement
"Displacement Scale": Controls the scale of the displacement effect. (e.g. "0.050" will be very minor displacement whereas "4.000" will much more)
"Clamp Min/Max": Clamps the values of the image texture you're using making it possible to flatten out areas of your mesh or clamp the maximum to create a cracked looking effect.
"Edge Crease": Works in the same way as with a subdivision surface modifier.
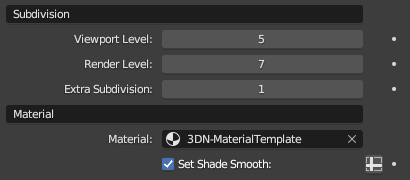
Subdivision and Material

"Viewport Level": Subdivision as viewed in the viewport.
"Render Level": Subdivision level that's only applied during render.
"Extra Subdivision": An additional subdivision surface (can help smooth out jagged edges)
"Material": Set whatever material you want to be applied to the mesh.
Extra Notes
As mentioned earlier, if you're using a custom material you can add "uvScale" and "uvRot" attributes into the shader editor. This will link whatever scale or rotation you set in the modifier with the material.
Discover more products like this
materials Geometry Node Groups realism bfcm23 displacement tools image-textures Shader summer23 spring23 Cycles eevee


