Sound Nodes - Audio Visualization
Sound Nodes
Sound nodes is a Blender addon for audio visualization. The addon processes music files such as .mp3 or .wav and extracts relevant information, which is then stored as keyframes in the .blend file. These keyframes are connected to custom Nodes in Geometry Nodes editor. Use outputs of this nodes to drive your animations. With Sound Nodes, you have the ability to create dynamic and engaging animations with the added dimension of sound.
Instalation
- Download the SoundNodes.zip file from Blender Market.
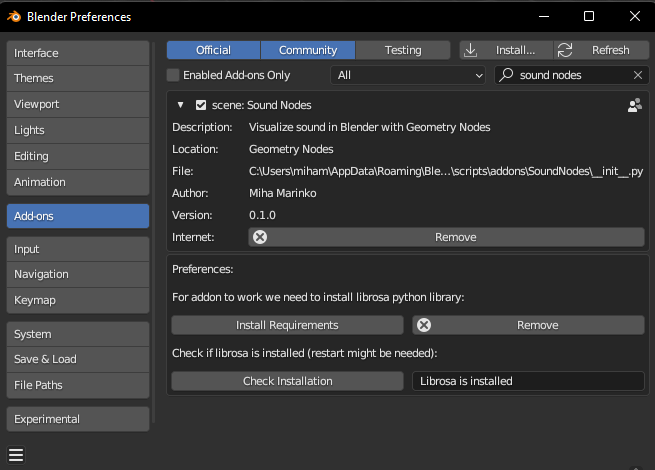
- Open Blender and go to Edit > Preferences > Add-ons.
- Click the "Install" button and select the downloaded SoundNodes.zip file.
- Enable the addon by checking the box next to it and expand the tab.
- Click the "Install Requirements" button, the process may take a few minutes to complete.
- To verify that the installation was successful, click the "Check Installation" button.
Usage
Addon is located in the Geometry Nodes editor on the right side pannel (press "n" to open and close).

Load and Analyze Your Music
First step is locating your audio file. Click "Load Audio" and select your music file from your computer. Sound Nodes supports most popular audio file formats including .mp3, .wav, .flac, and .ogg.
Once your audio file is loaded, click "Analyze Audio" to detect the features in the music. This process can take a few minutes, depending on the length of your audio track.
To optimize the detection time, you can choose "Limit to scene frames" option to only analyze a specific range of frames in your scene.
Sound Info Node
The Sound Info node contains basic information about the audio, including Loudness, Average Frequency, and Beats.

Meaning of Loudness and Average Frequency are straightforward. If Loudness is normalized, its highest value will be 1 and it will not go under 0. Average Frequency value of 0 indicates a frequency of 0 Hz and an Average Frequency value of 1 representing a frequency of 15 kHz. Normal music will typically have an average frequency value between 0 and 1, typically around 0.1.
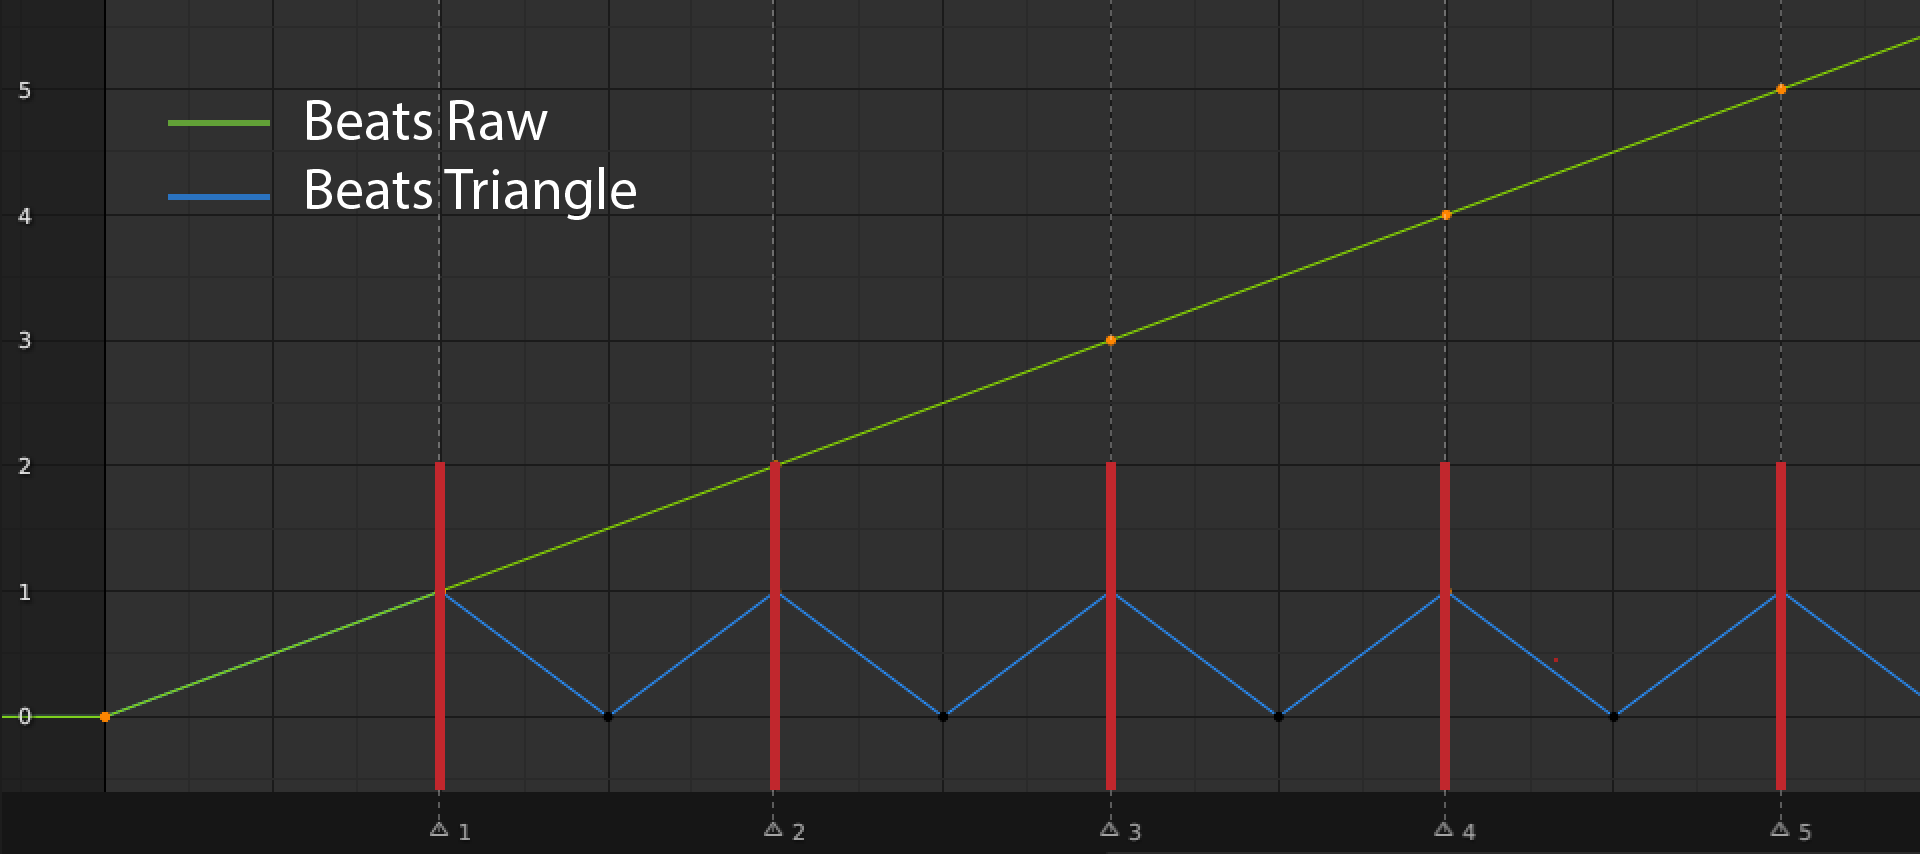
There are two outputs for beats: Beats Raw and Beats Tiangle. To efficiently store beats as keyframes, they are represented as integer values over time, with the first beat in the song having a value of 0, the next beat a value of 1, and so on. This is the Beats Raw output.
The more useful output of beat values is the Beats Triangle, which represents the distance of a point in time to the closest beats. A value of 1 indicates a beat, while a value of 0 indicates a point in the middle of two beats.
Following image represents values of raw and triangle Beats function. Red lines represent beats.
To help the script with beat detection, you should adjust Estimated tempo to BPM (beats per minute) of your song. When detection is done, the detected tempo will also be displayed.
Spectrogram nodes
Spectrogram is a popular representation of frequencies in audio. Frequencies are divided into a specified number of bins (user specified). At each frame, the intensity of the corresponding frequency is calculated and stored for each bin.
To simplify usage for various use cases, there are two different Spectrogram nodes with the same effect. The Spectrogram node is a direct representation of all bins of the calculated Spectrogram, while the Spectrogram Separate node only outputs the value of one bin at specified index. This can be useful when creating a long node tree composed of similar nodes, allowing for less connections and a cleaner appearance.


Chromagram node
Chromagram or chroma feature is special type of spectrogram that shows the energy of musical pitches over time in an audio signal. It has 12 outputs, each representing intensity of a tone in musical octave.
The Chromagram, also known as the Chroma feature, is a unique type of spectrogram that displays the energy of musical pitches over time in an audio signal. It has 12 outputs, each representing the intensity of a specific tone in a musical octave.

Smoothing factor
Smoothing factor is a setting that determines the level of smoothness in the generated keyframes. It specifies the number of frames between keyframes. A lower smoothing factor results in more keyframes, while a higher smoothing factor results in fewer keyframes and smoother animation. The minimum value for smoothing factor is 1, meaning that a keyframe will be set for every frame in the animation. Increasing the smoothing factor to 2, for example, means that a keyframe will only be set every other frame.
Troubleshooting
Analyze Audio not working
If the "Analyze Audio" feature is not working, it may be due to compatibility issues with the audio file format. Try importing the audio into an audio editing software like Audacity and exporting it as a .wav file.
Beats not detected correctly
Try to match the Estimated tempo (beats per minute) with the desired BPM in your music. Take into account the detected tempo.
In some cases, the script might not be able to detect beats correctly as they can be very inconsistent and mixed in with the rest of the music.
Cannot find Sound nodes in Geometry Nodes
Sound nodes are generated only after you load and analyze an audio file.
Discover more products like this
nodes analyze addon geometry node loveblender Geometry audio spring24 top import Analise Visualization free winter24 Music bfcm24 geo nodes sound geometry nodes audio visualization summer24