Renderworkshop - Multi-Device, Distributed/Local/Remote, Batch Rendering System
RenderWorkshop Distributed Rendering Plugin User Guide
Preparation Before Use
-
Shared Storage Space
Ensure you have a shared storage space (e.g.,//192.168.0.10/render) accessible by all computers. -
Computer Settings
Set all computers to not sleep. -
Blender File Preparation
In Blender, prepare the.blendfile to be rendered (e.g.,test.blend):
- SelectFile -> External Data -> Pack Resources.
- Set rendering parameters (e.g., rendering engine, resolution, color management, etc.).
- Place thetest.blendfile in the shared storage space (e.g.,//192.168.0.10/render/test.blend). -
Blender Installation
Install Blender on all computers. It is recommended to use the same version. -
Resource Allocation Suggestion
Use less powerful computers as Manager and more powerful computers as Worker.
Worker Usage Instructions
1. Download and ExtractDownload the latest Worker compressed file to the Worker computer and extract it.
2. Start WorkerSelect the file suitable for your operating system and start the Worker.
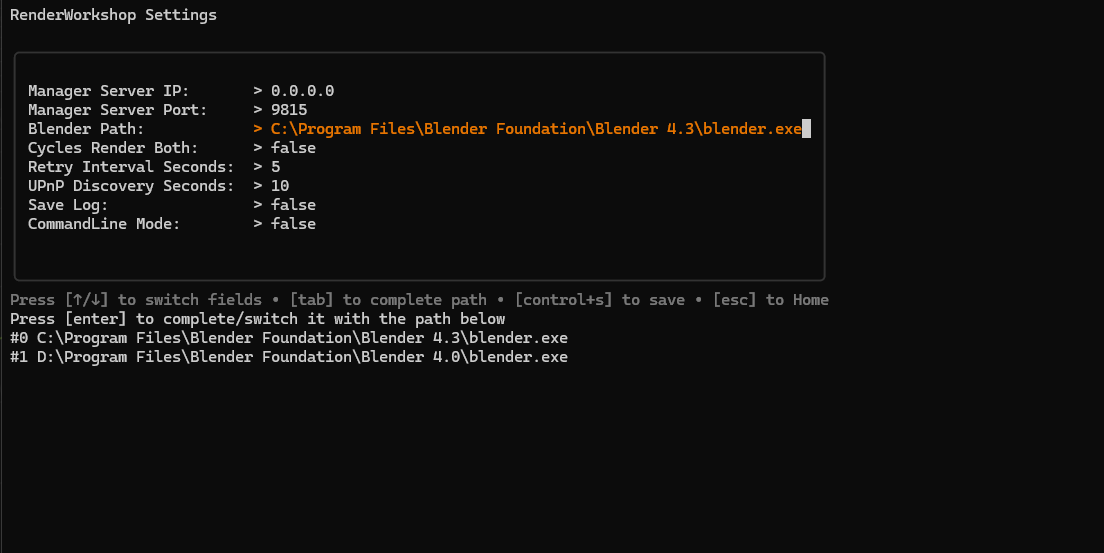
3. Initial SetupOn the first launch, the setup interface will appear. Configure the relevant parameters, press Control + S to save, and then press Esc to exit. You can see a description of each in the appendix below
Restart the Worker. On the first launch, it will automatically detect the Cycles rendering devices and GPU backend set in Blender (this may take several seconds).
5. Network PermissionsIf the system prompts for network access permissions for the Worker, allow it.
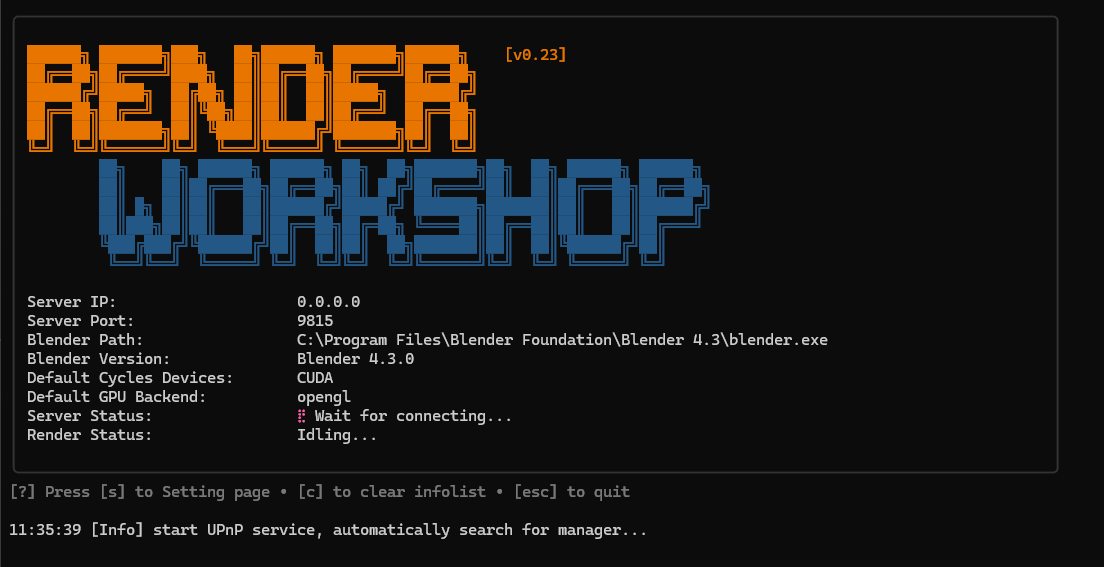
6. Configuration SuccessIf the Worker homepage displays all parameters correctly, the configuration is successful.
Manager Usage Instructions
1. Install the PluginDownload the latest Manager plugin file to the Manager computer, install it in Blender, and enable the plugin.
2. Open the Blend FileOpen the .blend file to be rendered (e.g., //192.168.0.10/render/test.blend).
Press N to open the N panel and locate RenderWorkshop.
In the Network Service Section, set the server port (must match the port number in the Worker settings). If there are no port conflicts, it is recommended to keep the default.
Click the Start Server button to start the server. If the system prompts Blender for network access permissions, allow it.
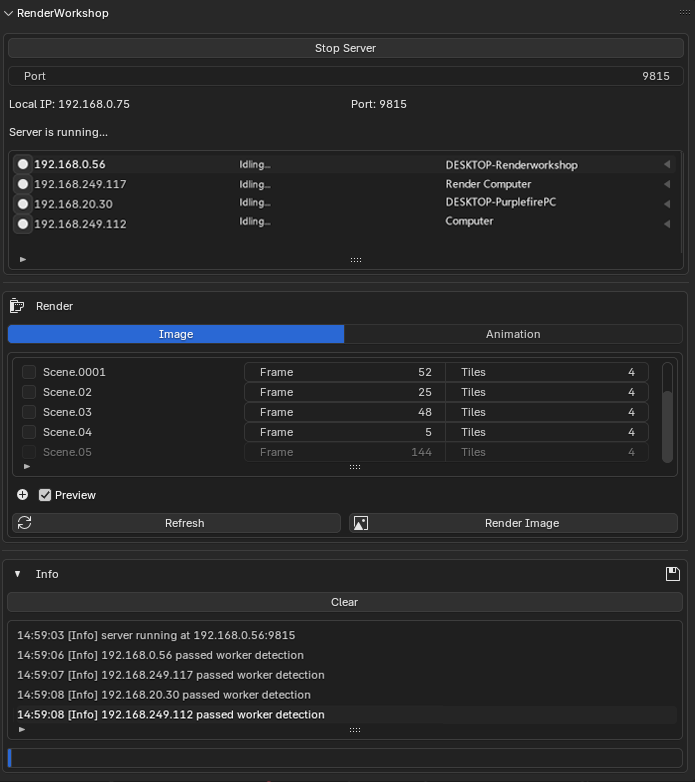
The message list will display the server's IP address and port number for manual Worker configuration.
If the Worker is running and configured correctly, it will automatically connect and appear in the Worker list.
7. Worker VerificationBy default, the Manager will automatically verify the Worker. Upon successful verification, the button on the left side of the Worker will turn into a solid circle.
If automatic verification fails, manually click the button on the left side of the Worker to verify.
If verification fails, adjust the parameters according to the prompts in the message list.You can see a description of each in the appendix below
Click the Refresh button to display the scene information of the .blend file.
Choose between Image or Animation pages as needed.
- Image:
Tiles: Divide the image into several blocks for rendering (e.g., 4 means dividing into 4x4=16 blocks). It is recommended to set a larger value for high resolutions. - Animation:
Split: Divide the animation frames into different intervals for rendering (e.g., 1-60 frames divided into 1-15, 16-30, 31-45, 46-60). It is recommended not to set this value too small.
To add the same scene for rendering, click the + button at the bottom left of the scene list, set the scene parameters, and add it to the scene list.
To preview the image rendering in real-time, check the Preview option under the scene list.
To check and re-render missing frames after rendering is complete, check the Check and re-render missing frames option (automatically enabled for image scenes).
Ensure that the hosts in the Worker list are connected and verified successfully.
Confirm that the scenes to be rendered are selected and the rendering parameters are set correctly.
Click the Render Image or Render Animation button to start rendering.
The rendered content will be saved in the same directory as the .blend file.
View real-time rendering feedback in the message list.
The scene list displays the rendering status of the scenes.
The progress bar below the message list shows the overall rendering progress.
During rendering, heartbeat detection is performed on the Worker. Adjust related parameters in the preferences if needed.You can see a description of each in the appendix below
19. Cancel Rendering (Optional)To cancel rendering, click the Cancel button.
Click the arrow on the left side of the message list to expand/collapse it, or click the Clear button to clear the message list.
To save logs, click the Save button at the top right of the message list.
Appendix
1. Worker Settings Explanation- Server IP: Automatically detects the Manager's IP address within the subnet by default. Only fill in when manual configuration is required.
- Server Port: Automatically detects the Manager's service port within the subnet by default. Must match the Manager's port.
- Blender Path: Automatically detects the Blender installation path by default. If not detected, manually enter the path to the Blender executable.
- Cycles Render Both: Choose whether to enable both CPU and GPU rendering. By default, only GPU rendering is used.
- Retry Interval Seconds: Set the retry interval (in seconds) after failing to connect to the Manager. It is recommended to keep the default.
- UPnP Discovery Seconds: Set the time (in seconds) for the Worker to automatically search for the Manager upon startup. Set to 0 if the Worker and Manager are not in the same subnet or if the router does not support UPnP.
- Save Log: Enable this option to record Worker rendering information.
- Command Line Mode: Enable this mode to save resources or if the Worker displays abnormalities.
- Cycles Devices: Set the devices used by the Cycles rendering engine. It is recommended to keep the default.
- GPU Backend: Set the GPU backend. It is recommended to keep the default.
- Threads: Set the number of threads for Worker rendering (1-1024). 0 means automatic setting. It is recommended to keep the default.
-
BlendFile: Set the absolute path for the Worker to access the
.blendfile. Leave blank for automatic detection.
- get local blend file error: Re-open the blend file or check Blender's read and write permissions on the blend file
- please save the blend file: Save the blend file to the shared storage space
- xxx.xxx.xxx.xxx check timeout: Check timeout, please check whether the network of the worker and manager is smooth
- xxx.xxx.xxx.xxx can' t get blend file: The worker cannot access the blend file. Please check whether the worker can access the blend file and make sure the path is correct.
- xxx.xxx.xxx.xxx does not obtain the same file: The worker and manager are not accessing the same file. Please ensure that they are accessing the same blend. document. If it is the same blend file, please reopen the blend file in the manager.
- xxx.xxx.xxx.xxx passed worker detection: The detection is normal.
- HeartbeatInterval: Set the heartbeat detection interval (in seconds).
- HeartbeatRetry: Set the number of heartbeat detection retries. If no response is received from the Worker after the retries, its tasks will be reassigned to other online Workers.
RenderWorkshop supports local batch rendering. For local batch rendering only, simply set the scene list parameters and click start rendering.
6. How to set worker mutli-language
- There are two examples of examples of JSON file
- Copy the language file you need to the same directory of the worker program and modify the name of lang.json
- Restart the worker to take effect
Discover more products like this
queue BatchRender task distributed Render multi-devices network batch