 3D BlueHat


PBR Advanced 4.0
(By: 3D BlueHat)
The All-In-One material shading system that offers more!
(Now Updated to work with Blender 4.3 and 4.4)
Includes an Add-On for easy conversion of existing materials.
(More info at the bottom of this page.)
Now comes with "Vertigo"!
The Quick and Easy Solution for the "dolly zoom" effect.
(More info at the bottom of this page.)
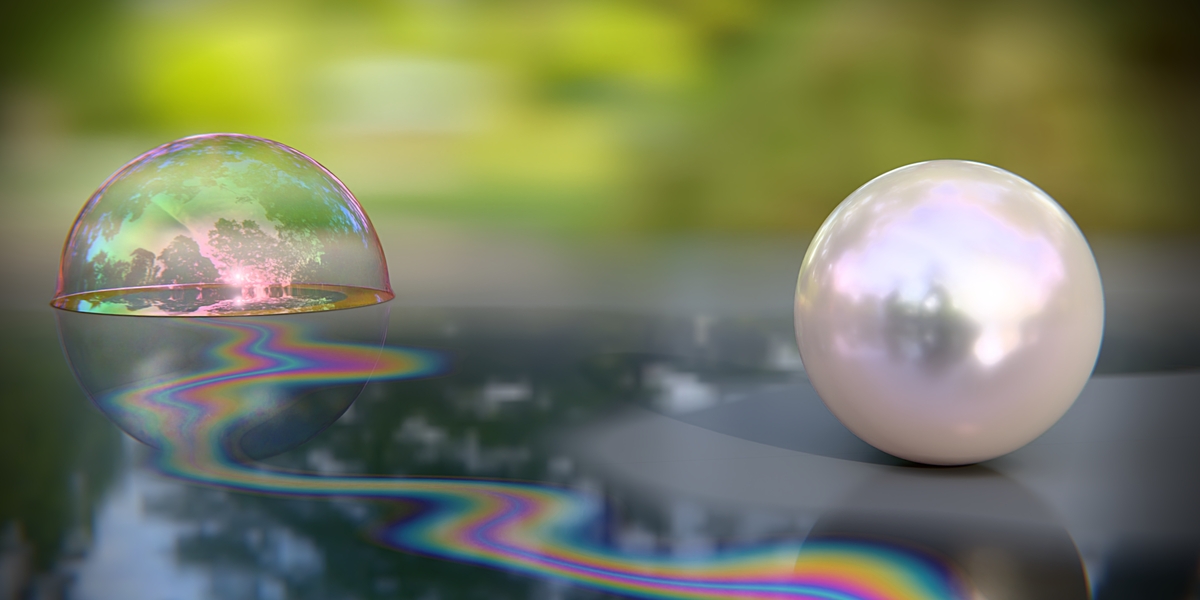
Save time making gorgeous realistic materials.
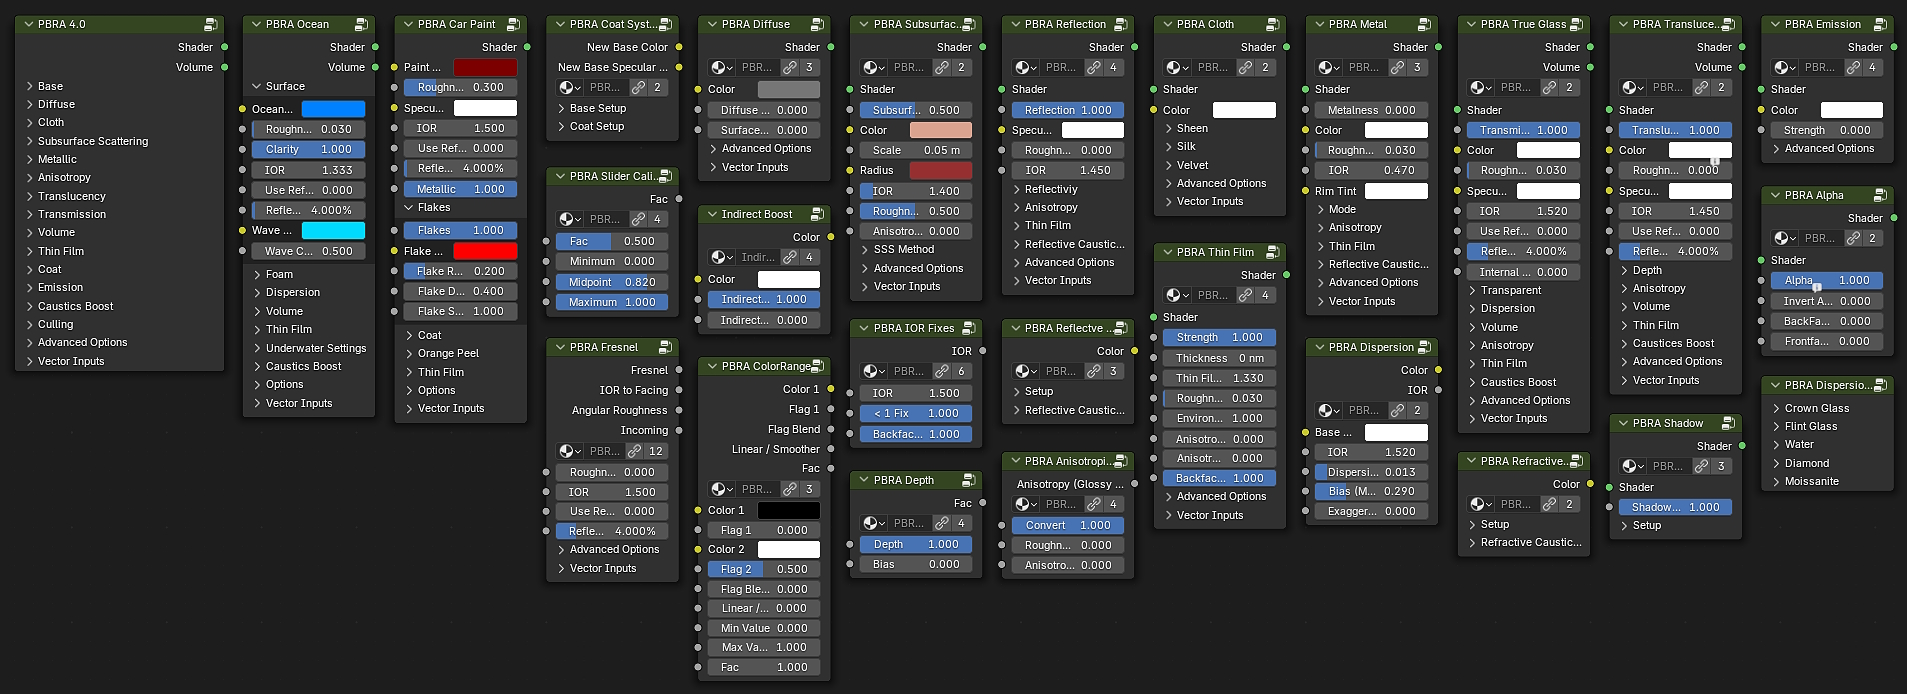
PBR Advanced is a powerful all-in-one material uber-shader, that can be used in the place of the Principled BSDF. It has many more features and offers much more control and flexibility when creating materials. It is also built modularly, so that the individual components that make up PBR Advanced can be used separately any way you wish.
(Read further down to see all of the included node groups.)
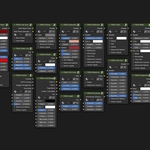
Everything All In One Place That You Can Use Everywhere
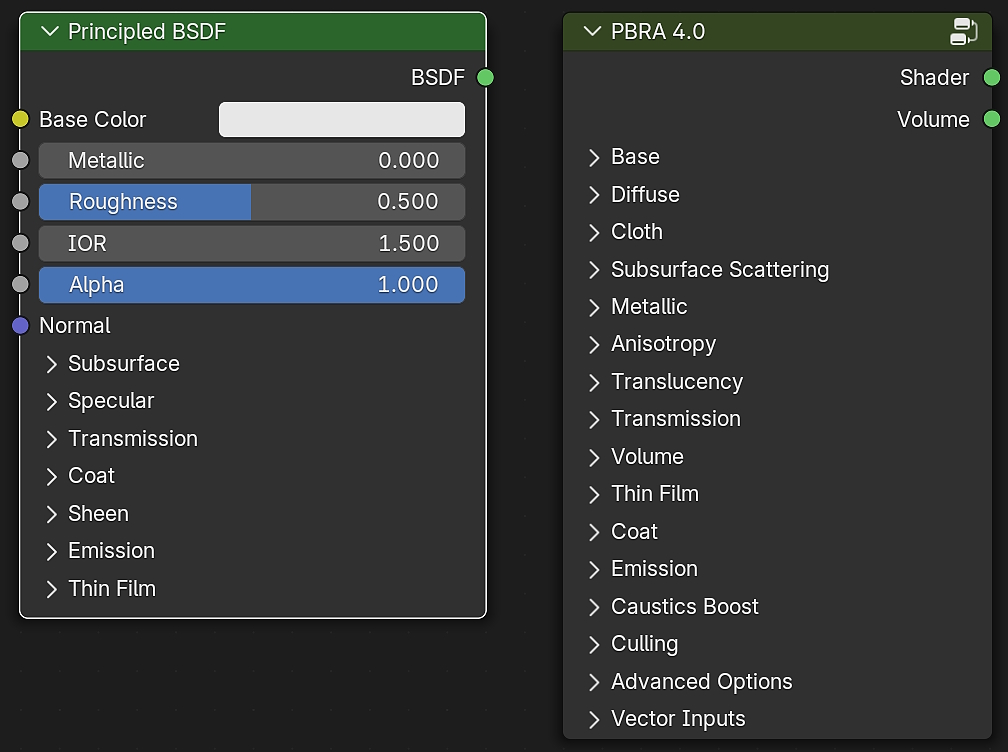
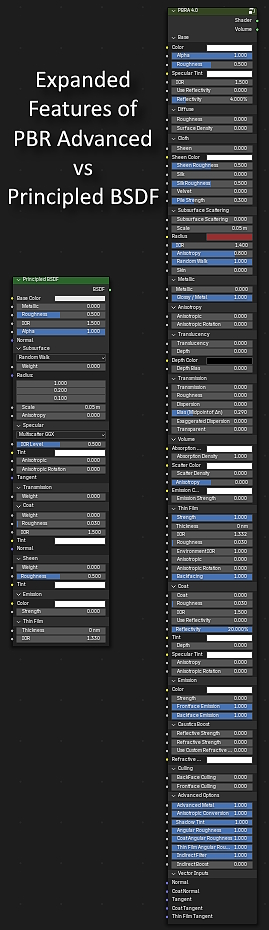
With all of it's panels collapsed, PBR Advanced is not much bigger than the Principled BSDF in the shader editor, but when all panels are expanded, you can start to see how much more PBR Advanced has to offer.
I originally created PBR Advanced for my personal use with the goal of it being my go-to method for ALL materials without having to build individual shader trees for each material or being limited by the Principled BSDF.
I later decided to release it to other users, because of how much time it has saved me and how pleased I had been with the results.
Over the last couple of years, I have made many improvements and added additional features.
It has now become an indispensable part of my workflow.
With Version 4, it has more features and better results than ever before.
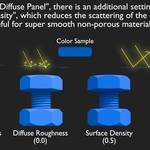
In addition to all of the typical features of the Principled BSDF, It has additional settings for:
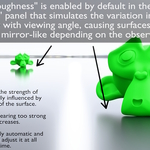
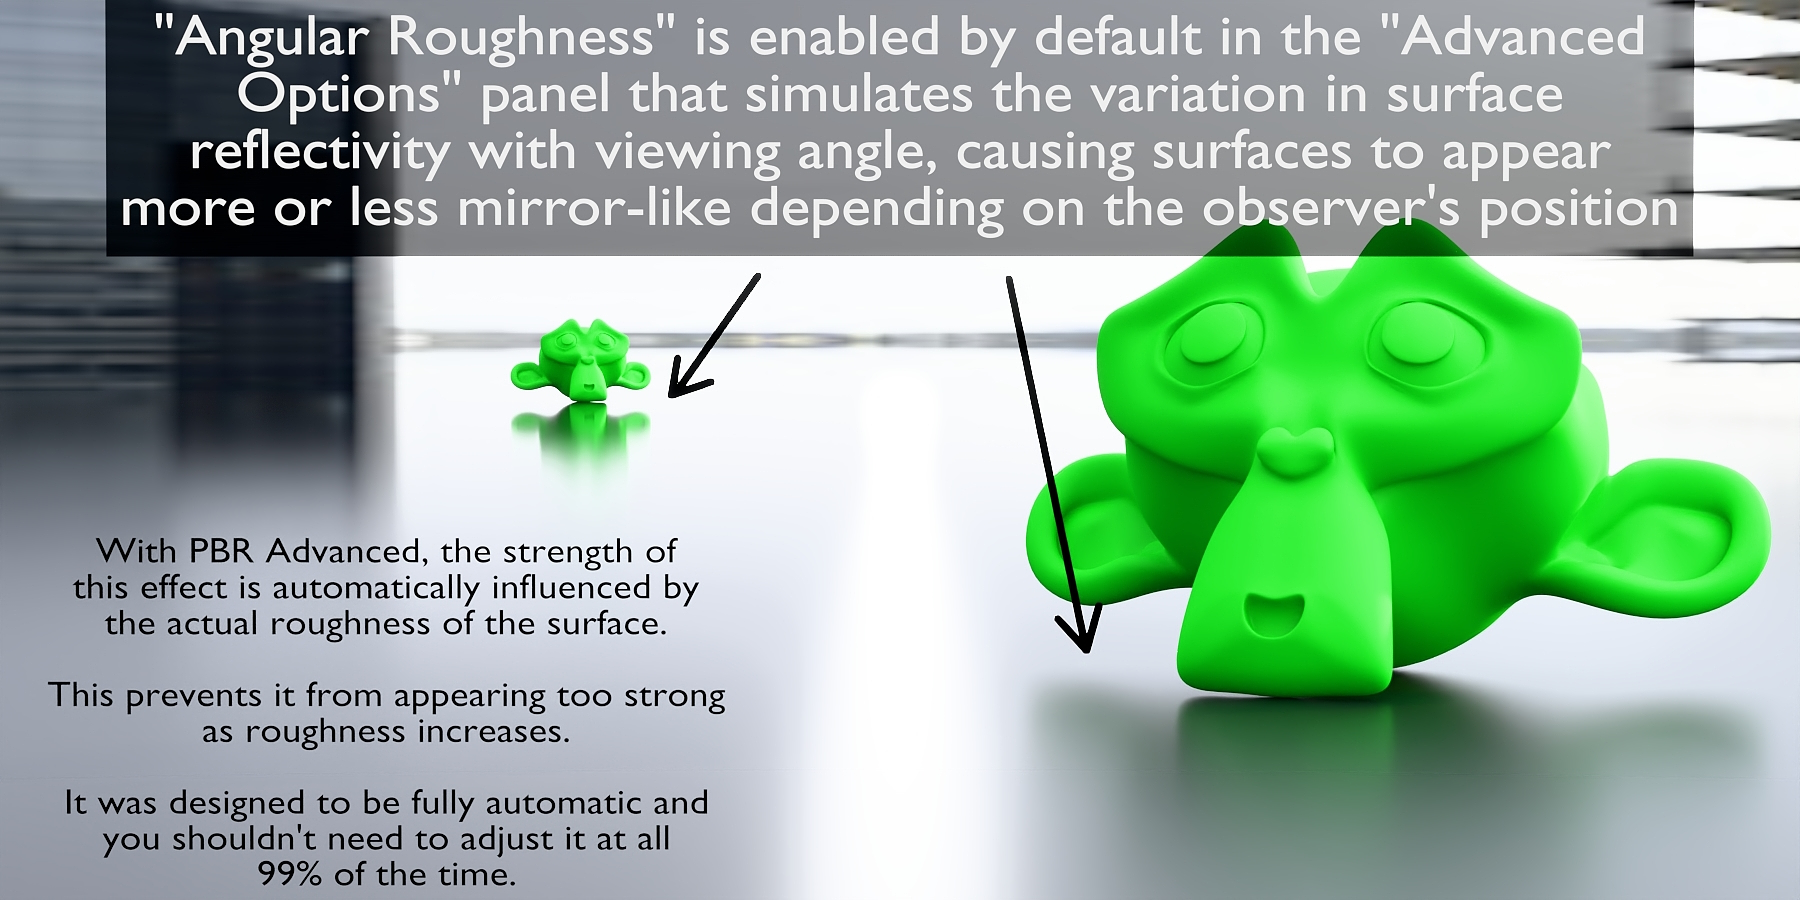
- Angular Roughness
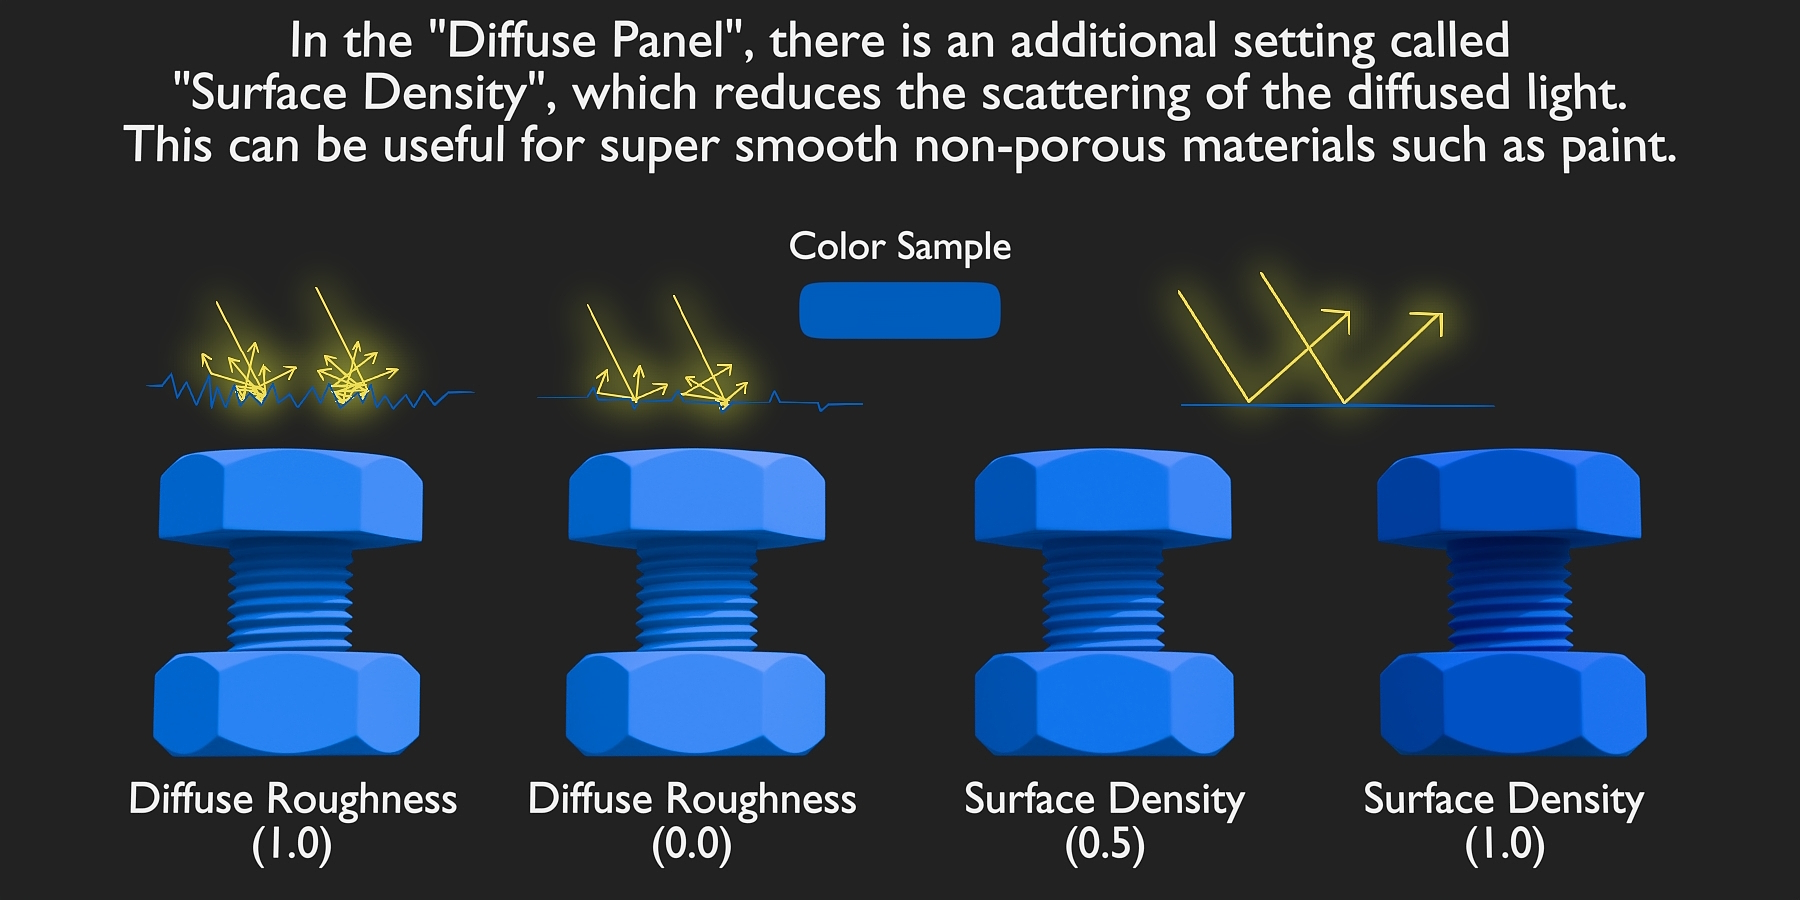
- Diffuse
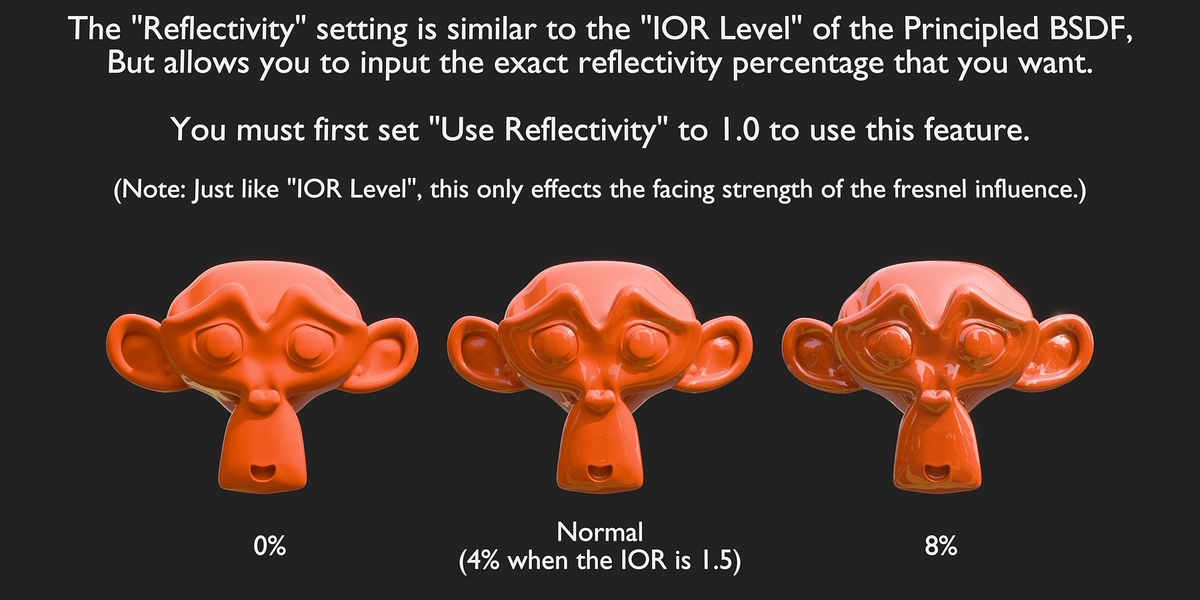
- Reflectivity
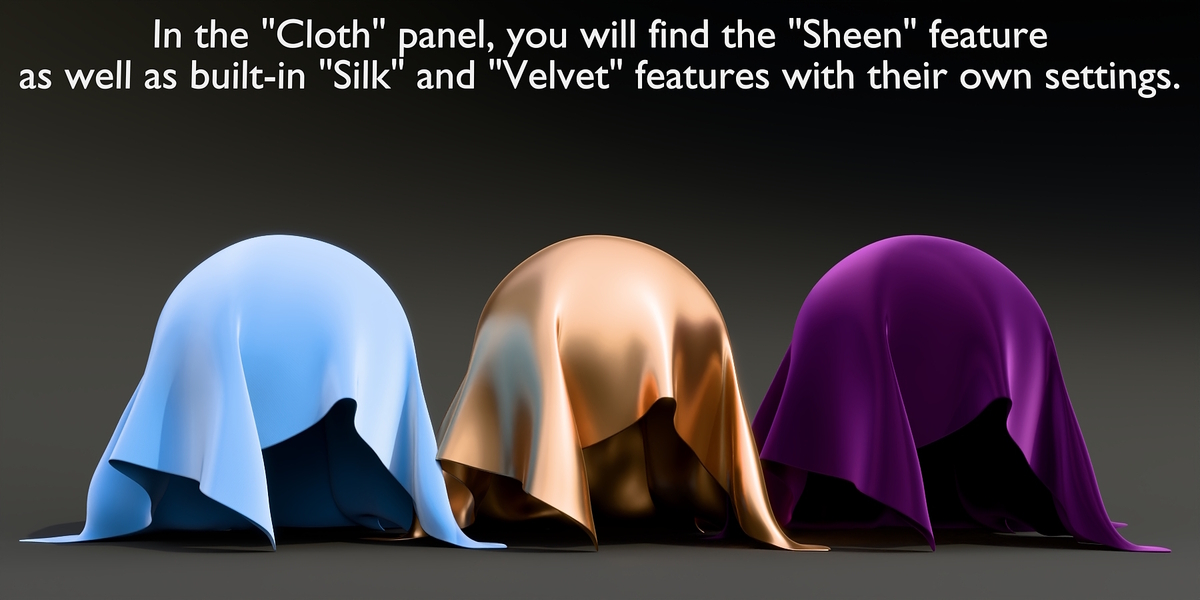
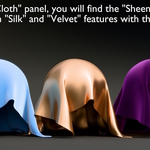
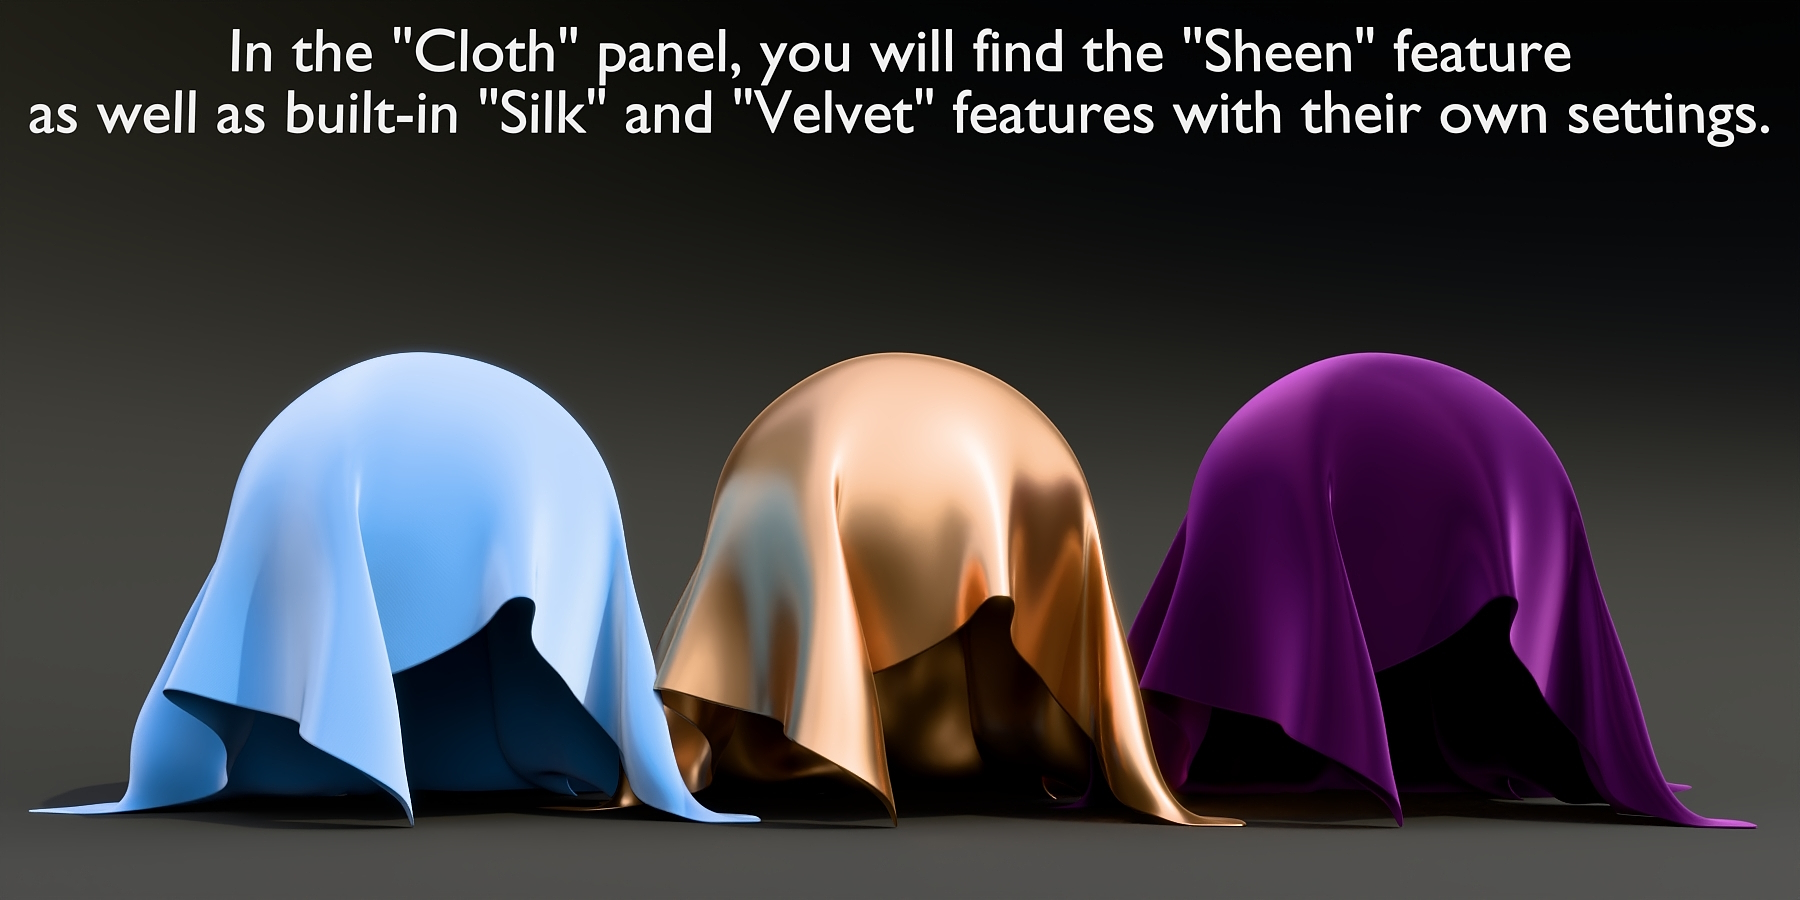
- Sheen
- Silk
- Velvet
- Subsurface Scattering
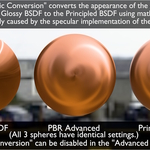
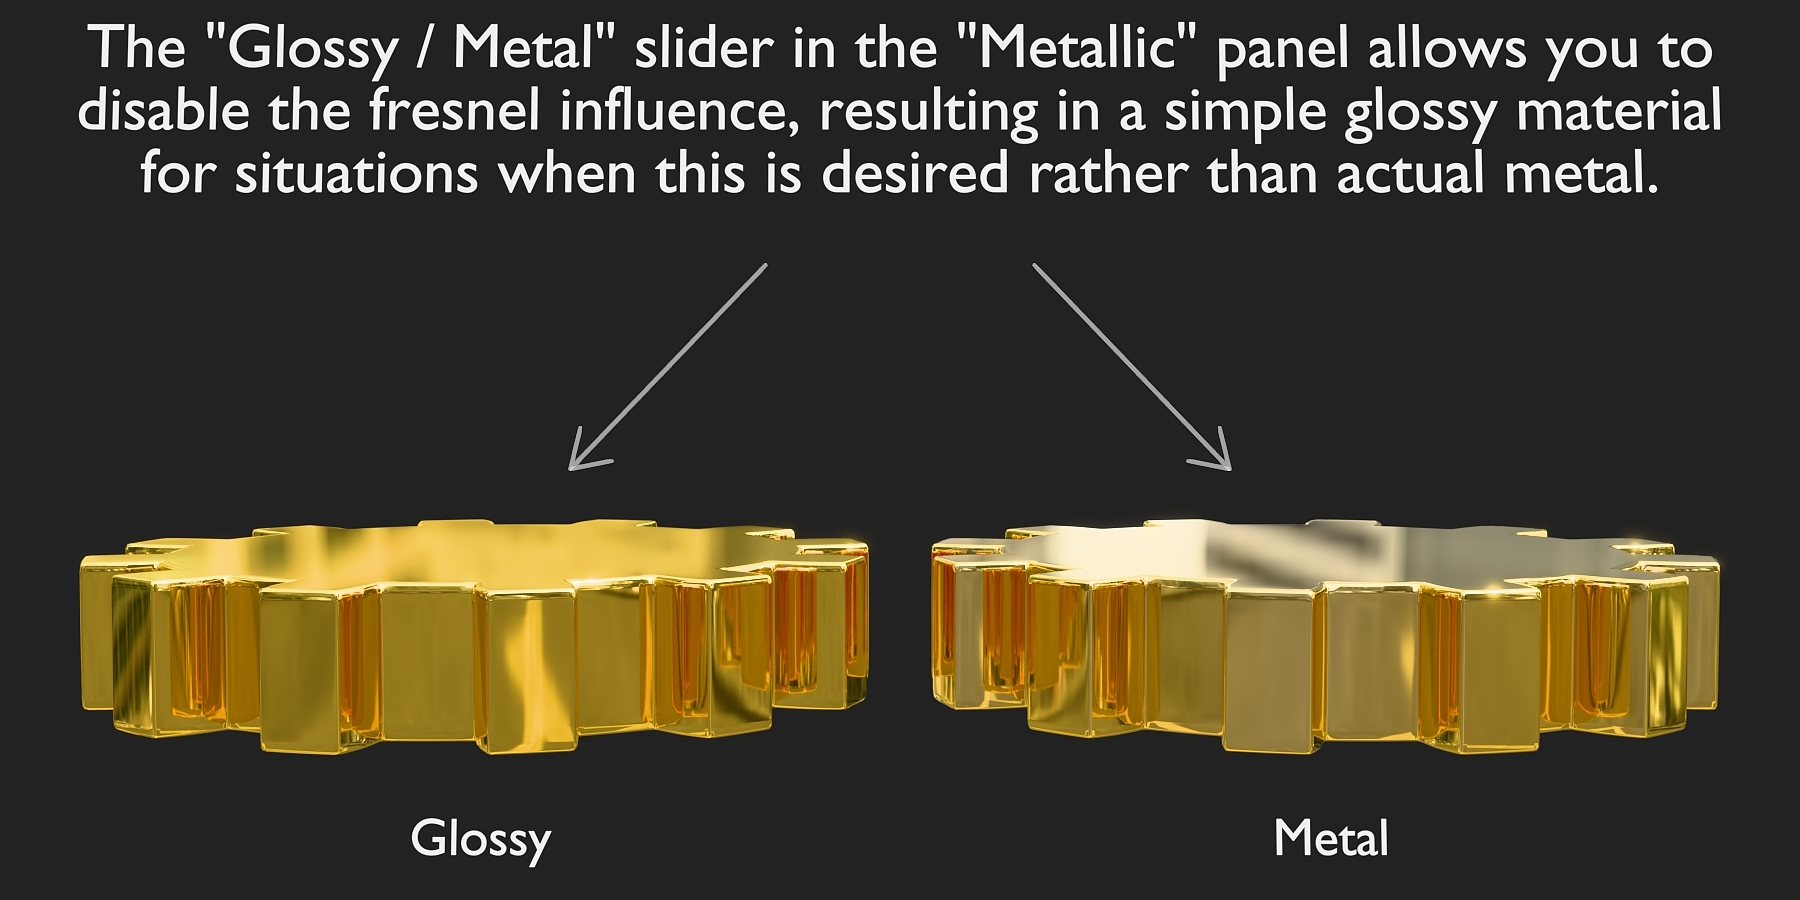
- Glossy
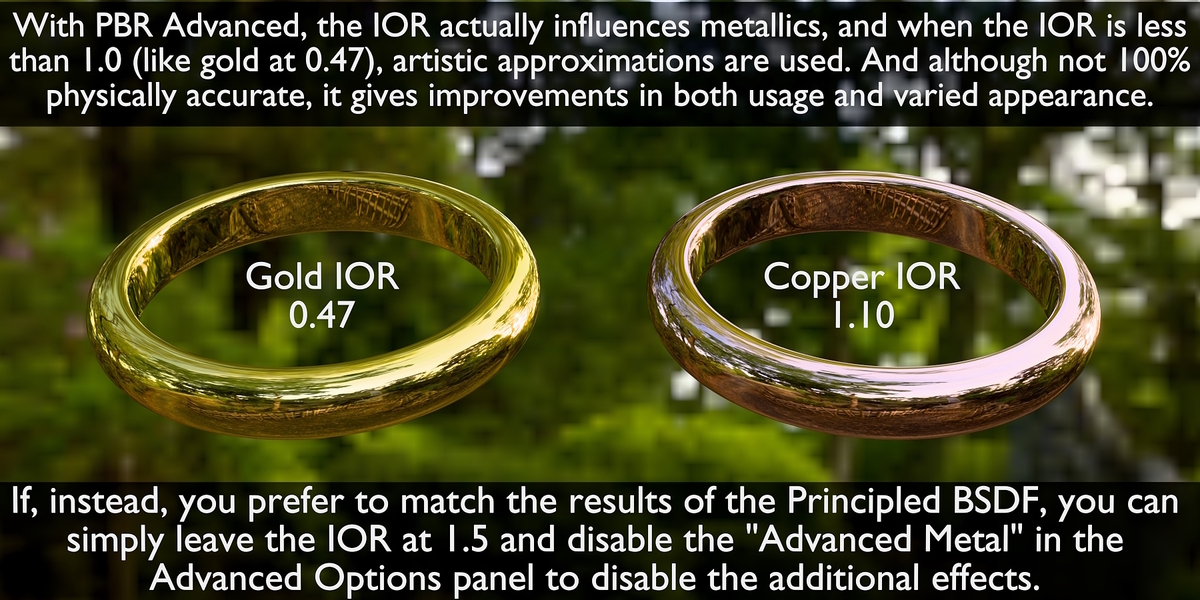
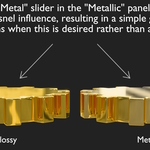
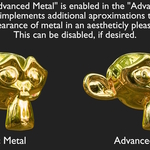
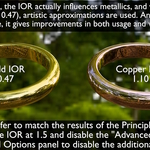
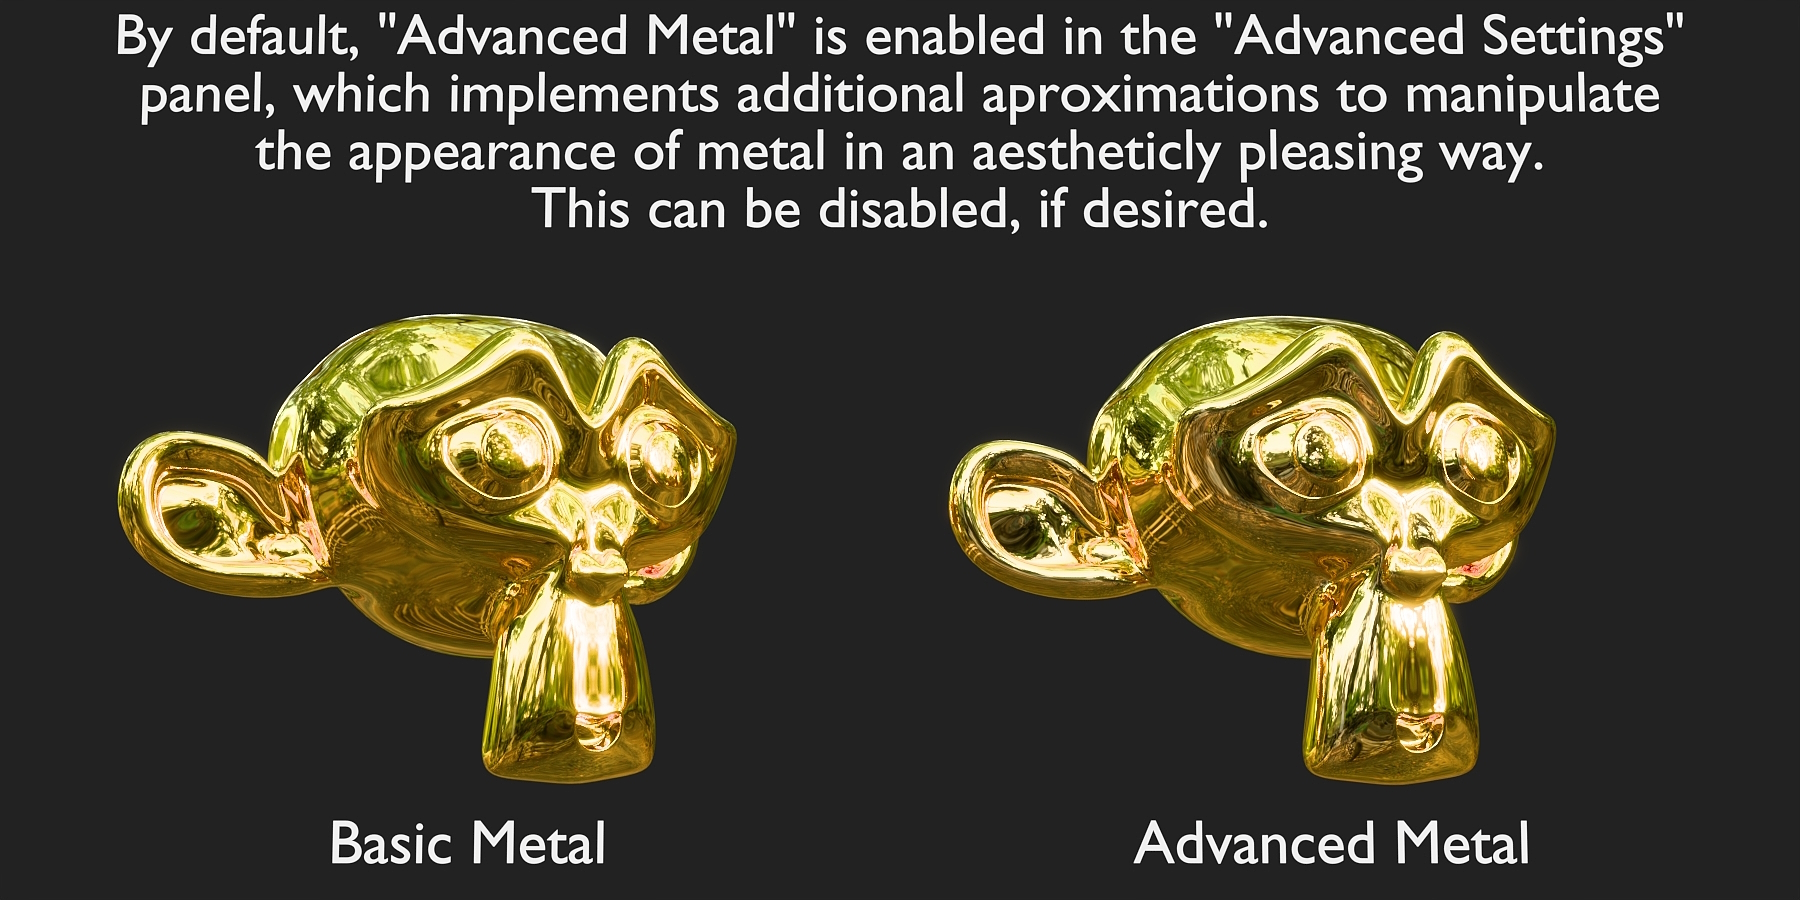
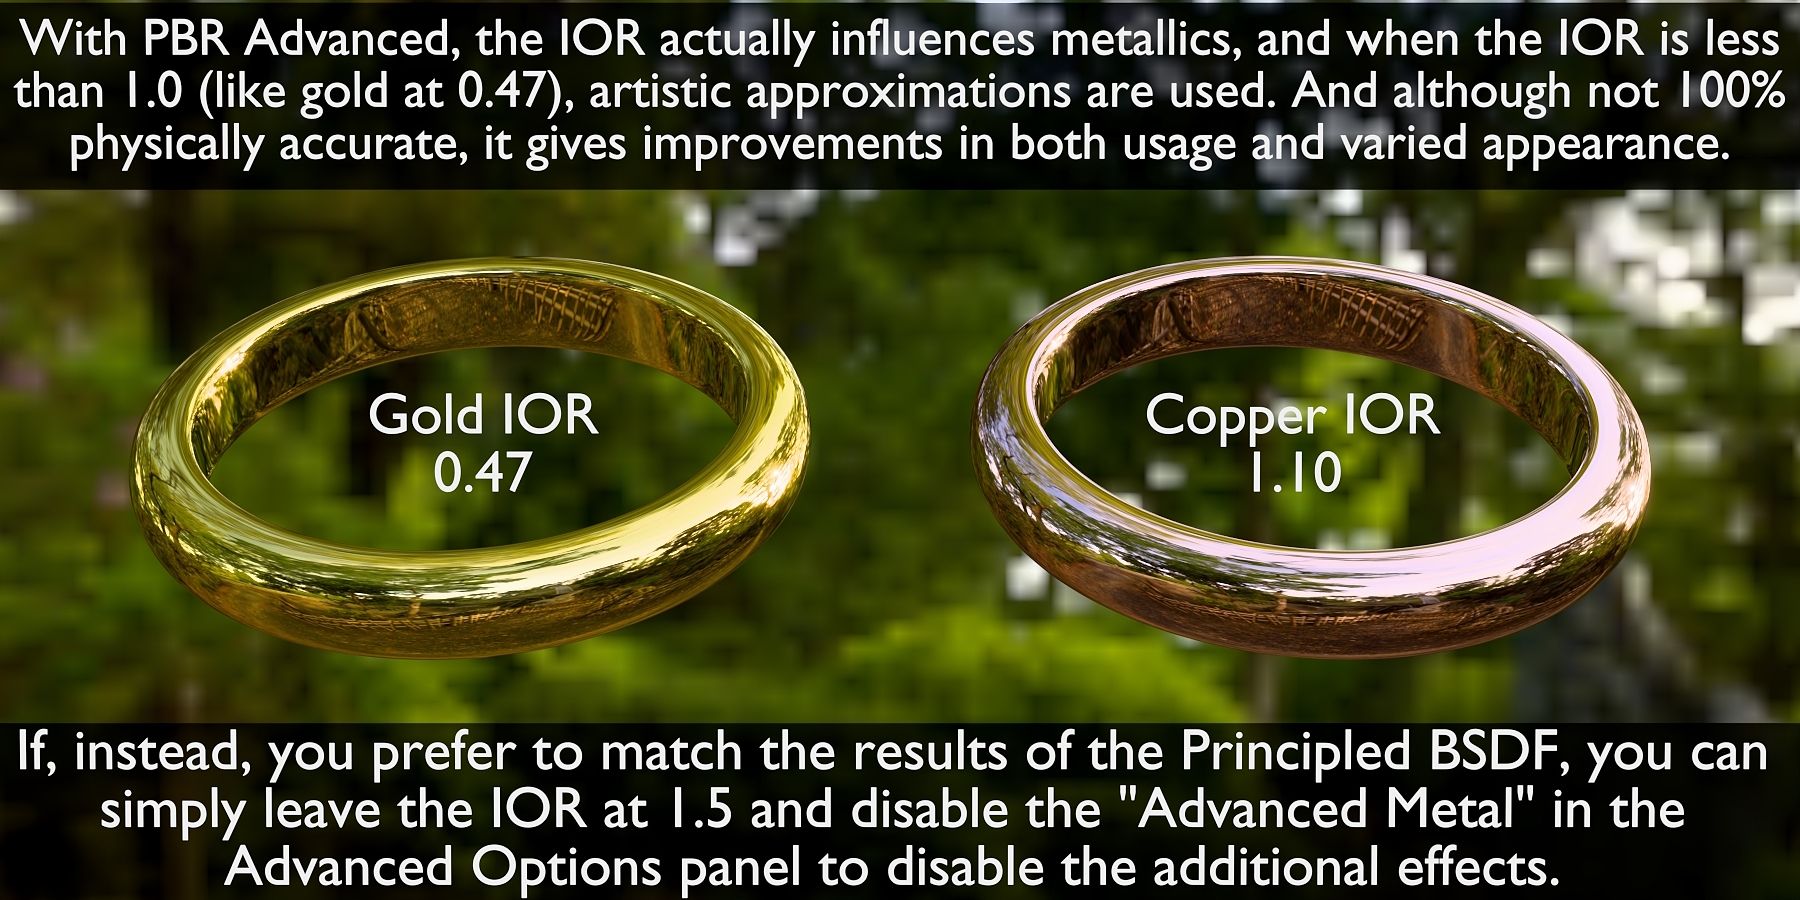
- Metallic (With an advanced metal mode)
- Anisotropy (2 Modes)
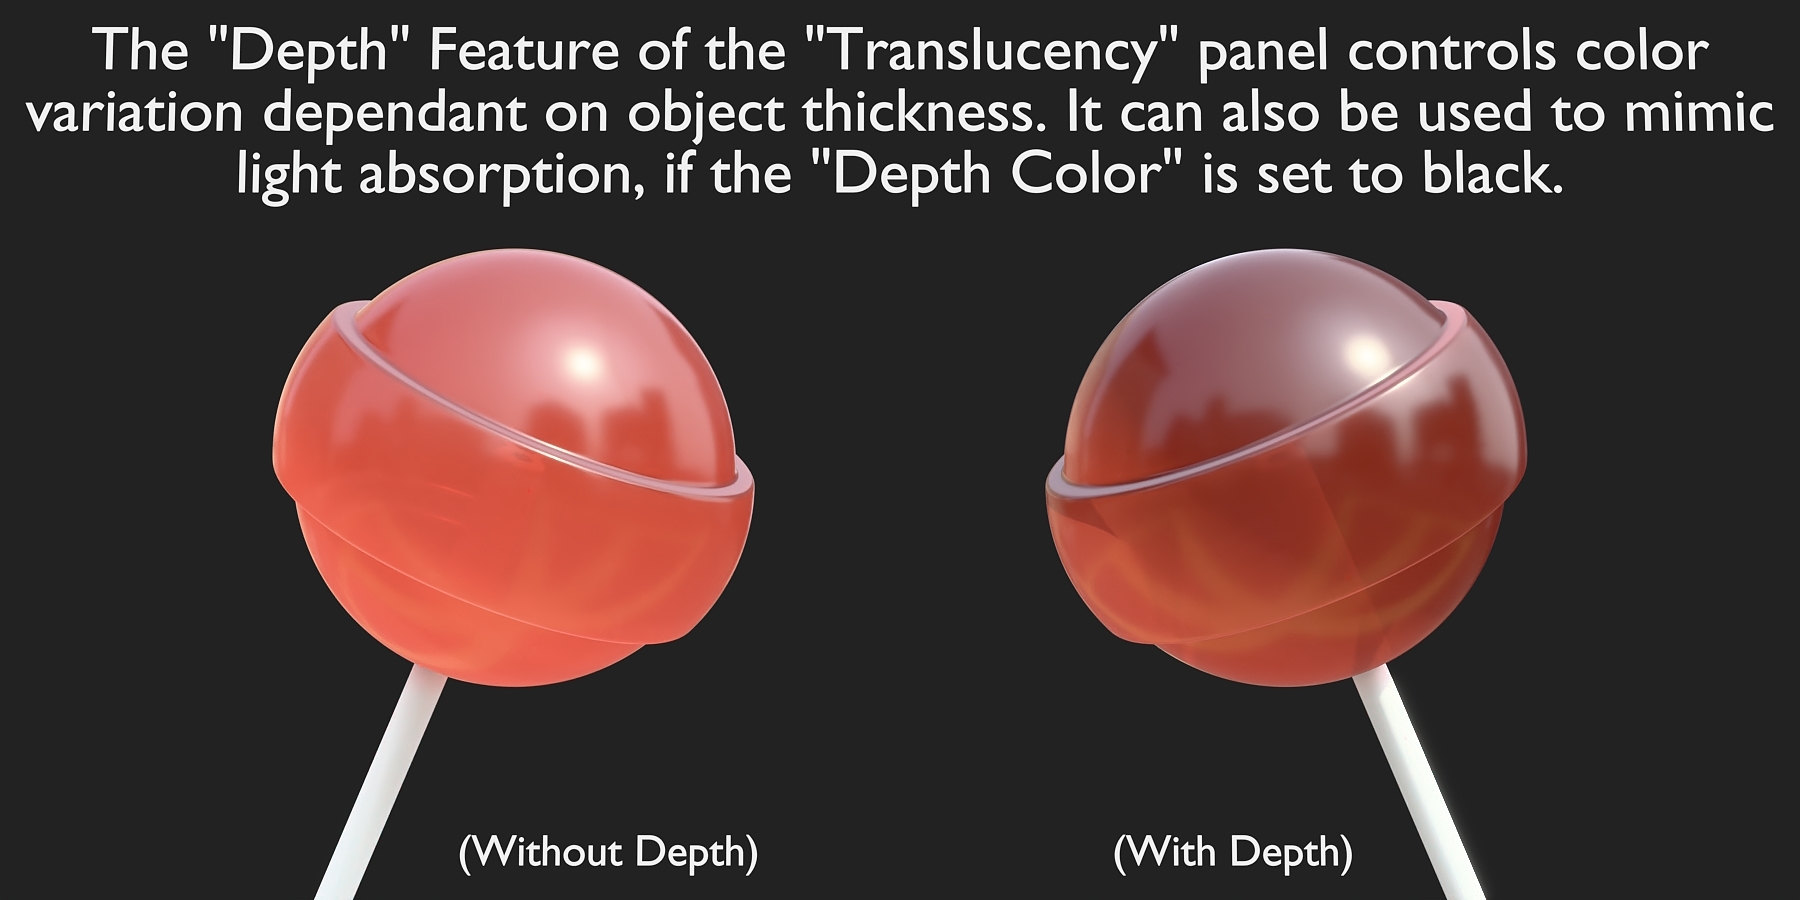
- Built-In Translucency
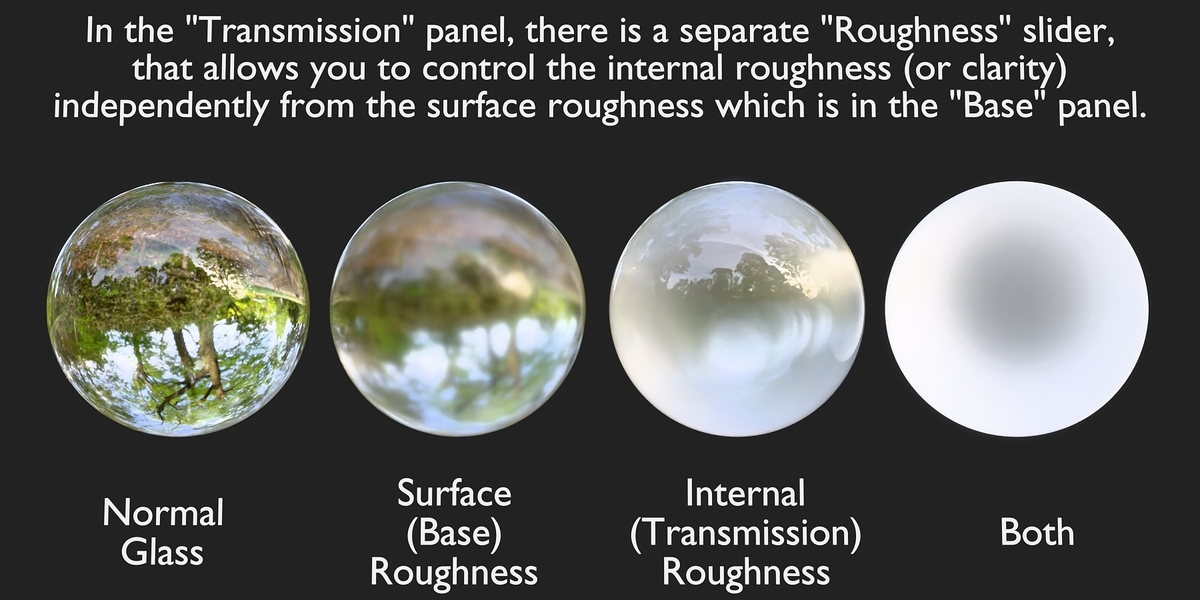
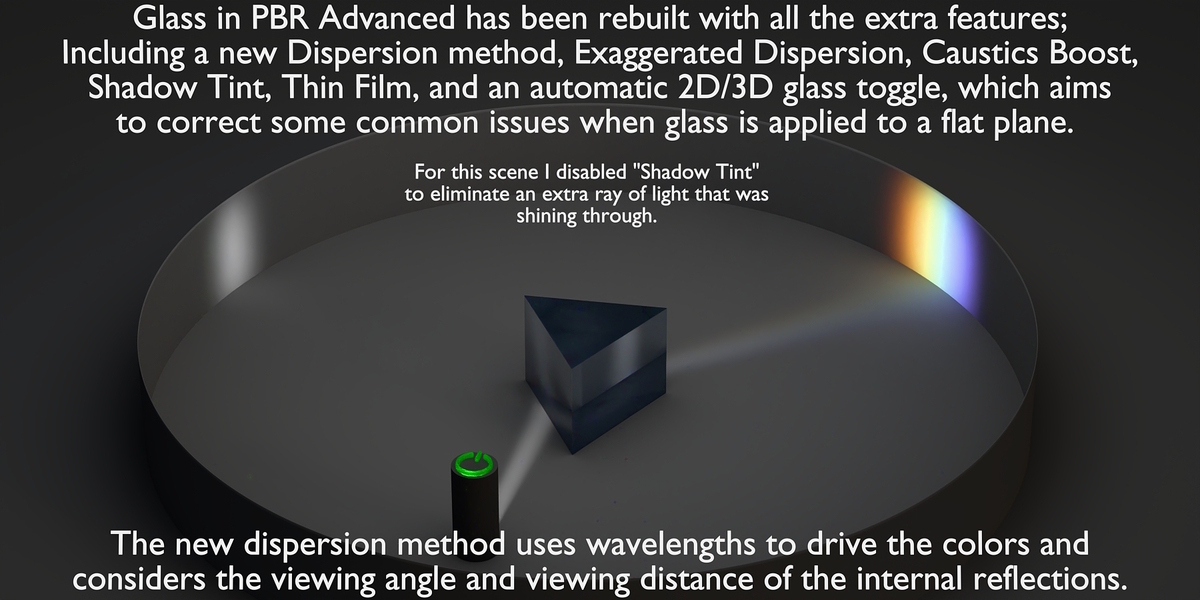
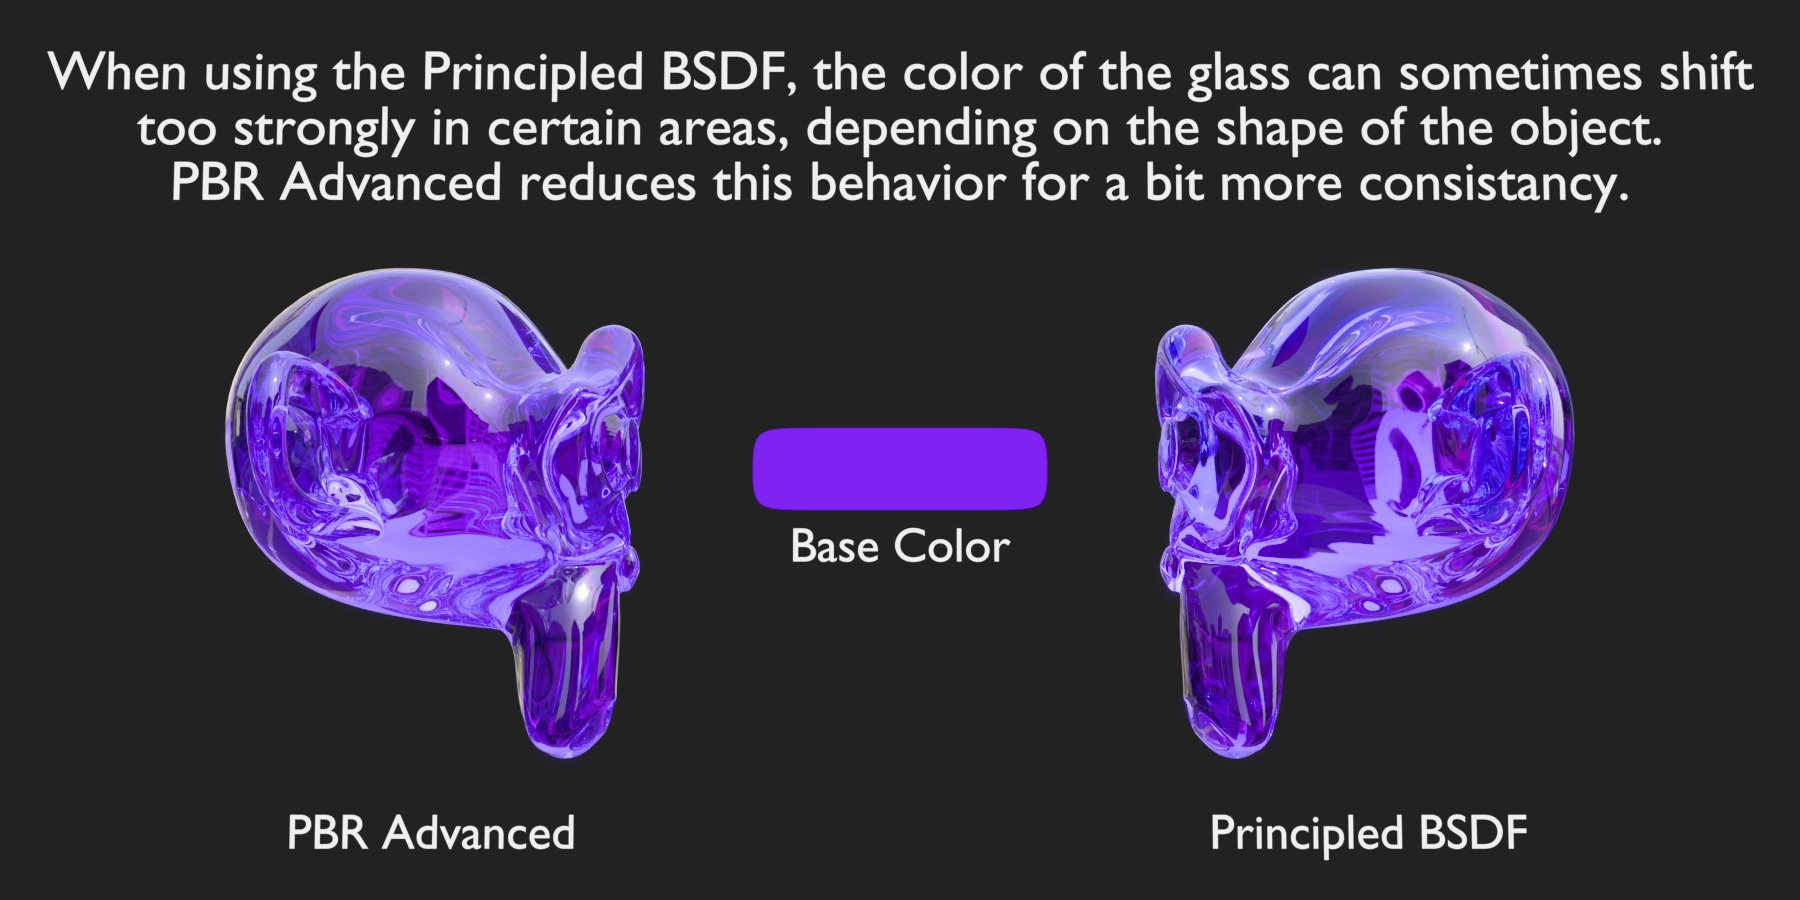
- Transmission (With a specially made True Glass)
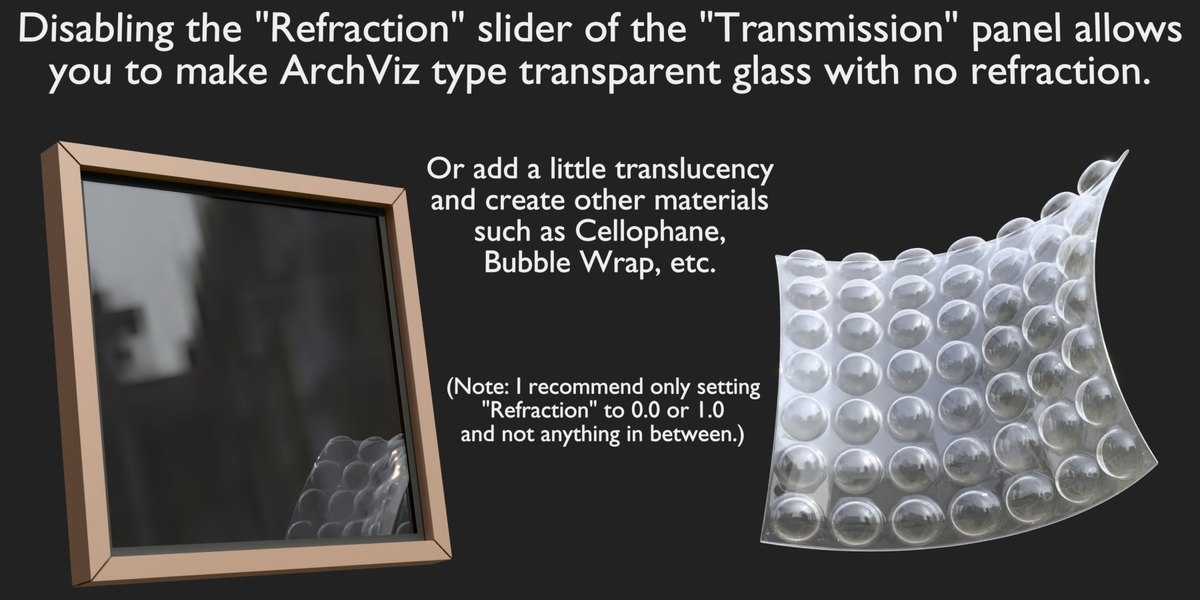
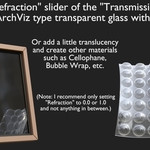
- ArchViz-style Transparent Glass
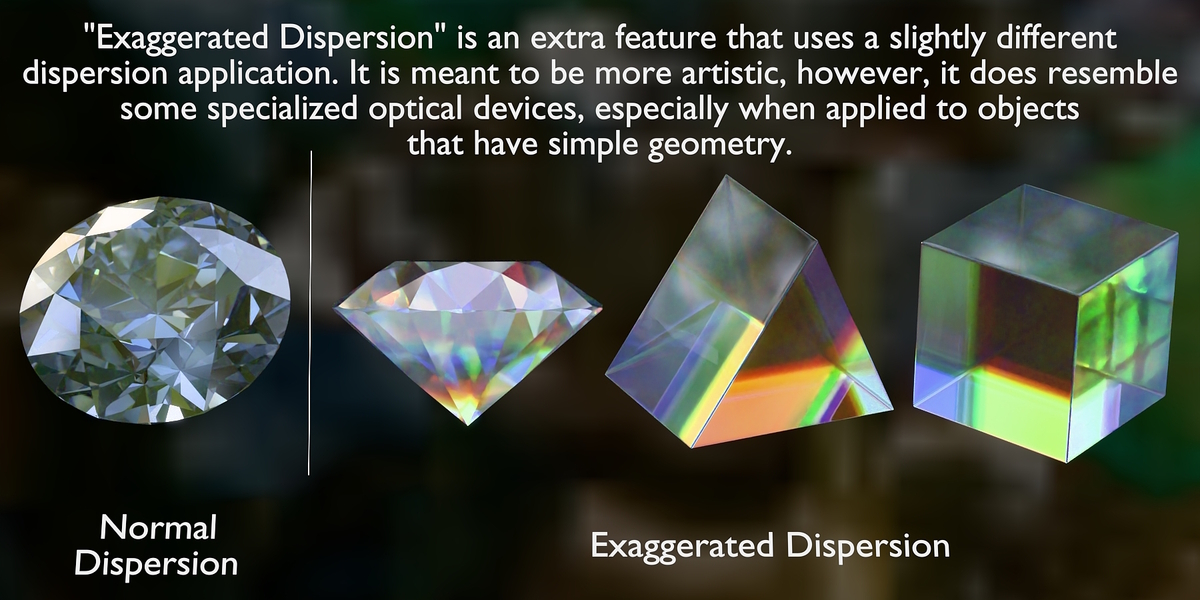
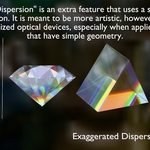
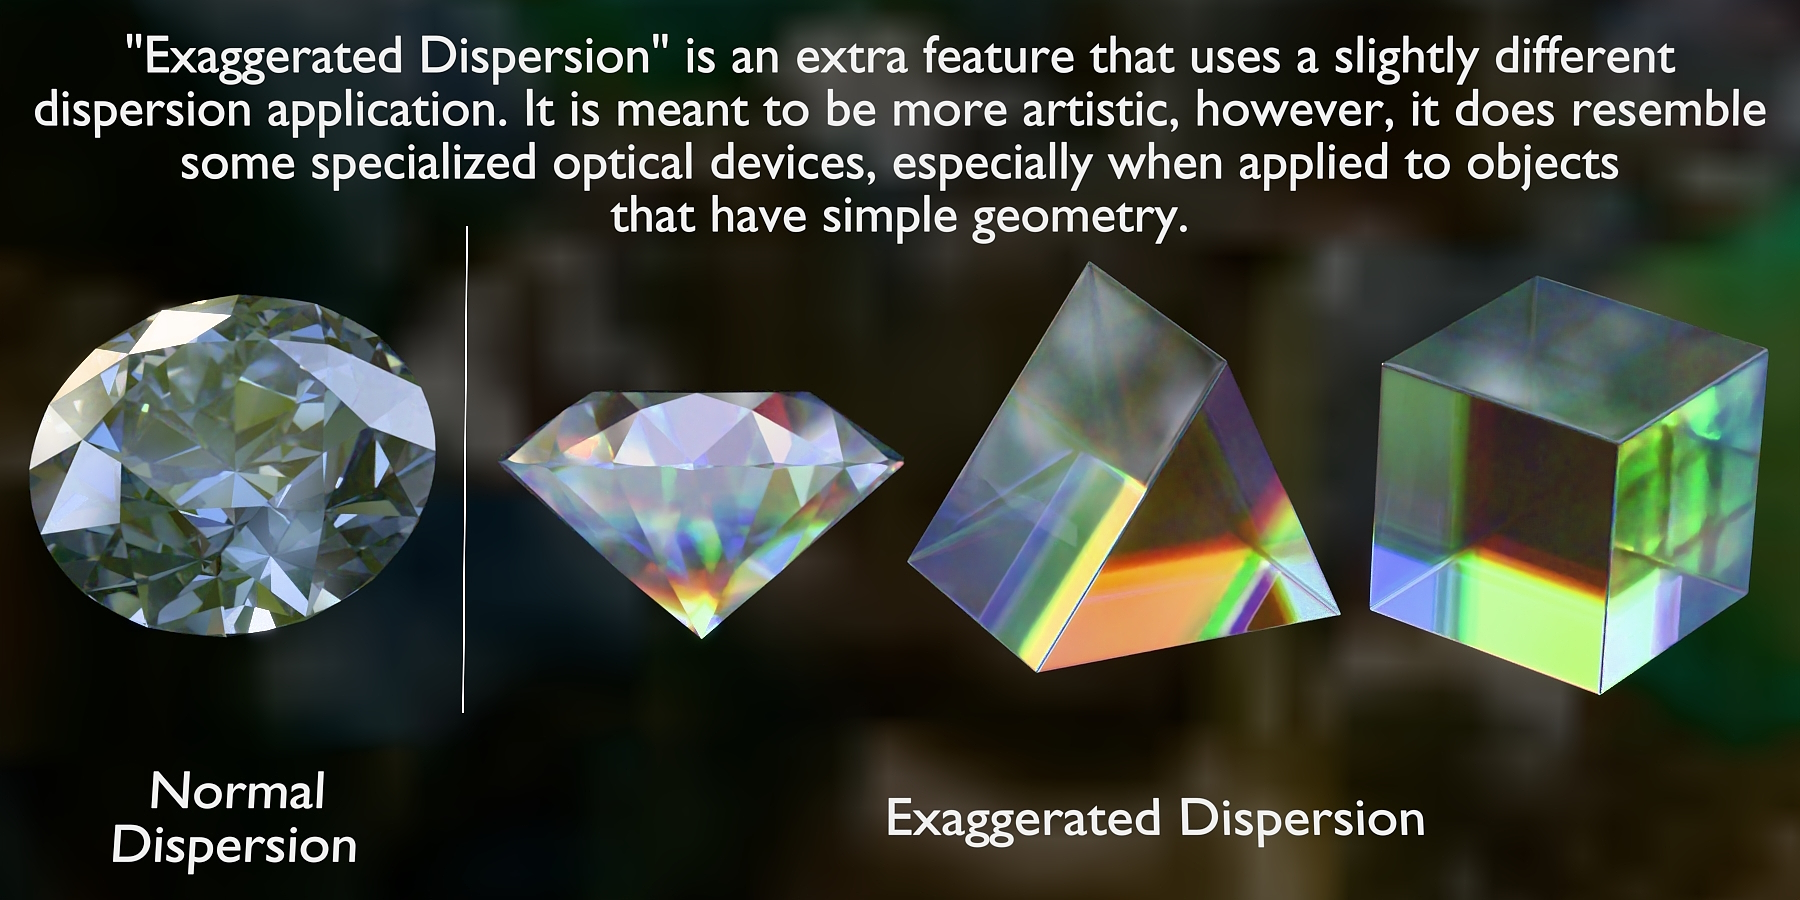
- 2 Modes of Dispersion
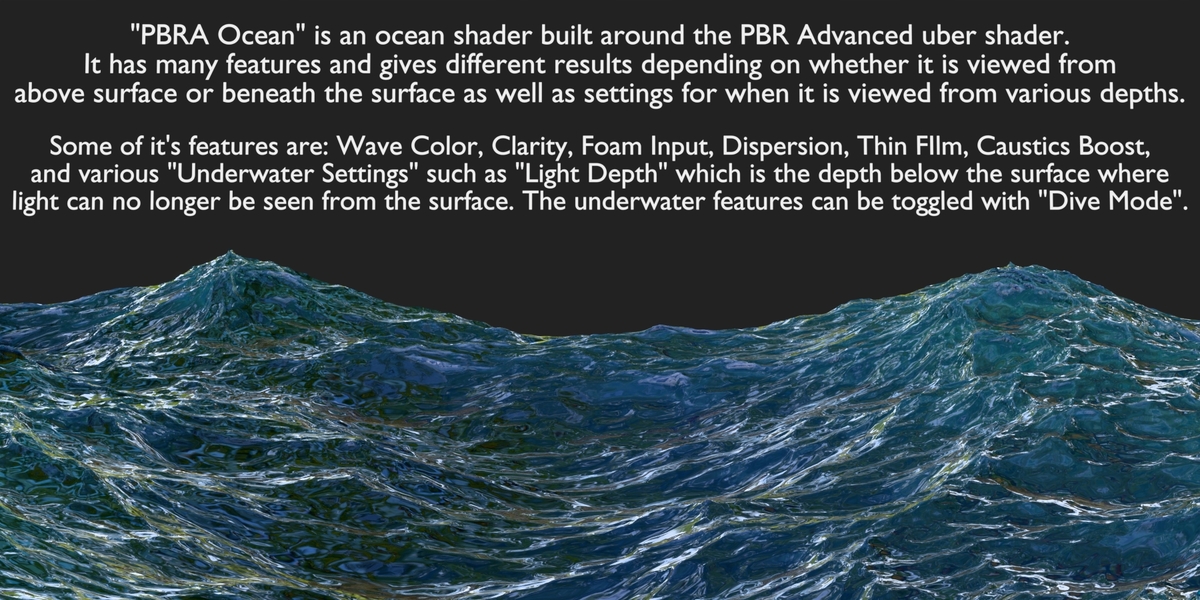
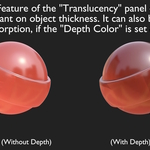
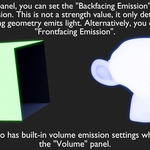
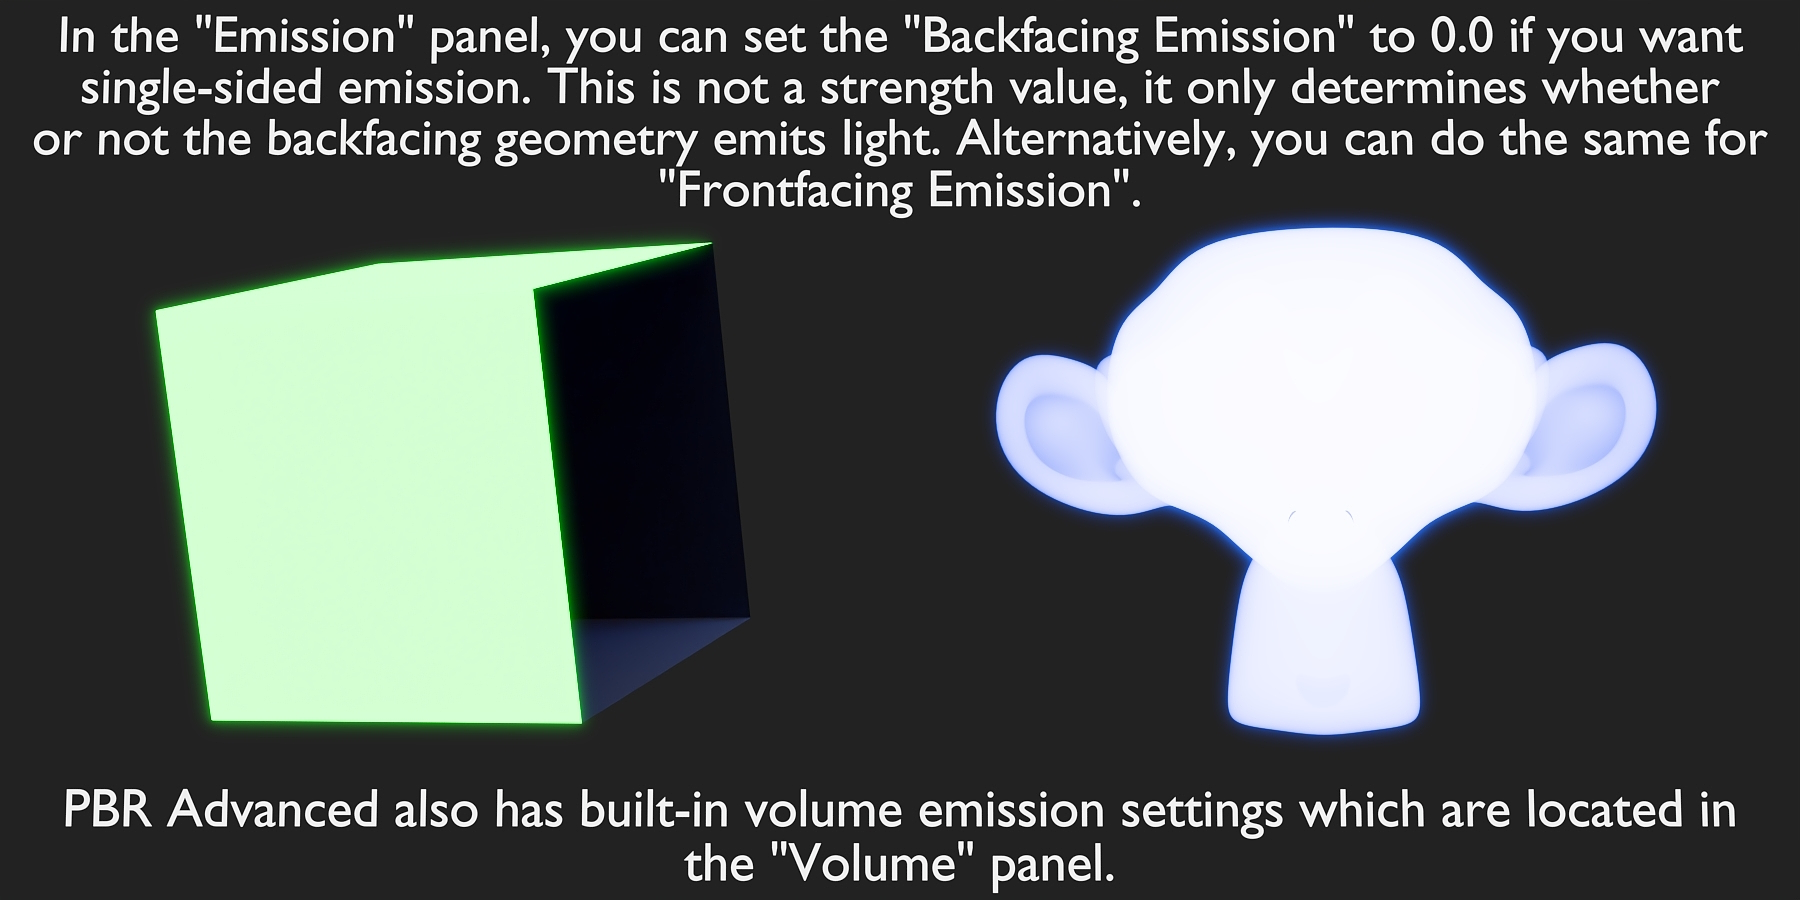
- Built-In Volume features
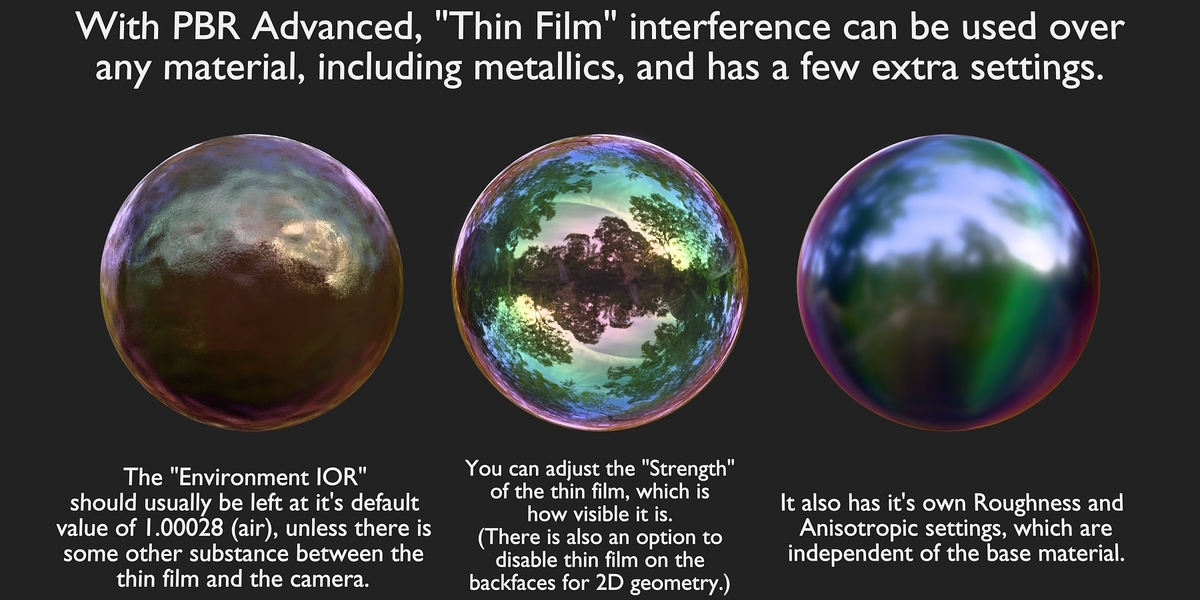
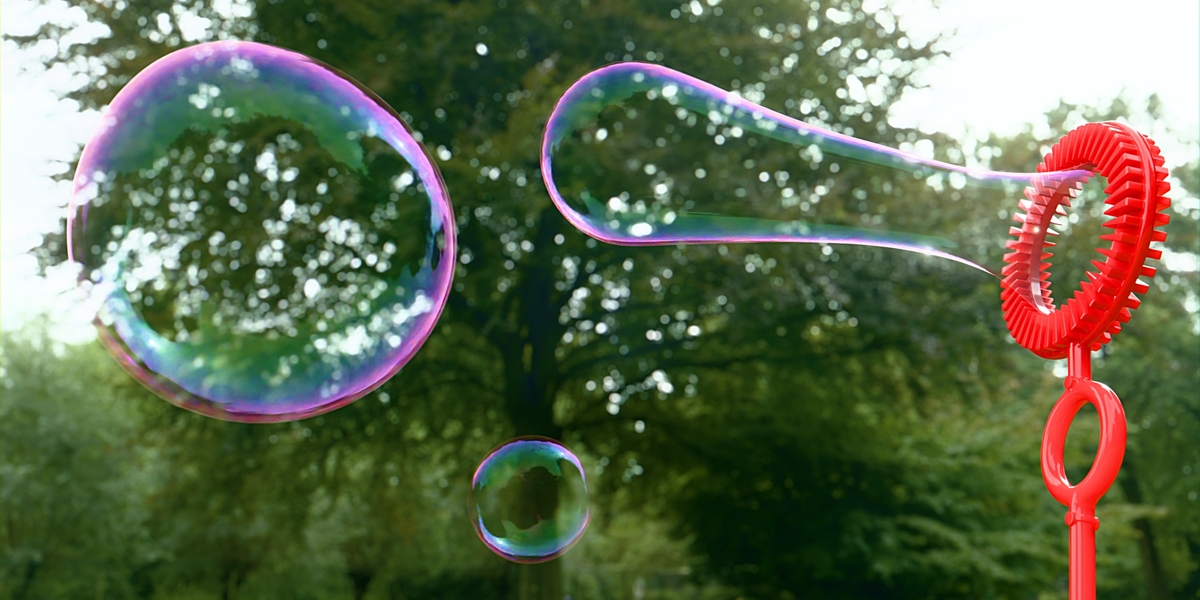
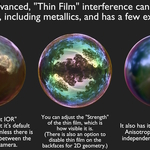
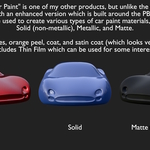
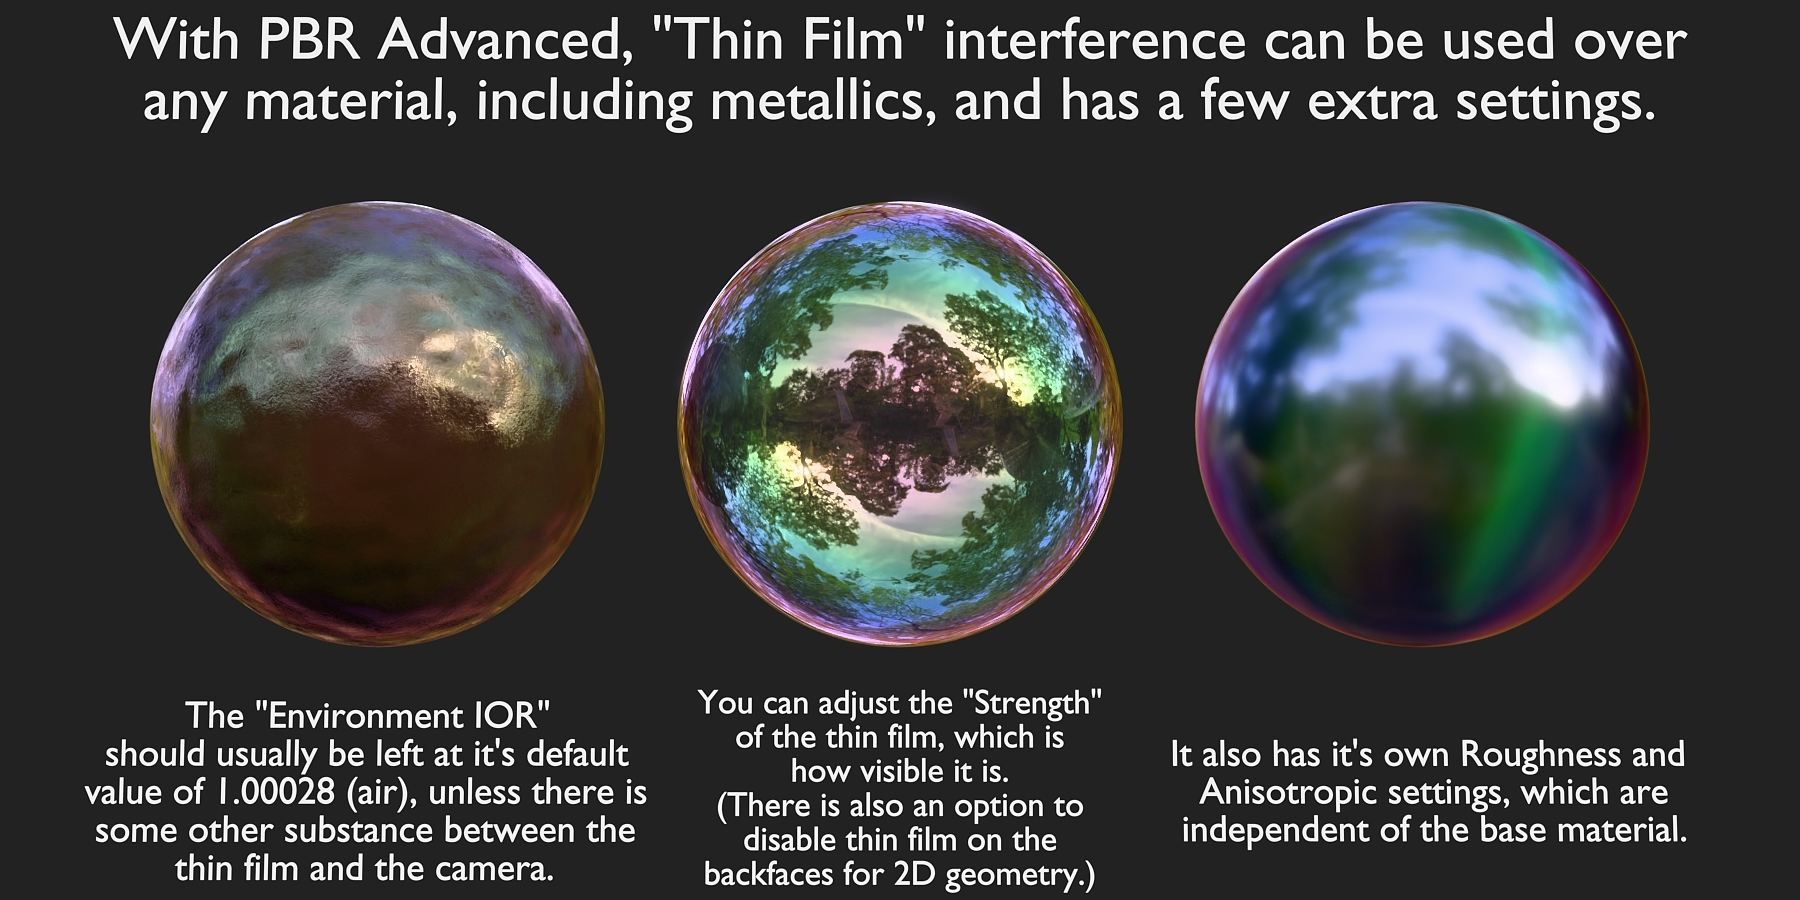
- Thin Film (Which can also be used separately)
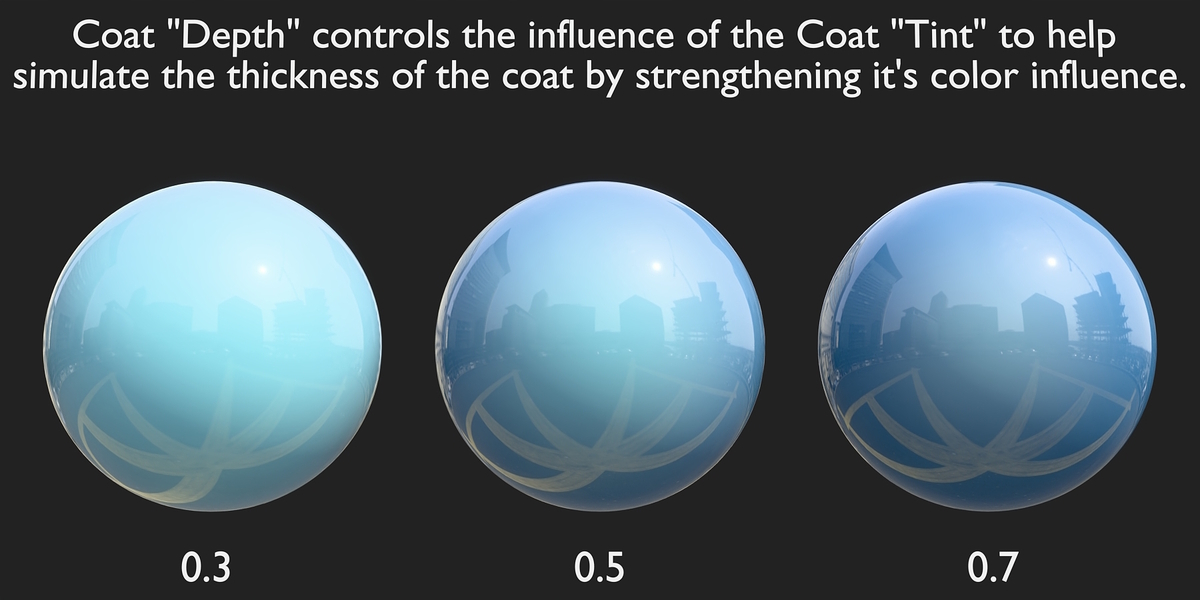
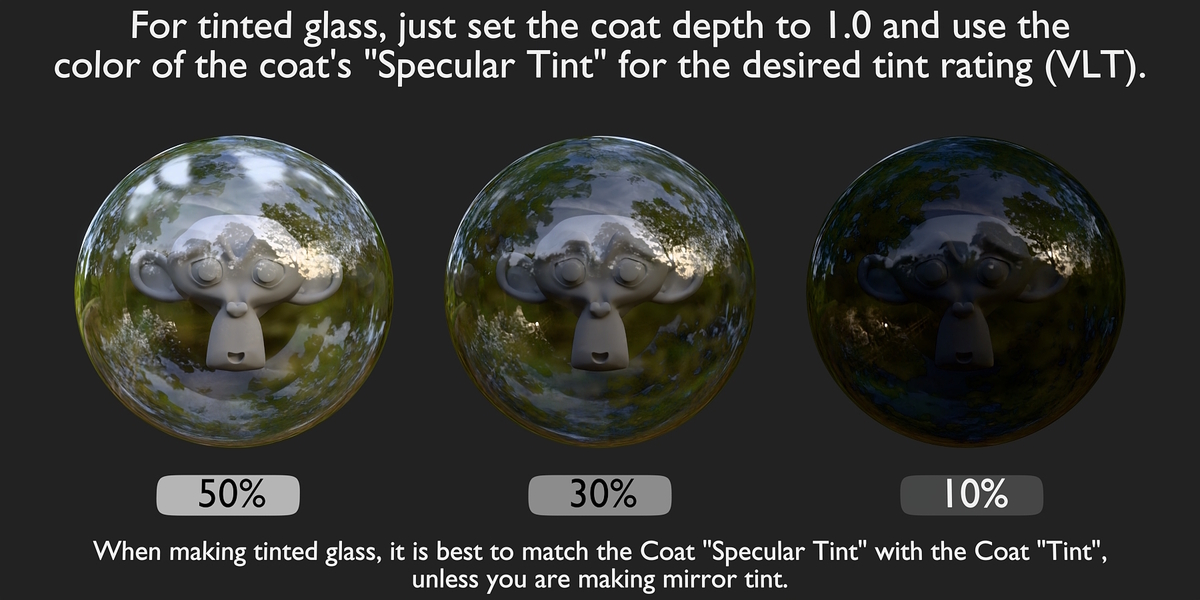
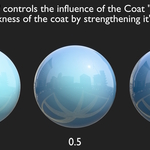
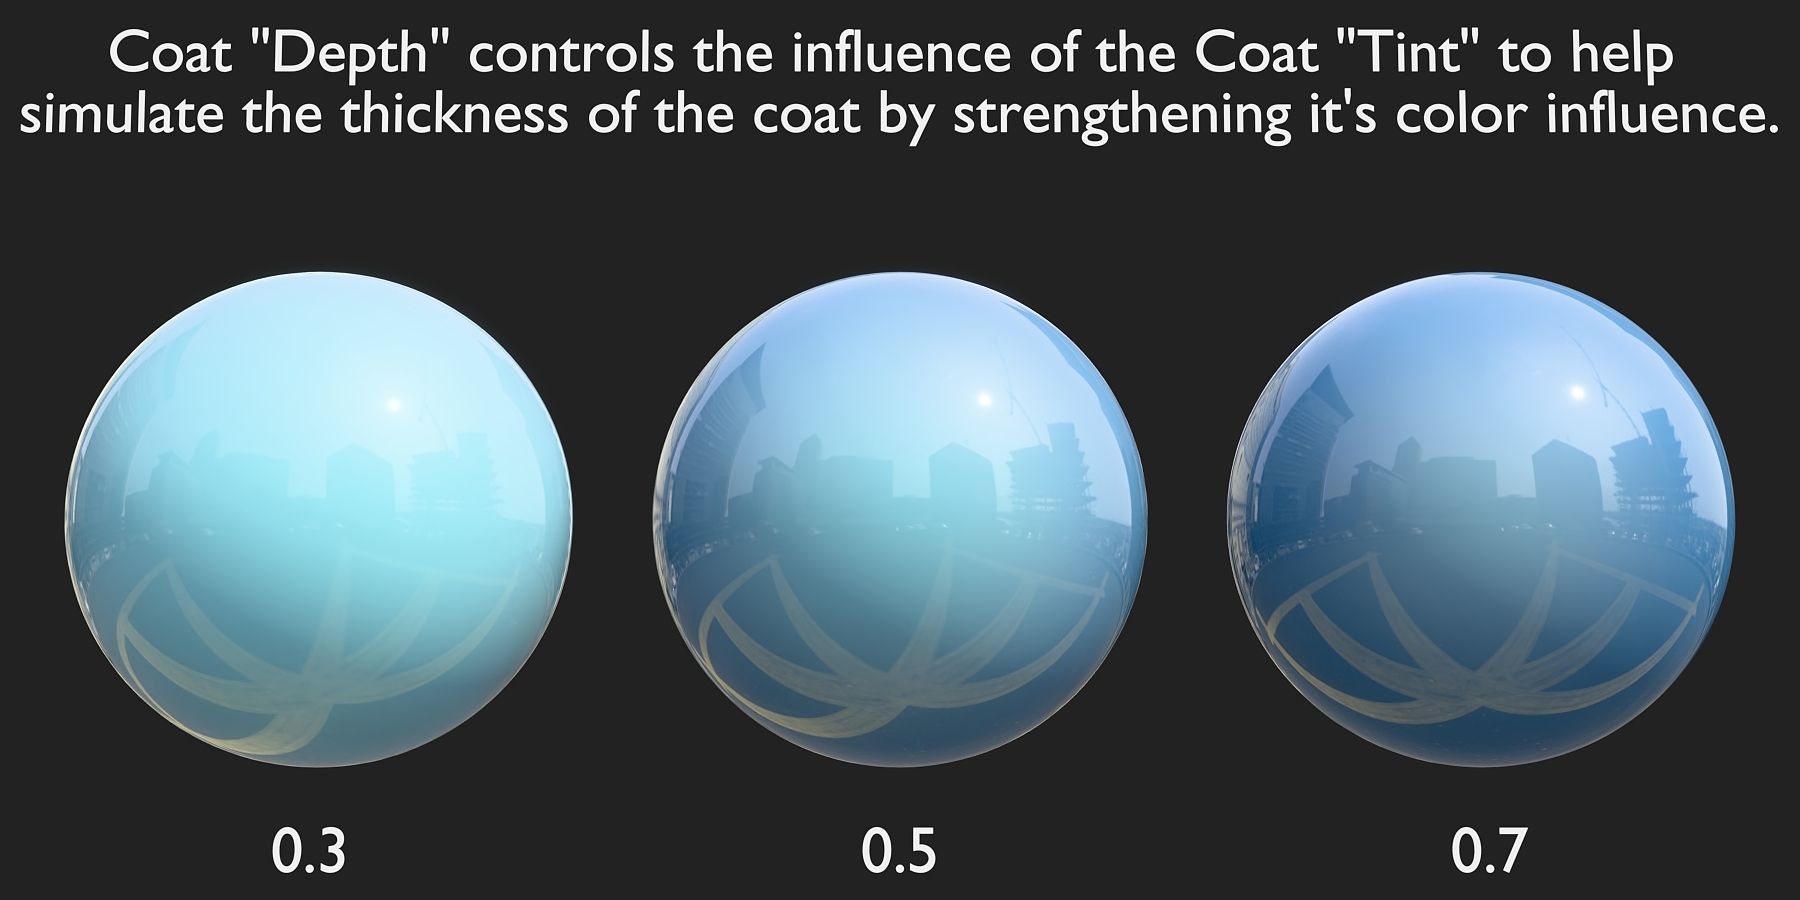
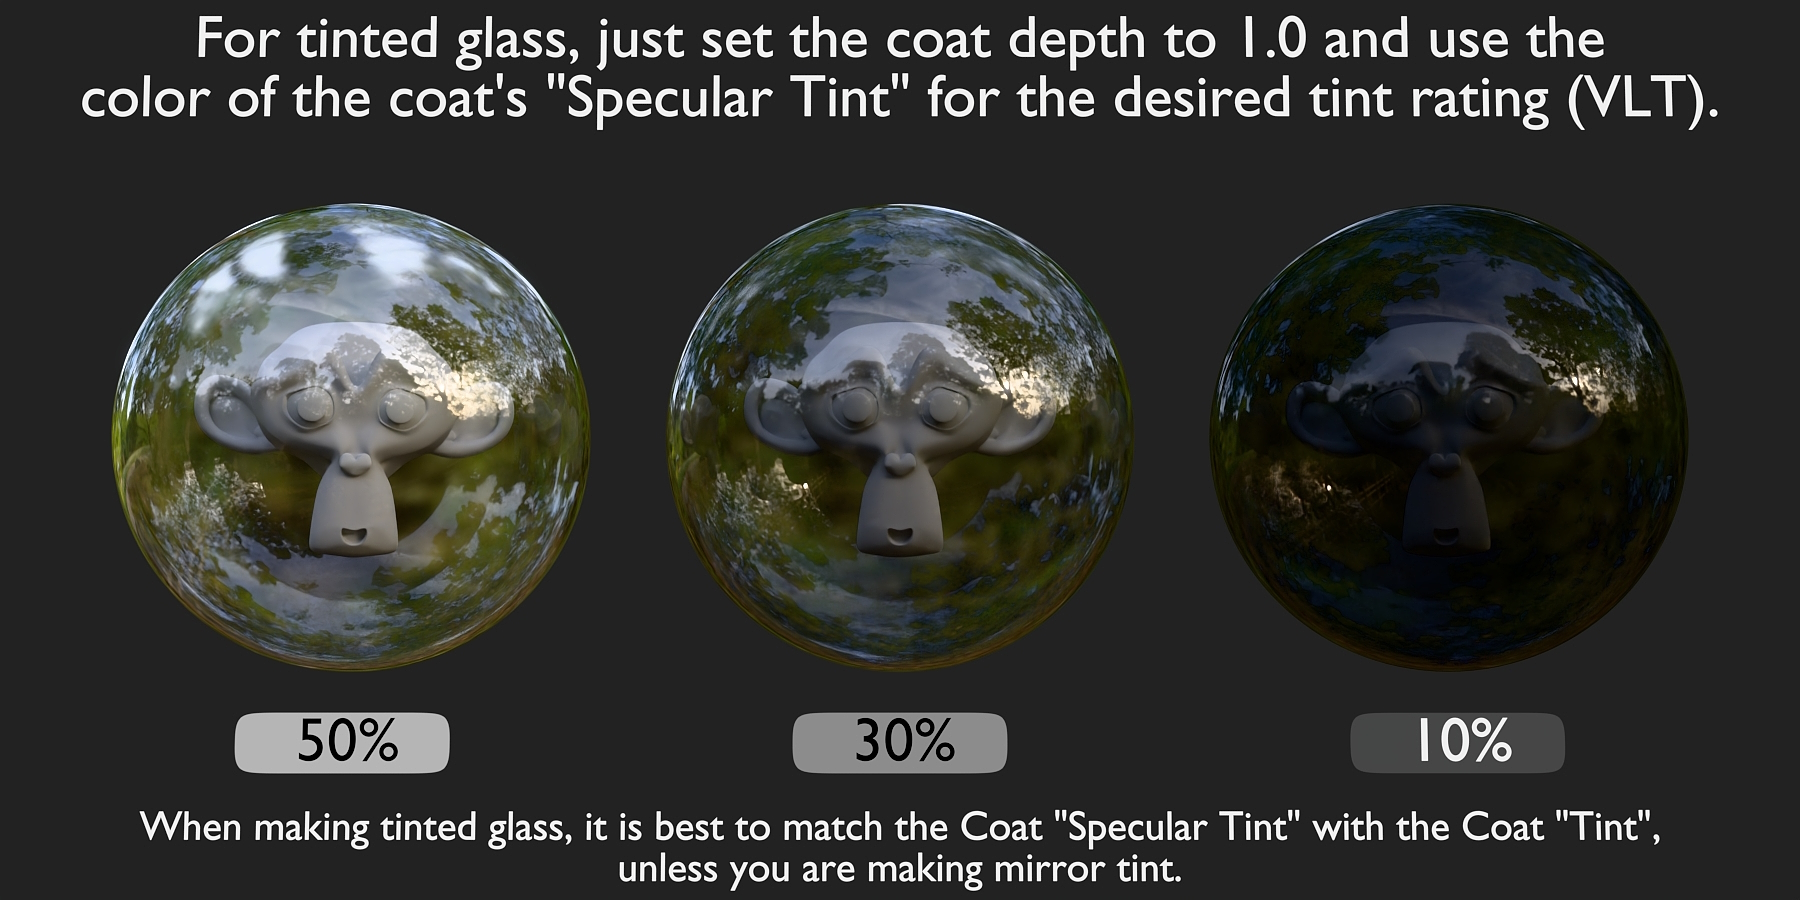
- Coat (With it's own coat system features)
- Emission (With built-in single-sided emission)
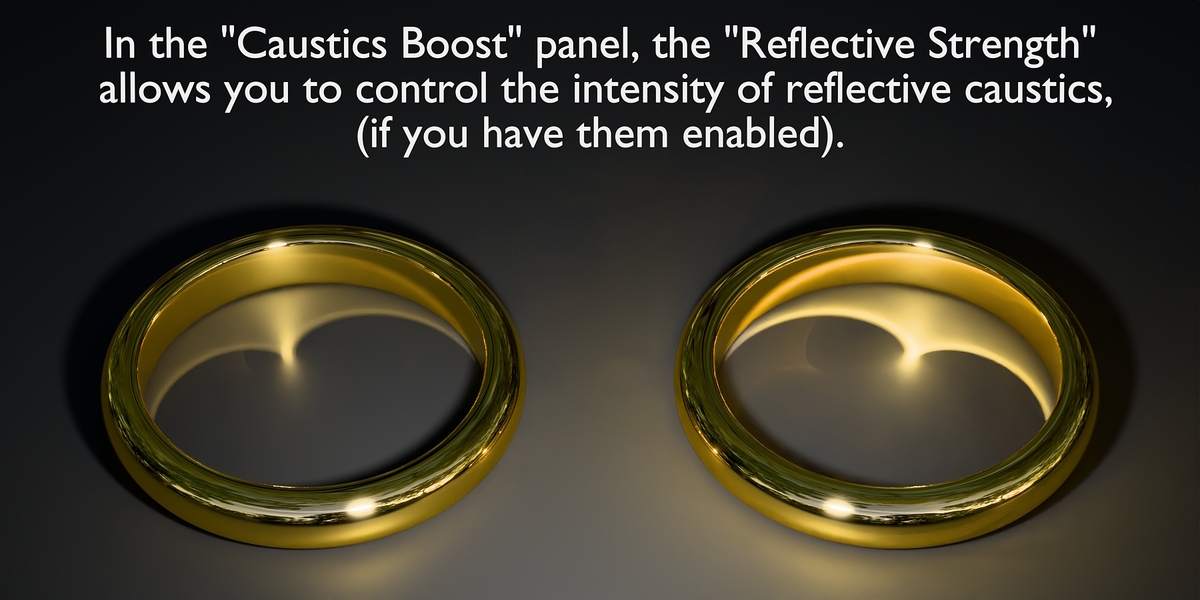
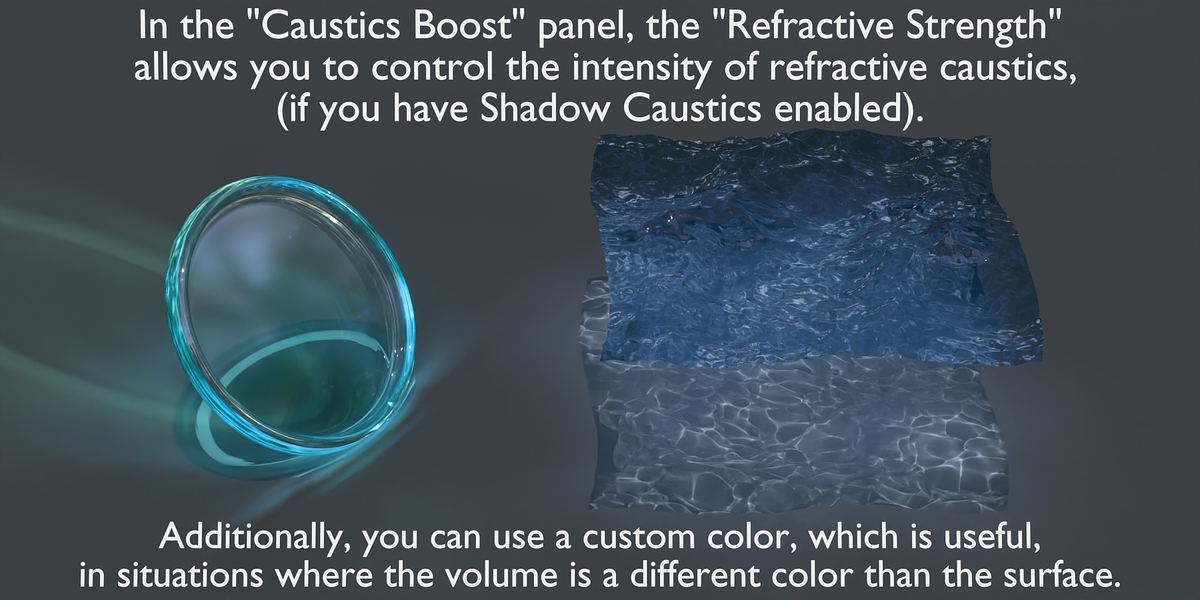
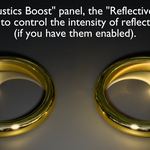
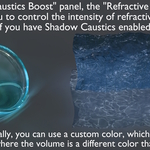
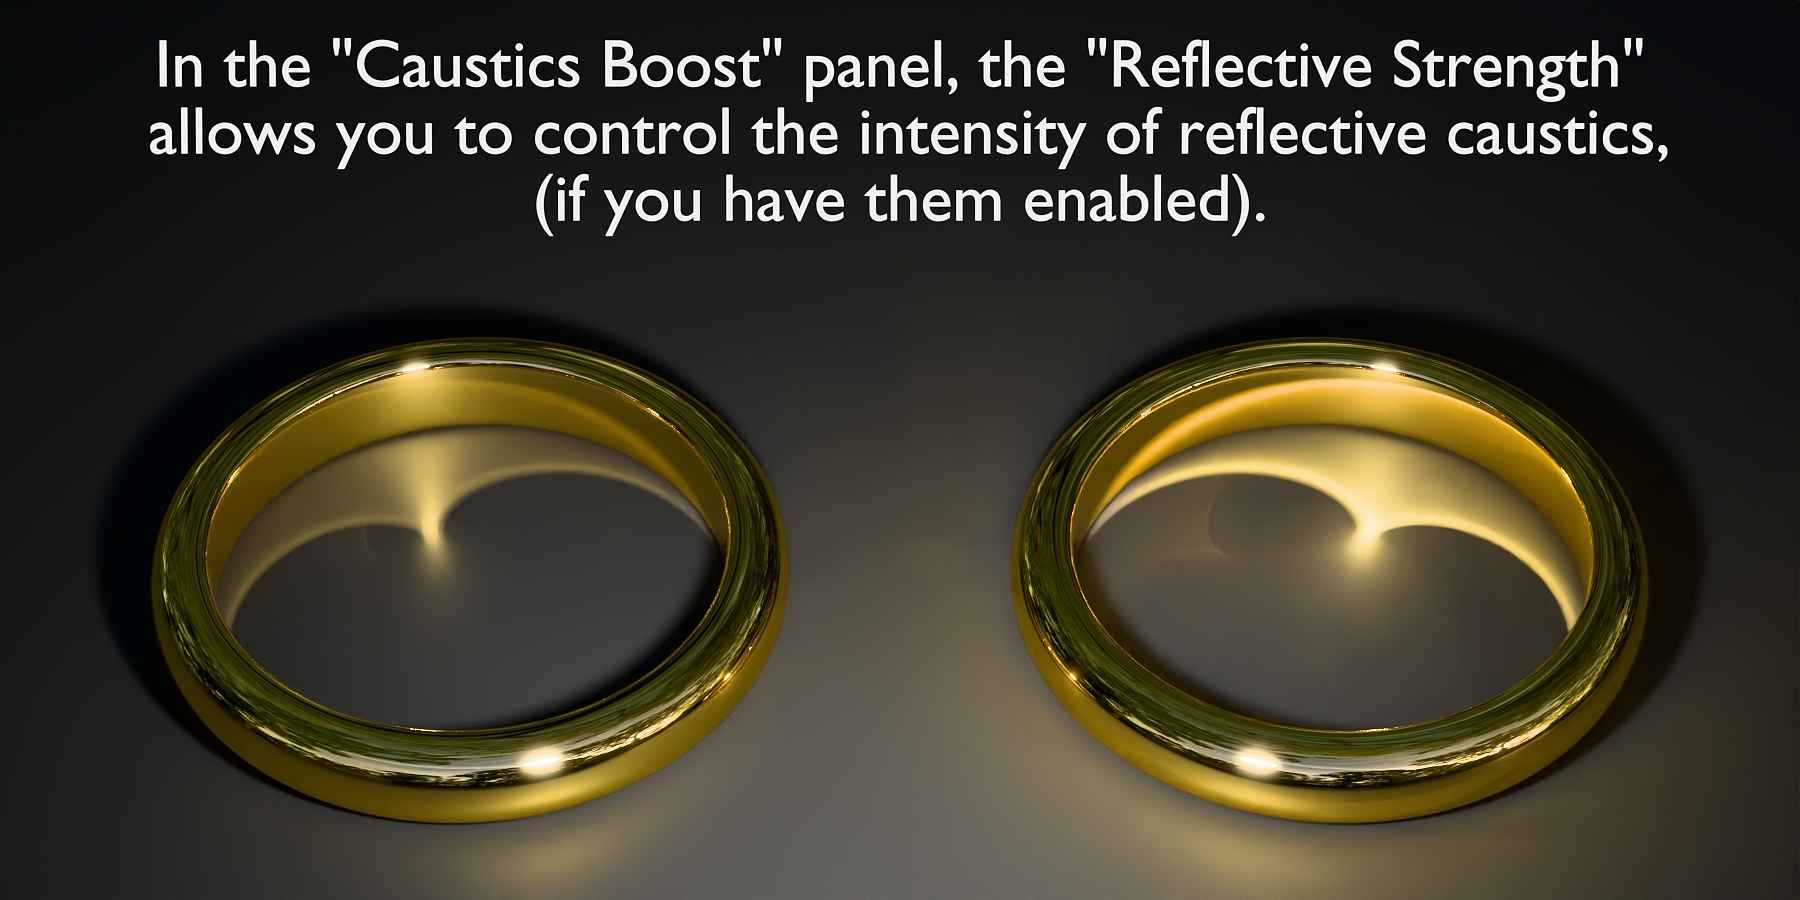
- Reflective Caustics
- Refractive Caustics
- Built-In Culling (Backfacing or Frontfacing)
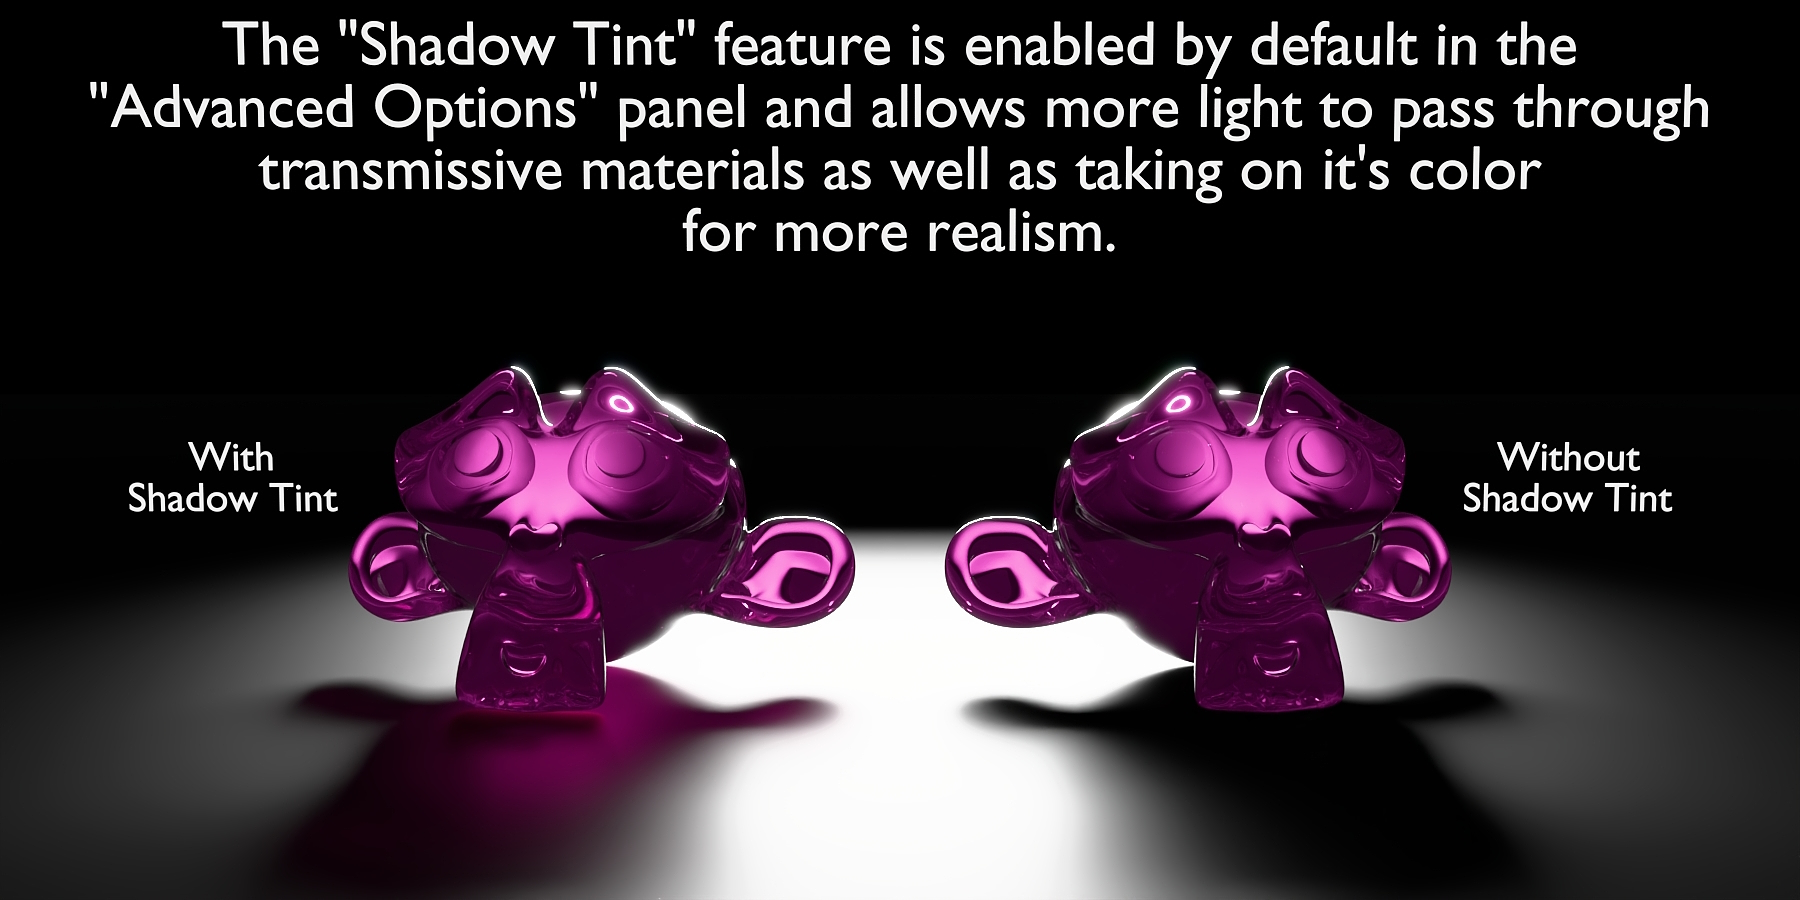
- Shadow Tint
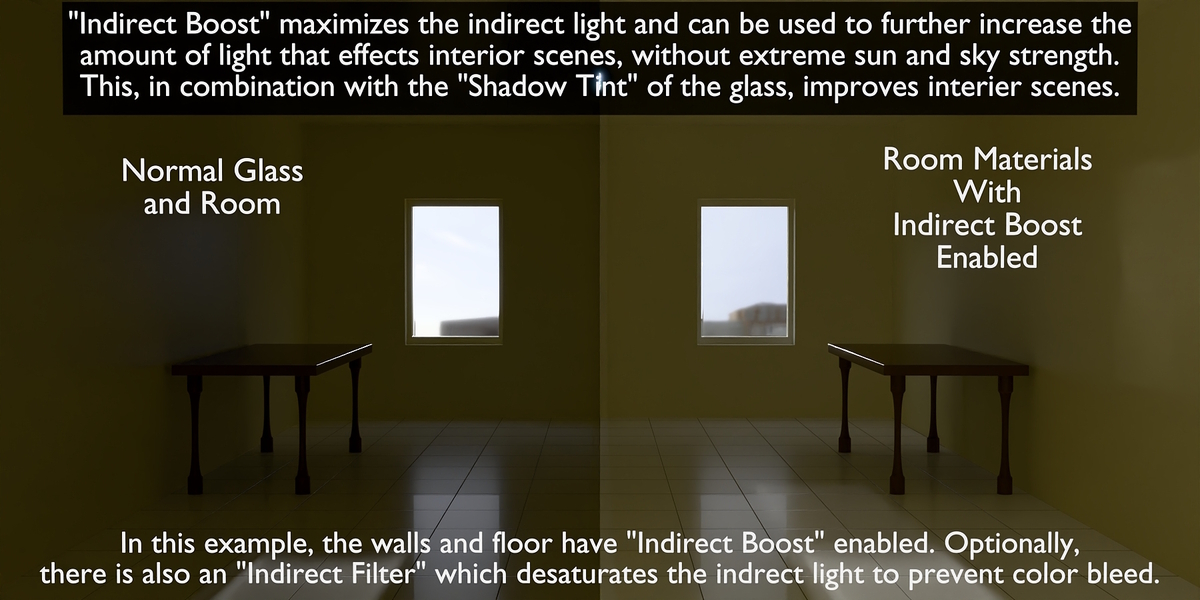
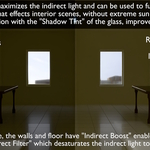
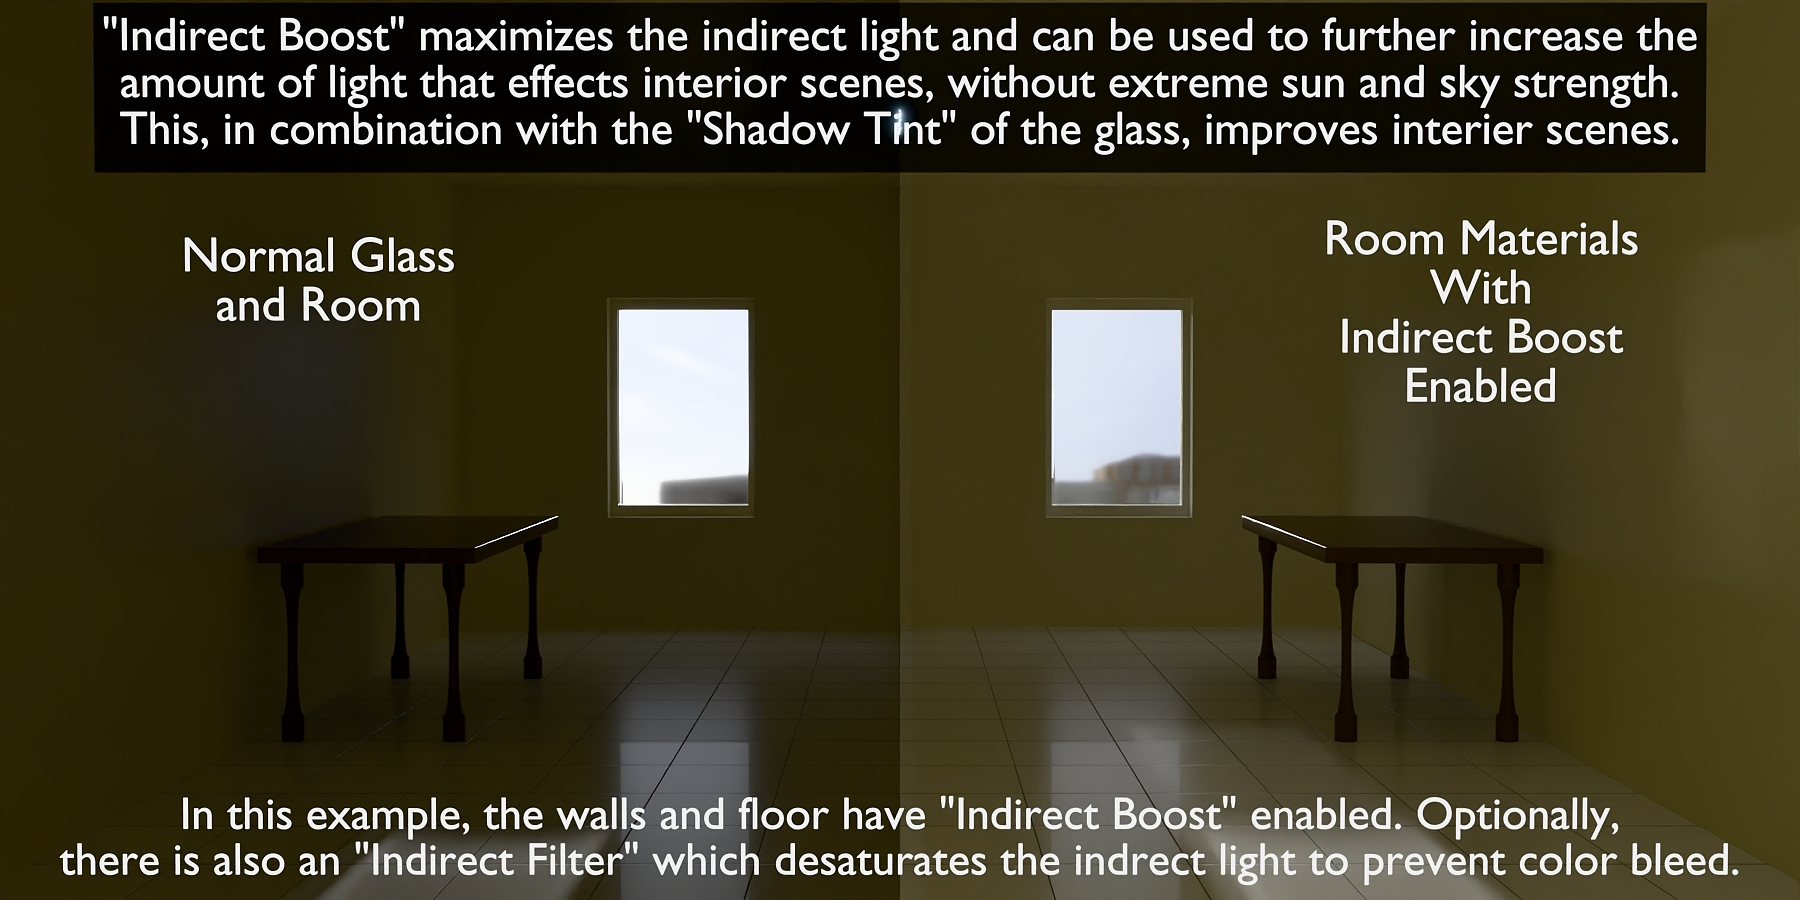
- Indirect Filter
- Indirect Boost
And an "Advanced Options" panel to enable/disable various built-in features.
As Blender continues to advance and introduce more features in the future, PBR Advanced will continue to advance with it. And I am always looking for more ways to improve or bring more features to PBR Advanced, whenever possible.
PBR Advanced can bring PBR textures to another level, by offering more flexible ways in which texture maps can effect the material. And additional maps or procedural techniques can be used in creative ways to control the additional features of PBR Advanced in ways that are not possible with the Principled BSDF alone.
I have used PBR Advanced in everything from serious architectural visualization projects to fun and silly animations, and no matter what type of project I am working on, it has saved me time working with materials, and with Version 4, the results are better than ever.
PBR Advanced was designed specifically for CYCLES, but can be used in EEVEE as well, as long as the individual features you are using are already able to be used and any necessary changes to any of the settings in eevee are made accordingly to get the results your looking for.
(Note: As improvements are made, an input or setting may change slightly, but I try to keep my customers informed via email of any changes or bug fixes that I make available between major versions and existing customers will be notified of newly released versions available for download. Those who purchased previous versions in the past have always been able to redownload my latest versions as they release even before I have updated the product page and images.)
Let's take a look at some of the features of PBR Advanced.
The following scenes are all included in the PBR Advanced.blend file and act as both a TUTORIAL and a demonstration.
Upon download, simply open the blend file and go through each scene to get a little familiar with various features of PBR Advanced.
(Note: These are very basic scenes just for reference.)


***Important***
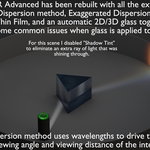
The Shadow Tint feature in PBR Advanced will ONLY work if the VOLUME output is also connected to the material output.
The exact reason for this is unclear, but it is an issue related to how Blender handles the material when nothing is connected to the volume of the material output.

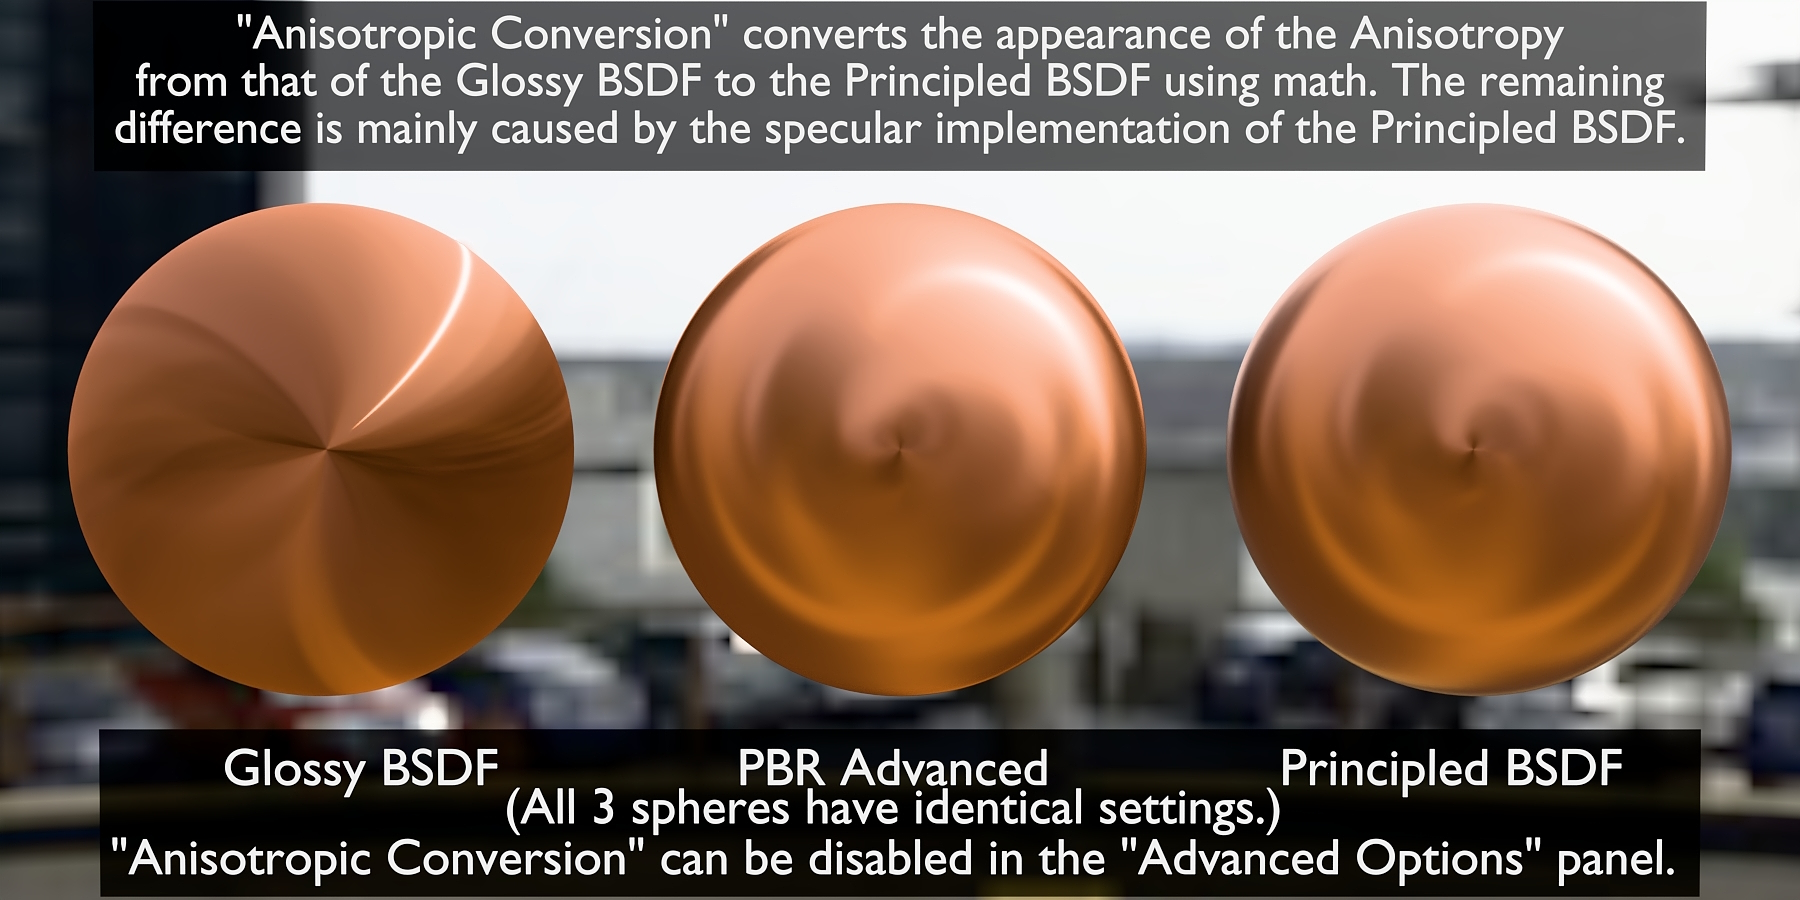
* * * Anisotropic Conversion is NOT a feature when using Blender 4.3 * * *
(This is only included in the blend file located in the "For Blender 4.2" folder.)
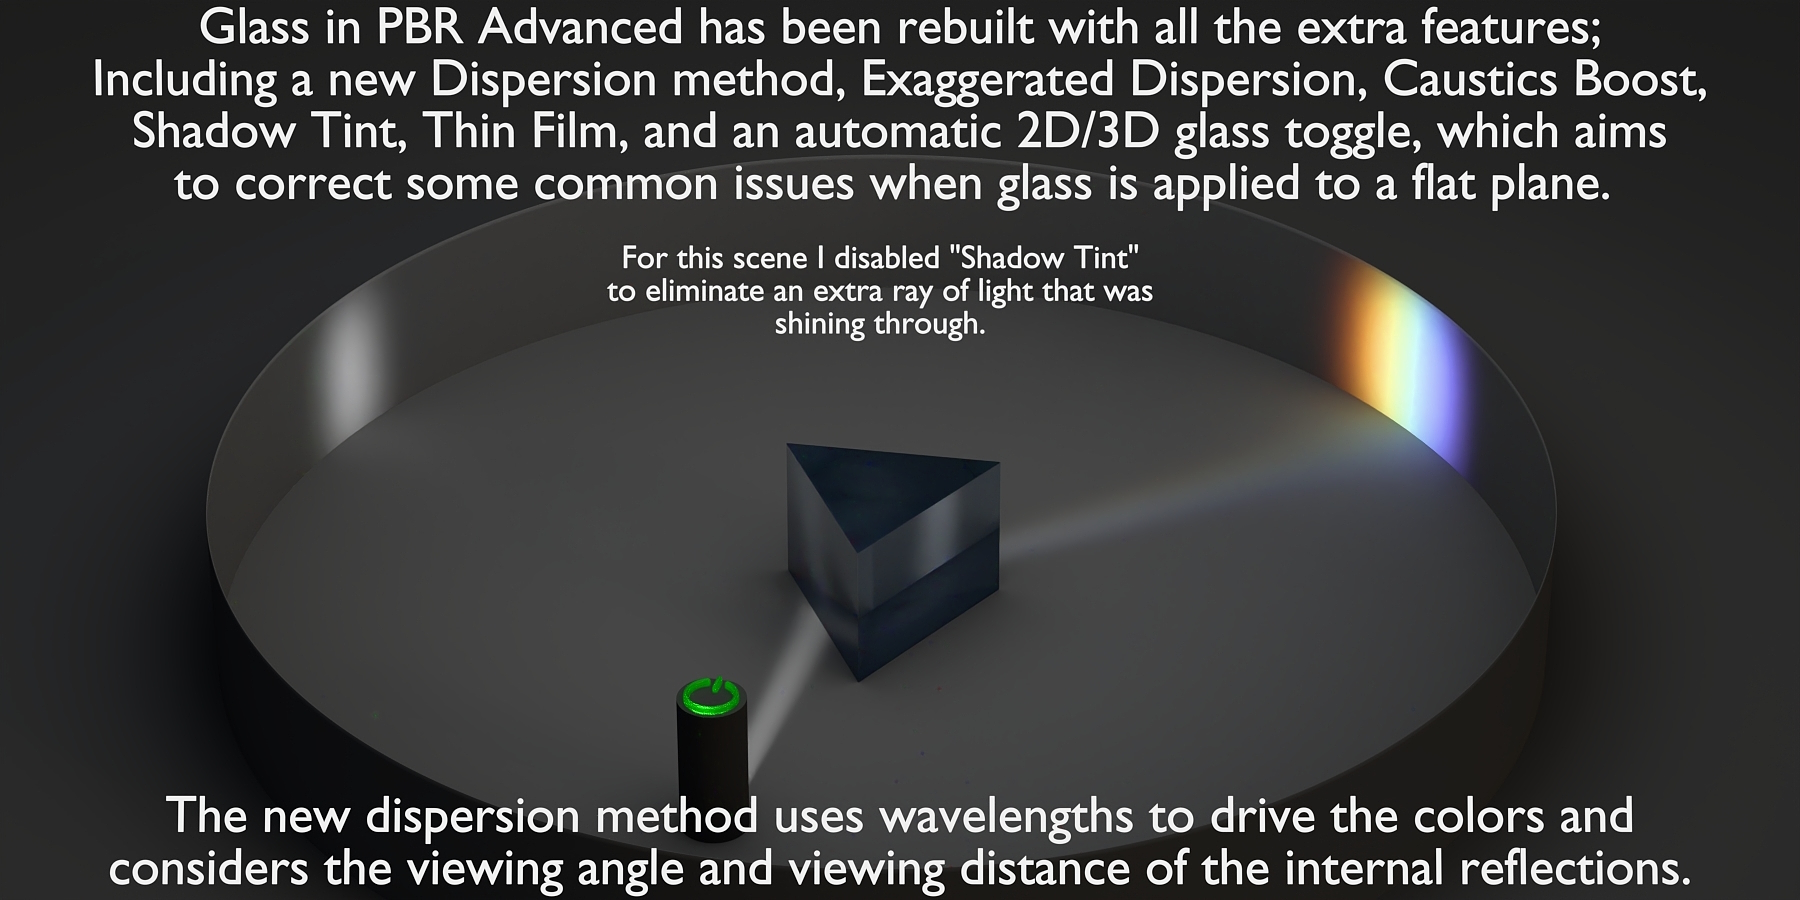
***2D Glass Mode***
In the "Advanced Options" panel, there is a "2D Glass Mode" which automatically uses a modified IOR for the blackfaces when they are viewed directly. This can be used when the glass material is applied to a 2D object such as a flat plane to correct the appearance of the refractions and reflections when viewed from the backfaces.


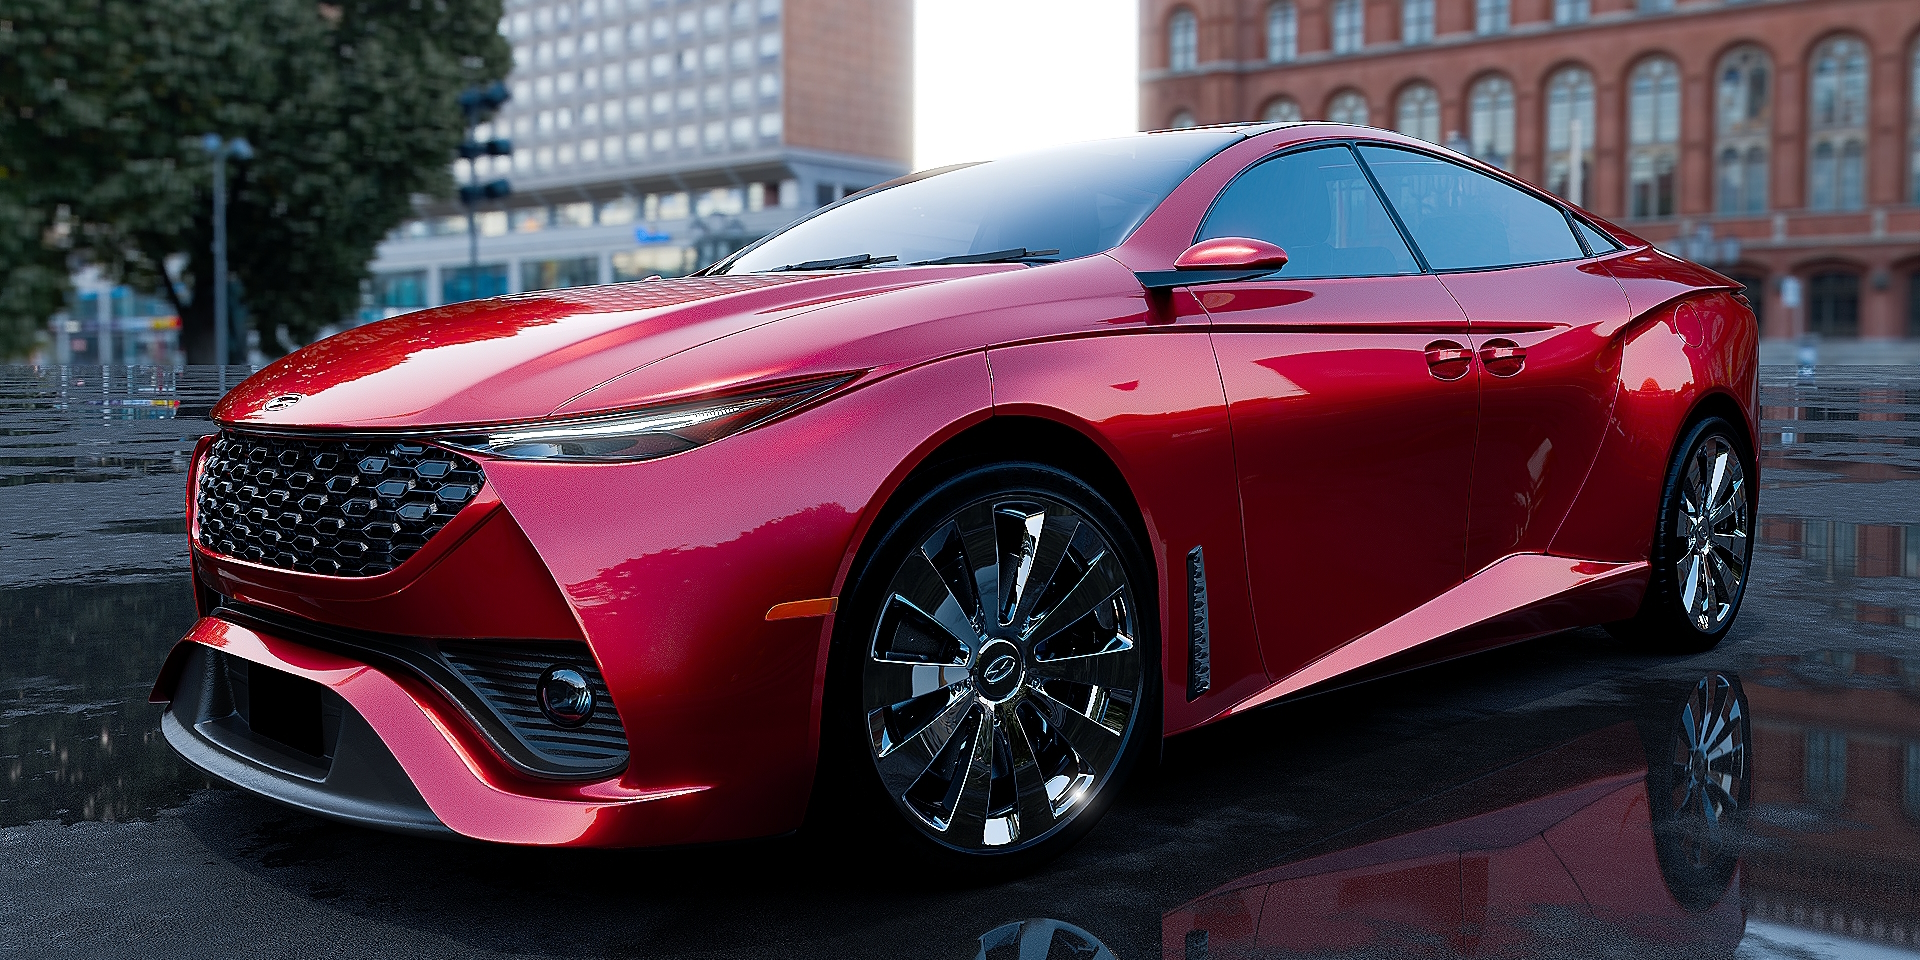
(For more car paint examples and features you can also view the product images that were made for PBR Advanced Car Paint by clicking HERE.)
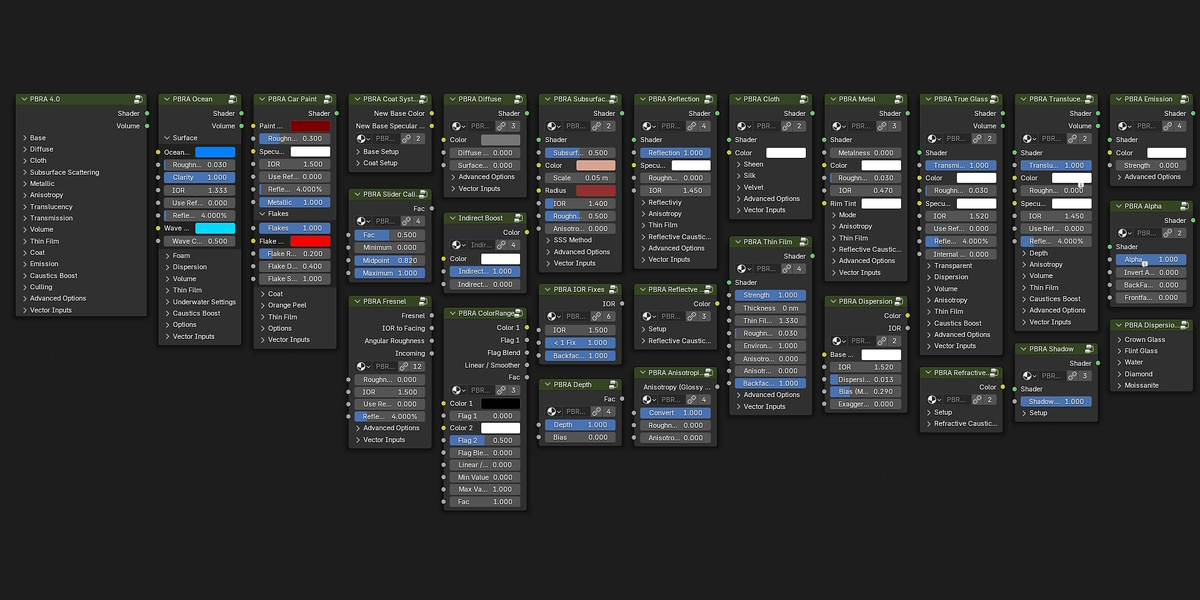
Modular Design
In addition to all of the built-in features of PBR Advanced, all of the following node groups that make up it's construction are included and can be used independently as desired.
(As of 1/35/2025, I have just added a PBRA Skin shader, and some of these will look slightly different as well, because of a few recent updates.)
Additional Included Products
PBR Advanced also includes my ColorRange product, as well as an enhanced version of my PBRA Car Paint product.
ColorRange - Click HERE for more information about this product.
PBR Advanced Car Paint - Click HERE for more information about this product.
Future New Product - I will soon be adding a collection of node groups that I am working on for use in the compositor. I will be releasing the collection as a new standalone product, but they will then also be included with PBR Advanced. They are NOT currently included, but when they are, I will be sending an email to notify all of my customers when they are ready for download. I do not know how long it will take me to finish developing it.
UPDATE for Blender 4.3
PBR Advanced is now updated to work with either Blender 4.2 or Blender 4.3.
When using with Blender 4.3, there are a couple of new features that were not previously available.
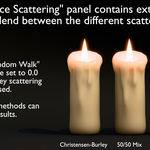
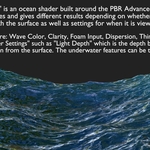
- The Volume panel now contains more options for the new volume scattering methods that come with Blender 4.3 and are labelled according to the specific use of each according to the Blender documentation and release notes. (Underwater, Clouds and Fog, Atmospheric, and Interstellar) for ease of use. If none of the corresponding sliders are used to enable any of those modes (by setting the desired mode to a value of 1), then the default scattering method (Henyey-Greenstein) is used.
- The Metallic panel now contains the option to use the new Physical Conductor mode of the new Metallic BSDF. This can be done by setting "Physical Metal" to 1 and using the new complex IOR and Coefficient inputs.
Installation
ASSET Installation Option A: (Recommended Method)
1.) Place the .blend file and "blender_assets.cats.txt" files into a folder of your choosing.
2.) Open Blender and in the top menu click on "Edit", "Preferences", and in the preferences window click on "File Paths" at the bottom.
3.) Under "Asset Libraries", Add the path to the folder where the files were placed.
4.) I highly recommend to make sure the "Import Method" is set to "Linked" for PBR Advanced, to help prevent duplicate node groups from piling up over the course of your scene creation.
Now that you've added PBR Advanced to your Asset Libraries, you will always have access to all of the node groups included with PBR Advanced. In the Shader Editor, you can now right click and see the PBR Advanced node group categories.
NODE GROUPS Installation Option B:
Instead of adding PBR Advanced to your asset libraries, you can simply append the desired node group(s) into your current blend file using the "File" "Append" method.
*** ADD-ON Installation: ***
(Filename: PBR Advanced.Zip)
In addition to the PBR Advanced node groups, it comes with a helper add-on for converting existing materials that are using the principled bsdf and/or glass bsdf so that they use PBR Advanced instead. This is a very powerful time saver, especially when scenes have many materials that you want to convert.
The Included PBR Advanced Add-On
PBR Advanced comes with it's own addon for quick conversion of pre-existing materials in one click. The addon is an additional tool for PBR Advanced that allows you to select as many objects as you want in the 3D viewport and with the press of a button, the addon converts all of the materials of all of the selected objects to the PBR Advanced Shader at once.
The conversion process involves finding all of the Principled BSDF and Glass BSDF shaders in each material and replacing them with a PBRA 4 shader while preserving all applicable input values and links. Optionally, this can also include any Principled BSDF and Glass BSDF shaders that are inside of any node groups being used in the materials as well.
This addon has saved me a lot of time with converting large numbers of materials in scenes that were originally not using PBRA, and I just had to share this with my customers to show my appreciation and to speed up your workflow when working with older projects or in any situation where this feature can help in any way. I have had to spend soo much time manually swapping out the original principled or glass shaders, copying and pasting input values, transferring the linked inputs, etc., in order to apply my PBR Advanced shader to countless objects. Creating this Add-On was a life saver.
This is my first addon using python, and I will be continuing to test and experiment with it and possibly add more features in the future.
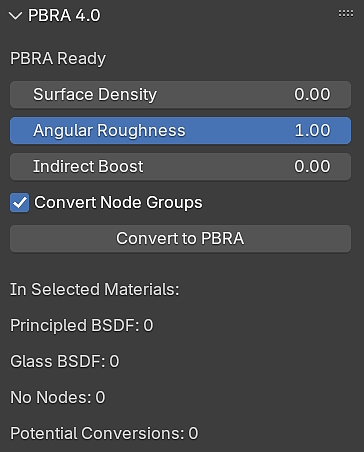
After installing/enabling the addon, you will find a new tab called "PBR Advanced" in the side menu (press "N" to see the side menu) in the 3D view port.
NOTE: You must have the PBRA 4 node group in the current blend file to use the addon. It will detect whether or not it is present and display either "PBRA not found" or "PBRA Ready" status.
All you have to do is select which objects you want to convert or just press "A" to select everything in the viewport and press the "Convert to PBRA" button. And your done in an instant.
NOTE: There are a few settings that can be made BEFORE conversion, if desired. These are "Surface Density", Angular Roughness", and "Indirect Boost". When the conversion is performed, these values will be used. Normally you can just leave them alone, but they are there just in case you already know what you want them to be in specific situations.
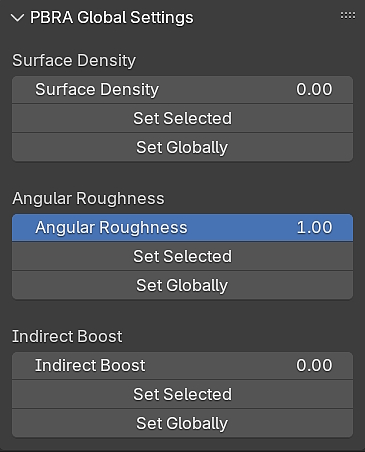
You can also make changes to these specific settings AFTER the conversion is performed, if desired, for either the selected objects or globally in the PBRA Global Settings section.
I've worked very hard on this product and continue to look for ways to improve it however I can to produce gorgeous results with less time and effort while giving more flexibility when it comes to Physically Based Rendering and 3D art in general.
(At some point, I will make a video demonstration of both this product, it's features and it's custom addon, whenever time permits.)
New Feature of the PBR Advanced addon:
There is now a new tab in the UI of the PBR Advanced addon in the side panel.
This new tab is called "PBRA Updater". The "Update PBRA" button now let's you convert any of your older projects from using the previous PBRA 3.0 to the latest PBRA 4.0 for your convenience.
***Note: This does not check for updates to new files on the Blender Market nor does it actually update the product itself. It is simply a way to quickly update your existing projects.***
To use the update feature, first simply place the latest "PBR Advanced 4 Package" node group into one of your materials so that it is in the blend file. Then just click the button in the side panel tab. That's it!
Afterwards you should see that all of the PBRA 3.0 and PBRA Car Paint node groups are now using the 4.0 version.
(It does not update from versions prior to 3.0.)
Now comes with "Vertigo"!
The Quick and Easy Solution for the "dolly zoom" effect.
Vertigo is a one click solution to creating the "dolly zoom" camera effect.
Vertigo installs just like any other extension in Blender.
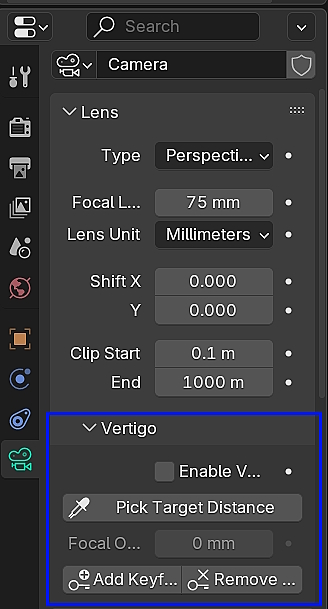
To use vertigo, select a camera and look it the camera properties.
In the Lens settings is where you will find it's sub panel.
1. First adjust your lens's focal length and position your camera. (Focal length must be decided before enabling vertigo.)
2. Click on the "Pick Target Distance" button and use the mouse cursor to click a point in the 3d viewport. (It will automatically find the distance from that point to the camera.
3. Simply check the "Enable Vertigo" checkbox and move the camera forward or backward (along the camera's local Z axis) and vertigo will automatically calculate the focal Length adjustments to created the effect.
This can be used to keep the subject in frame and the same size as you move the camera to get the field of view that you like, or the effect can be used in animations.
There is also a "Focal Offset" which allows you to make fine adjustments before, after, or during an animation sequence.
For animating, there are additional buttons to assist you.
1. Pick a frame in the timeline where you want the effect to start.
2. After positioning your camera and setting your initial focal length, Press the "Add Keyframe" button.
(This will add keyframes to the camera's location, rotation, the current focal length, and the focal offset.)
3. Pick the frame in the timeline where you want the effect to end and move the camera to another position.
4. Press the "Add Keyframe" button again.
And that's it.
There are also buttons to move forward and backward through the frames in the timeline specifically where the vertigo keyframes are and a "Remove Keyframes" button to remove the keyframes at that point for the camera location, rotation, focal length, and focal offset.
***Additional Notes***
Each camera can use vertigo independently with different settings.
Be Sure to uncheck the "Enable Vertigo" button before animating your camera BEFORE and AFTER the effect, or else it will continue with the automatic calculations.
A new Target Distance can be picked while Vertigo is still enabled. This can be useful for finding the most preferred subject or area of the subject or it can also be reused at keyframes to switch subjects or areas during an animated sequence.
Here is a quick example animation made using Vertigo that demonstrates changing the target distance at various keyframes:
I am continuing to attempt to improve not only the product itself, but the user experience as well, using the PBR Advanced addon to do more than before as well as the new "Vertigo" addon. I am a novice with coding python and I am a one man crew, but I try to spend time whenever time is available working on my products. I truly hope that all of you are enjoying and benefitting from PBR Advanced and I sincerely thank you for the support and your kindness. Please spread the word to other users that may be interested in trying out my products. The more people that use PBR Advanced, the more positive feedback I get that helps me consider new ways to improve it for everyone. I wish the best to you all!
I have recently reduced the price of PBR Advanced. I do not have a team helping me with the development of my products or with any marketing. I do all of this alone and currently with limited time available to do so, and with only a low-end machine at the moment, but it is a passion of mine to keep moving forward and make as many improvements as possible along the way. It has improved in leaps and bounds since version 1.0.
Rating my product as well as any feedback is greatly appreciated.
And thank you as a 3D artist, whether you are a beginner or a pro, for being part of the Blender community, which in my opinion has some of the most creative and awesome people around.
- 3D BlueHat -