External Python Button-Bar Addon For Windows
External Blender Button-Bar PRO (EBB Pro) and Dektops-Manager AddOn for Windows.
Manual*
WARNING:
This Software-Product will only work with MS-Windows. It will NOT work on LINUX, MAC etc. [Windows-Only] does NOT work with other OS!
*There is a illustrated Version of this Maunal as PDF included in the Distribution,
#####################################################
The External Blender Button-Bar (EBB) is a Sort of "Macro-Button Bar". The idea behind is, that you can get „anything you need with just a button-press“.
Instead of clicking through the Blender UI, or using hundreds of Keyboard-Shortcuts. You can define these Buttons with whatever features you you need for your productions.
IMPORTANT:
Please see the further Installation-Instructions on Page 3.
Blenderbar MAY NOT WORK otherwise.
Is your Blender-Interface crowded from so many Plug-Ins and AddOns?
Get an external Button-Bar that will start all your favorite Python-Scripts for Blender. It comes with over 50 built-in Functions like "Select Similar Size".
Generally the External AddOn is independent from the Blender Version. Just the changes in the Python-Library that is provided with the Button-Bar makes it a bit Blender Version dependent.
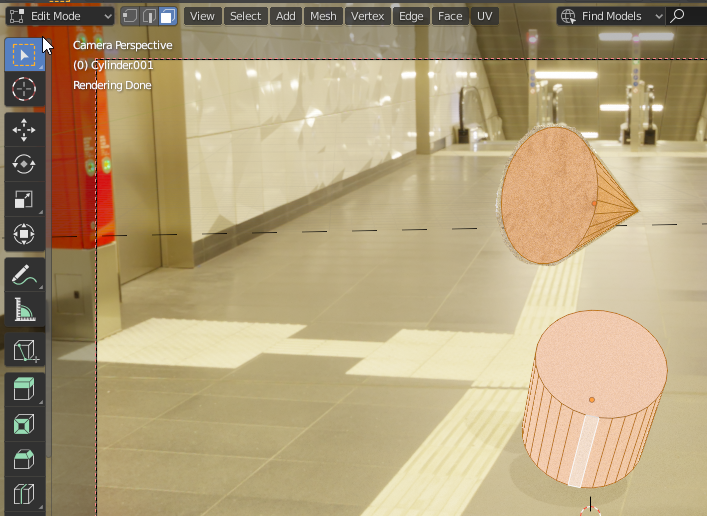
Get up to 360 Buttons at the right Side of Blender in up to 9 "Button-Layers". You can put on each Button your own Python-Code, even separate Code for the Left and the right Mouse-Button.

Please note that the Buttonbar was improved since the Video was recorded. Many buttons have now two functions (left- and right-Click), which can not be seen in the Video.
You can easily redefine Buttons with your own Python Code, or add new Buttons. Of course you can also delete Buttons if you do not need them.
And you can switch Buttons (move them around) and group them together in the way like you want.
To make this easier, there is a File „Switchbutton.exe“ included in the Archive.
INSTALLATION:
It‘s only 3 Steps until you can use the Blenderbar.
1. UNPACK the ZIP.File
Just unpack the ZIP-File and copy the Folder with the Files wherever you like.
From there you can start Blenderbar.
Technically behind the Buttons are Blender-Python Scripts which get executed when you press the Button.

2. Make sure the PYTHON-CONSOLE is in Place!
2. Make sure that there is a Python-Console WIndow in the lower right corner of Blender. I recommend taht you make this your „Startup-Configuration“.
A „Python-Console-Window“ MUST BE in the lower right corner of Blender.

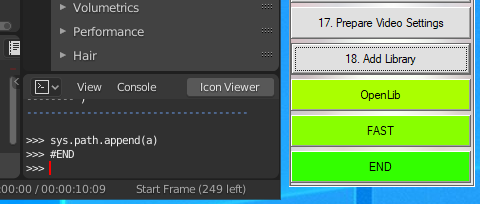
3. Run Blenderbar and Press the „“Add Library“-Button.
For Blenderbar to work, it must register its Python-Library with Blender.
This is done with a Single Click on „Add Library“.
Therefore this Button is always the first Button you click.
If you forget to do this, you will get error-messages in the Python Console-Window for every Button you click.
Then just press „Add Library“ - its never too late. And if you are not sure if have already clicked it?
Don‘t worry. Its never too much: you can click „Add Library“ as often as you like.
#######################################################
Picture 4: Here you can see another Button, that makes use of the right Mousebutton as well. Therefore it has two functions.
Technical Details:
The The Blenderbar PRO-Version can have up to 40 Buttons times up to 9 Layers times 2 for Left and right Mouse-Button.
So you have much Space for all your Python Scripts. And then just call them with a Button-Click.
Note that the Calculation includes the reserved green System-Buttons. These green Buttons do not have a number and can therefore not be changed by the User.
The difference to most other AddOns is, that this is a separately running "Standalone" Program that will "hang on" to the Blender Window on the right side.
So it will not use any Space inside of Blender and just hang outside of it. The advantage is that most functions can just be called with a single click on a Button.
Sometimes a Popup appears that will ask you to enter a number that is then used in the Script.

I did the Blenderbar AddOn originally when i made a lot of Rigid-Body stuff. It was annoying for me, that I had always to go to the right side choose Rigid-Body "click here and there" to change something or to BAKE. It should had been done with just 1 Click!
So thats the short-story behind the Blenderbar and that is why I made it primarily for myself.
You may also have some tasks that are special?
What are your task that you can automate and put on a button?
When you are inside a Blender Project, you will find them. Ist everything where you think „Oh again I have to press this and that and this … „. These are you Candidates for your buttons.
You also have functions that you need often and would like to have them on a own Button?
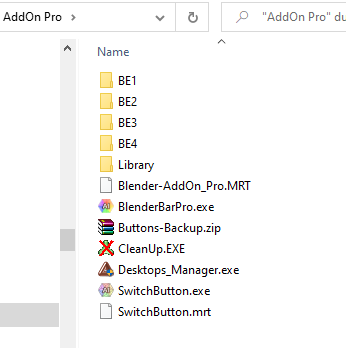
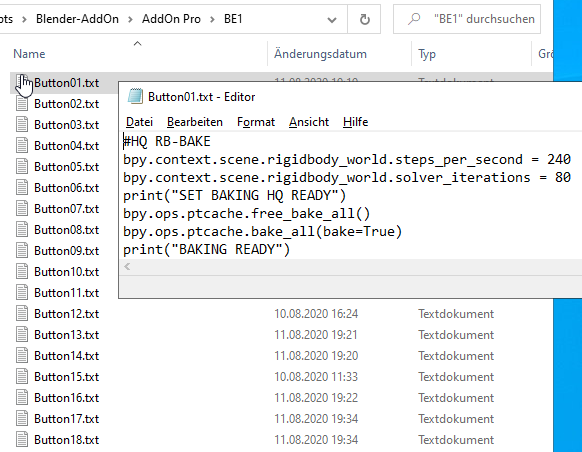
The Python Code that is on the Buttons can be changed, which is as easy as editing a Text-File. All the Button-Functions are inside normal Text Files, with the Number of the Button.
The „Library“
Included is a Library Folder with a "Library.py" file which contains the Code behind the Buttons and a lot of Code-Samples about doing a lot of things with (selected) Objects in Blender. You can also put your own Library Routines into this file and then easily call them from the AddOn and from Blender.
The AddOn-library must be registered into Blender one time when Blender starts. Blender will remember the Library as long as its open.
This "Library-Register" is done with just a Single-Click on the "Add Library"-Button.
You need to do this always as the first Click to "get Blender and the AddON a Team".
General Description of the current Button-Layers
So if you also have favorite Blender-Actions which you would like to have an o Single Button Click.
And you have the Python code for these. Then you can put these tasks (as Python Scripts) on a button and call them with just one Click.
If these are multiple sequencial tasks (for example "Save and Bake"), its even more interesting. Then you click one time, and things happen like they should.
Using the Layers of the PRO-Version, you can sort several types of tasks in several "Button Layers". Below is a complete Functions-List for all (currently 4) Button-Layers.
1. Currently we have Rigid-Body mostly on Layer 1,
2. Object-Generation mostly on Layer 2
3. Move and Rotate Objects mostly on Layer 3
4. Manta-Flow, Sample-Scenes and "Plank-Towers" on Layer 4
Below you will also find a Description of the additional Programs/Tools that are in the Package.
HINT: To switch between the (currently 4) Button-Layers, you can press the Yellow Button on Top of the Buttonbar. If you press it with the left Mouse-Button, it will go one Layer forward e.g. from Layer 1 to Layer 2. If you press the right Mousebutton instead, it will go one Layer backwards. e.g. from layer 1 to Layer 4 or from Layer 2 to Layer 1. This way you can quickly switch to the Layer where you want to go. If you make a Double Click onto the Button, it will quickly switch +3 Layers. This will be interesting if you have more then 4 Button Layers.
Clicking Left or Right?
The Buttonbar has now been enhanced to also detect Right Clicks. This made it possible, to put 2 Functions on each button.
One for the Left Click, one if you Click with the Right Mouse-Button.
This is useful for Example when you rotate Objects with a Button.
So clicking Left can rotate by "90 Degree", and a "RightClick" in the opposite direction.
Buttons that have got 2 Functions and can therefore be right-clicked are painted in a bit more light color, compared to the "normal Buttons" that can only be clicked with the Left Mouse-Button.
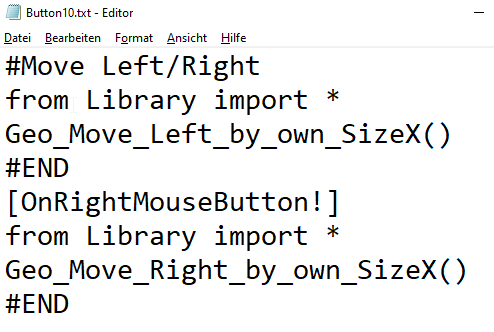
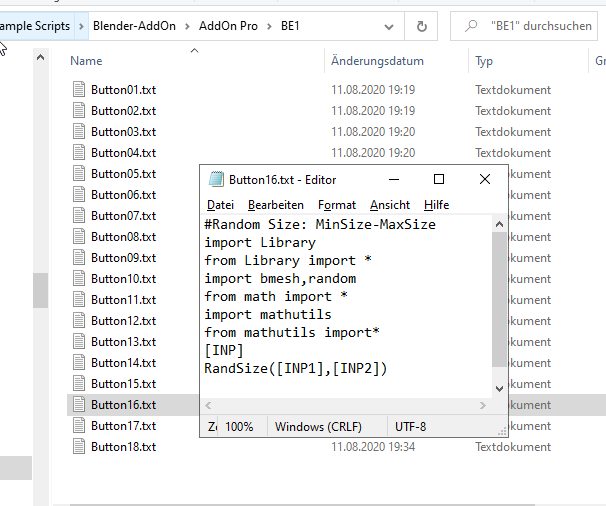
If you open a Button-Textfile, it will look like this (Example):

As you can see, the file contains both Parts. The Part for the Left-Click as well as the Part for the Right-Click. In the Textfile they are separated with the "[OnRightMouseButton!]"-Directive.
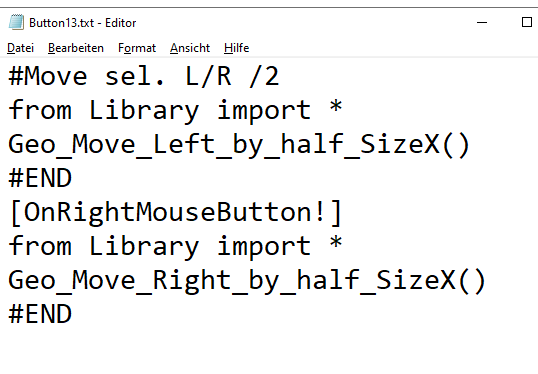
If you do not understand what a Button is doing, you can simply open his "Textfile" and read inside what is going on.
Here is a commented Example.
This way ist easy for you to customize any Button the way you like it.
You press a Button, the EBB will write a Python Script (that you can define) into the Python Console at that place. Making Blender do whatever you have placed onto that Button.
This way you can add your own Python-Scripts on a Button for use in Blender. Without crowding Blender's AddOn Area more.
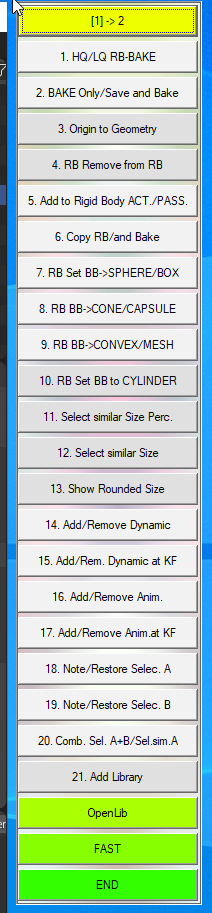
Functions-List Layer 1/4:
1.-2. "Bake", "Bake-Hi Quality" and "Bake-Low Quality" and "Save and Bake".
These 2 Buttons are meant to speed up working with Rigid Body.
No matter where in Blender you are or what is selected.
Just press the Button and it will BAKE with the preferred settings.
As you can see the Buttons have each two functions, depending if you click left or right Mouseclick on them.
3.-4. "Origin to Geometry" and "Remove from Rigid-Body". These two Buttons are also Shortcuts for Blender Functions that are often used while doing Rigid-Body stuff.
5. "Add to Rigid Body (ACTIVE)" and "Add to Rigid Body (PASSIVE)". This will add all selected Objects to the "Rigid-Body Simulation System". Use "ACTIVE" (left Mouse Button) for all Objects that shall move. And use "PASSIVE" (right Mouse Button) for "floor-like" Objects that should not move, but still be able to react to other (falling or moving) Objects.
6. "Copy Rigid Body Settings" and "Copy Rigid Body Settings and Bake".
This Buttons just speeds up Rigid-Body stuff. You can of course click them in Blender, but then you need to click several times to get there. Here its just one Click as it should be.
7.-10. "Set Rigid-Body Bouncing Box" to: SPHERE, BOX, MESH, CONVEX, CONE, CAPSULE or CYLINDER (one click for all selected Objects). With these Buttons you can set all selected Objects to another Bounding box. Doing so in Blender would require several steps (Do it with one Object, select the other Objects, go to "Copy RB Settings") , here its just one Button Click for all selected Objects.
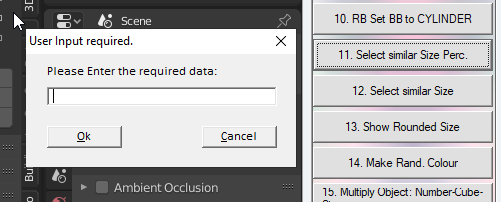
11. "Select similar Size Percentage" This will select all Objects that have a similar size then the one that is right now selected PLUS/MINUS a Tolerance that you have to enter in the Input-Box in Percent. It is a more tolerant version of Button 12.

Here you can see the Textfile that is behind the Button.
For doing so, Blender will calculate the size of the Bounding Box of the Object and compare it with all the other Objects. Now if the selected Object calculates to a size of "1" and you enter "10" into the Input-Box. Then all Objects with sizes between 0.9 and 1.1 will be selected. (See old Video below at: 12:25)
12. "Select similar Size" - this is one of my favorite functions. It will just select all Objects that have a similar size then the one that is right now selected. For doing so it will calculate the size of the Bounding Box of the Object and compare it with all the other Objects.
13. "Show Rounded Size". This is for you to better understand the size of Objects with Buttons 11. and 12. It will write the calculated size of the selected Objects into the Python-Console Window.
14. „Add/Remove Rigid-Body Dynamics“ for all selected Objects. Its just that you can set this small Checkmark in one strike for all selected Objects.
15. „Add/Remove Rigid-Body Dynamics at Keyfile“ for all selected Objects. This will set the Checkmark and then add a Keyfile at the Frame/Position where the Animation-Slider right now is.
16. „Add/Remove Rigid-Body Animated“ for all selected Objects. Its just that you can set this small Checkmark in one strike for all selected Objects.
17. „Add/Remove Rigid-Body Animated at Keyfile“ for all selected Objects. This will set the Checkmark and then add a Keyfile at the Frame/Position where the Animation-Slider right now is.
18. „Note/Restore Selection A“. Clicking left Button here, will SAVE the current Object-Selection. If you then Click RIGHT Mousebutton here, your Selection is restored.
19. „Note/Restore Selection B“. Clicking left Button here, will SAVE the current Object-Selection. If you then Click RIGHT Mousebutton here, your Selection is restored.
20. „Combine Selection A+B“ (Left Mouse Click) combines the stored Selection of Butons 18. and 19. into one Selection and select all these Objects.
20. „Select similar to Selection A“ (Right Mouse Click). There needs to be a stored Selection with Button 18. Now the first Object of this selection is taken, and a „Select similar Items“ is done with this. This is especially useful, if you want to do later a „Layer 2 / Button 11: Make Point at“. Then all the found Objects will rotate themselves direction of the Object that was selected and stored with Button 18 (A).
21. „Add Library“. This is possibly the most important Button. It will make the connection between the Blenderbar and Blender. So this Button must be pressed One-time before you can use the Blender-Bar. If you forget it, don‘t worry—ist never to late. You can also press it multiple times, this is completely Ok (but not needed). Once pressed Blender will keep the Library-Path until ist closed.
22. "OpenLib" - will open the Library-Folder in the Windows Explorer. Note that this is a green-System Button that can not be changed. It will however change it functionality in the other Layers.
23. These Buttons are available in Layers 2+3 instead of „OpenLib“."Save Blender-Size","Restore Blender" will save and restore the Position and size of the Blender-Main Window. These Buttons are in Layers 2 and 3 and replace the "OpenLib"-Button from Layer 1. There may be a new function in Layer 4 in further Updates.
24. "FAST"/"SLOW"/"END" are three green System-Buttons that are available on all Layers and can not be changed from the User. "FAST" will change the writing speed of the Blenderbar from "faster then you can see" to "Normal human typing". (See Video 2:44)
25. "END" will end the Blenderbar AddOn. If you close Blender, the Buttonbar will close itself automatically.
You can have multiple Instances of Blender with multiple Buttonbars running at the same time. If you minimize Blender the Buttonbar will minimize itself together with Blender.
 Functions-List Layer 2/4:
Layer 2 has mostly Functions to multiply Objects along the X,Y and Z-Axis. All these objects are "linked Duplicates". Exception is Button 10, using the Array-Modifier and Button 10 you will get "real copied Objects". You can use Button 3 to influence what you get (no warranty—new feature).
1. "New Scene" - A Click on this Button will delete all Items in your Scene and create a new Scene as a starting point. Of course you can modify the details.
IMPORTANT: Due to the concept of this "Just one Click"-AddOn there is NO Safety and no Undo available for this Button. Click it and whatever was there in your Scene, is gone forever.
2. "Delete all" Objects, leave all Collections. This will delete all Objects but leave all Collections untouched. So you can restart whichever Project you just did.
IMPORTANT: Due to the concept of this "Just one Click"-AddOn there is NO Safety and no Undo available for this Button. Click it and whatever was there in your Scene, is gone.
3.“Set Linked 1/0“. Press the Left Mousebutton to switch to „Real Objects“. Press the right Mouse Button, to get „Linked Duplicate Objects“. See the blue Text that appears in the Python-Console Window.
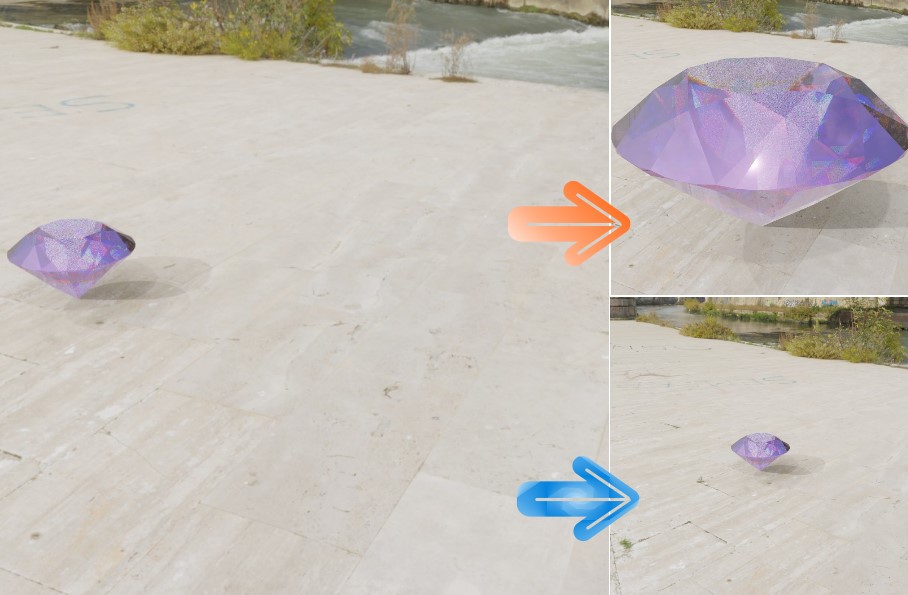
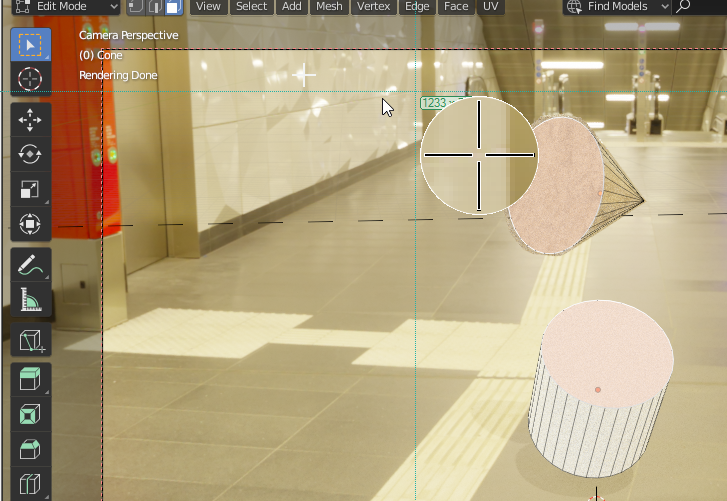
4. "Active Camera Point at Selected Object". Press this Button to make the active Camera look at the selected Object. This is not identical with the Blender Function "Align Active Camera to selected" (orange Arrow in the picture below) as it will not change the Zoom of the Camera and instead just turn the Camera into the right direction (blue Arrow in the picture below).
 5.-6. "MakeLine X/Y/Z". This functions duplicates the selected Object(s) and line them up in the selected direction (X/Y/ or Z). "Linked Duplicates" are used. This way the Objects can be faster animated using the Rigid-Body-System. It will work with 1 selected Object or with multiple selected Objects, in such case the number of generated Objects will exponentially rise.
8.-9. "MakeQuad XY/YZ". This is the Combination of two times "MakeLine" while all Objects stay selected. It will produce a field of Objects. As most functions in Layer 2 this will produce "Linked Duplicates" of the original Object. This saves Memory and speeds up the Rigid-Body Simulations.
10. "Apply Modifiers". This is a special backend for the Array Modifier. Use the Array Modifier first, then click this Button. You will get perfectly separated Objects, also the Centerpoint will already be centered in the Geometry for each new Object.
Unlike the other Functions, here you do get real Objects not "Linked Duplicates".(See Video 13:56)
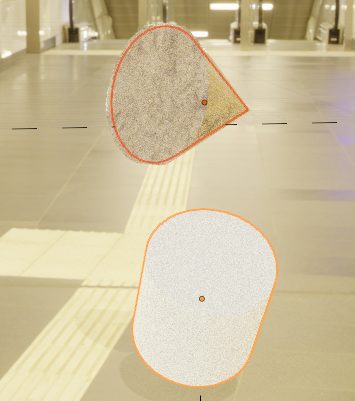
11. "Make Point at". This will make the selected Objects all point at the first selected Object. It can handle multiple Objects in one run.
Using this Button can make nice looking Object patterns that look like magnetic field-lines, see Picture.
Here you see two "Round-Towers" that were made with the functions on Layer 4. An then the "Make Paint at/A" was used on them.


12. "PlaceInCube". This function will distribute all the selected Objects randomly in a (assumed) Cube of a chosen size. See picture left.
13. "Bake to Frame Auto". This will Bake a Rigid-Body Simulation into Animation Frames. For all selected Objects(!). Just click the Button - you get it.
14. "Make Cube (Size,Height). This will duplicate "linked" the selected Objects in 3 Dimensions so that you get a resulting Cube with Size*Height duplicated Objects. Using the Buttons in Layer 1 you can immediately add them to Rigid-Body (if the original Object was not), BAKE it with another Click and voila, your Animation is ready.
15. "Rotate Objects (Speed, Last Keyframe"). This Function will create the Keyframes for an animation. It will rotate all selected Objects around themselves with a random speed (below given Speed) in a way that they return to the original position at the last Keyframe. This way you can make Looping animations with no end.
16. "Move (Speed, last Keyframe)". This Function will create the Keyframes for an animation. It will move all selected Objects around on a random path, in a way that they return to the original position at the last Keyframe. This way you can make Looping animations with no end.
17. „Random Size“. You get an Input Box to enter 2 numbers. First is the minimum Size, second ist the maximum size. If you enter „0.5,1“ then the Objects will be scaled to a random value between these two number.
18. „Multiply Objects, number, Cube-Size“ . You get an Input Box to enter 2 numbers. First is the number of objects. The second ist the Size, second ist the Size of the Cube in which the Objects will be distributes randomly. This will multiply the objects in a quadratic way. So if you enter 5 you may get 25 Objects in result.
19. "Make Random Color" - this will give each selected Object another random Color. If that does not work, please check:
Is it a „Real Object Copy“ or a „Linked Duplicate“?
Only real Objects can have an own color. "Duplicate Linked" Objects share the same geometrical and Texturing Data, so they will most often (unless using special location dependent shaders?) all have the same color.
However due to the sharing of the Object data, „linked Duplicates can more effectively used in „Rigid-Body“ especially Plank-Tower-Simulations.
If you change the color of one linked Duplicate, ALL of them will immediately get the new color.
20. "Add Plane and Ball". Will do just that, add a Plane and a Ball.
This is the Textfile behind the Button:
 Functions-List Layer 3/4:
Buttons in Layer 3 are mostly around moving and Rotating Objects quickly. „Button 19“ is an exception threfore please read the description for Button 19 carefully.
1.-6.“Rotate X+/-“. These Buttons rotate the selected Objects round their local Axis by either 45 or 90 Degree.
The direction depends on wether you use the left or the right Mouseclick.
So these Buttons can be clicked with left or right Mousebutton.
7. „Random Rotate Selected“. Randomly rotate all selected Items to a angle between 0 and 360 degree.
8. “Move Objects to 0,0,0“. Move all selected Objects to 0,0,0.
9. „Set Rotation to 0,0,0“. Clicking this Button will reset the Rotation of all selected Objects.
10. –15.“Move Objects“ These Buttons will Move all selected Objects wether by its own full size (Button 10-12) or by its half size (Button 13.-15.). In any direction. Generally you can click with either the left or the right Mousebutton to get this or the opposite direction.

16.-18. “Move by X“: These Buttons will move the Object on their Axis for the amount that you enter in the Inputbox.
19. „EDIT: Align Faces“. This is an special Function, as it works (unlike other Buttons) not in Object-Mode, but only in EDIT MODE. So here is what you do. Step by Step.
Step 1.
Here are two Objects that you want to Align to each other. Make sure BOTH Objects are selected.
Step 2.
Get into EDIT MODE.
Step 3.
Make sure that nothing is selected.

Step 4.
You must be in EDIT-MODE in FACE-SELECT MODE.
Step 5.
Now select the two faces that shall be aligned to each other. Make sure ONLY these two faces are selected.
Step 6. Press Button 19.
Step 7. Switch back to OBJECT MODE.
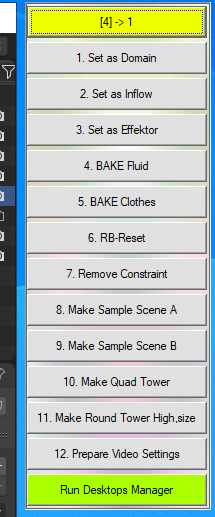
Functions-List Layer 4/4:
Buttons 1. to 4. are for Mantaflow-Simulations. There are some details you need to know. First, to BAKE with Button 4, the Domain Object must be selected. Else it will not BAKE.
Second, the BAKING will do very silent, there is no movement and no text-Output. Only the Mousepointer will rotate and show „Busy“. And third, Mantaflow-Baking can produce Gigabytes of temporary data. So i recommend taht you care to delete these „Caches“ after the Simulation is done.
Generally you can do this very easy in few steps:
->. Make a CUBE and press Button 1.
1. „Set as Domain“. This will declare the selected Object as Domain. The Domain is the surrounding spave in which the simulation takes place. To my current knowledge there can be only 1 Domain at a time.
2. „Set as Inflow“. This will declare a small Object—for example a CUBE or CYLINDER as the „Water“ or „Smake“ INFLOW. Note that the size must be larger then the „Domain-Size divided by the resulution“. If no water comes, wether increase the INFLOW, or increase the resultion from 32 to 96 or more. The higher this number the more detailled is the simulation. But will also produce much more data and take much longer.
3. „Set as Effector“. An Effector is an Obstacle that will lead the water flow somewhere.
After you have defined these 3 Objects, with three Buttonclicks, you can just set the Domain-Material to „Water“ (or whatever you like to flow) and then press:
4. „BAKE Fluid“. To use this Button, the DOMAIN-OBJECT MUST BE SELECTED. Then this will bake your simulation. After that you can play it.
5. „BAKE Clothes“. I did not test this much, it should bake Cloth-Simulations.
6. „Reset Rigid-Body World“. This will destroy the current RB-World, and delete all Bakings from RB. It will then create a new, empty RB-World.
7. „Remove Constraints“. Untested Function.
8. „Make Sample Scene A“. This will generate a complete Rigid-Body Scenen, with a Chain and some Cubes. Ist just a starting Point for you. And it will take time to build!
9. „Make Sample Scene B“. This will generate a complete Rigid-Body Scenen, with a lot of Plank Tower. IMPORTANT: If you press this Button, this may RUN OVER NIGHT forseveral Hours. Its just a starting Point for you.
10. „Make Quad Tower“. This will ask you for one number that is the „Hight“ of the Tower.
This Tower on the Picture has a height of 20.
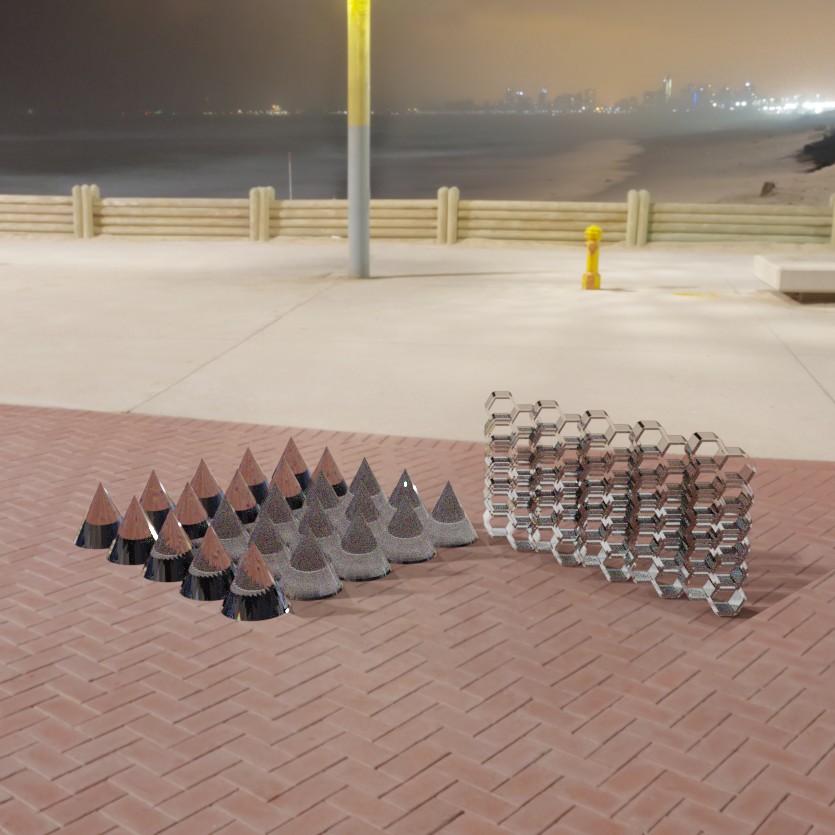
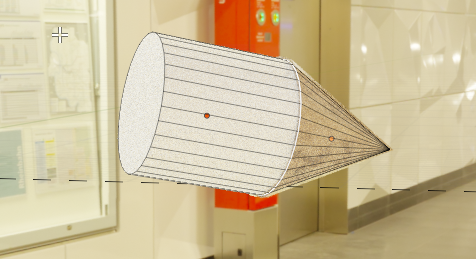
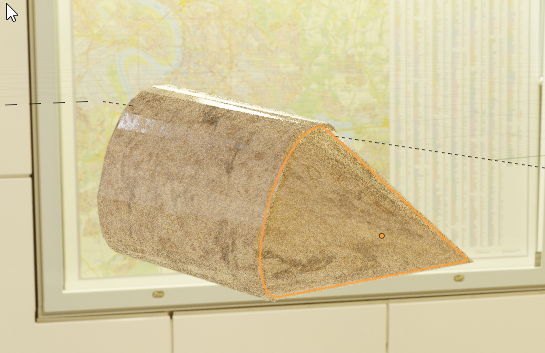
11. „Make Round Tower.“. This one takes 2 Parameters: Size and Height. Try 40x20 Tower for example.

Here are 2 Towers, one 40,20 (in the Middle), the other is the „20,40“ Tower.
12. "Prepare Video settings". If you choose to produce a video instead of a Single Picture, you will need to set multiple Parameters each time. Mostly its the same. Also if you need to render a Preview picture Blender will often reset the values to "PNG". So instead of doing this stuff over and over again, here is one Button that does it for you. Of course you can modify these Parameters to fit your needs in the Textfile "BE1\Button17.txt".
How to change or redefine Buttons?
In these Textfiles (picturte) the Buttons—their Text—and their functions are described.
You can redefine all Buttons that have a number on the left side by editing the Textfiles.
You can also add or delete Buttons by deleting or adding Textfiles.
You can also exchange Buttons just by renaming their Textfiles. To make this easier, there is a tool „Buttonswitcher“ included. If you start it, you will get a INPUTBOX.
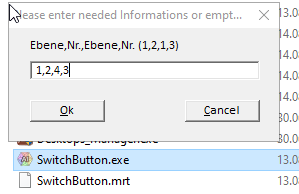
You can enter wether 4 Numbers like:
(Button-Layer A),(Button-Number A),(Button-Layer B),(Button-Number B)
Especially if you want switch Buttons that are not on the same Layer.
Or, if both Buttons are on the same Layer, enter:
(Button-Layer A),(Button-Number A),(Button-Number B)
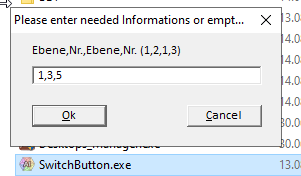
See pictures.
After pressing ENTER, the Buttons are exchanged, this will be visible once the Buttons get loaded new from the AddOn. Switching the Buttonlayer with the yellow button wiull make the changes visible.
Rules:
1. Make sure that all Buttonfiles succeed each otehr, so don‘t leave holes!
2. All Buttons in one Layer together should not exceed 40 Buttons.
3. You can have up to 9 Layers. If someone needs more write me. There is no real technical limitation from having 99 Layers :-).
SPECIAL FEATURES:
INPUTBOX-Feature.
In the Picture you can see a button that uses the „Input Box“ feature.
You can enter two comma-separate numbers and then press ENTER.
To use the Input-Box feature, use the [INP] directive.
The results will be filled in the Python-Code, where you place the
[INP1] …[INP9] directives.
Left and Right Mousebutton-Feature.
To use both Mousebuttons on a Button, use the [OnRightMouseButton!] Feature.
 The Random-Number Feature
If you use [?RND4?] in the Textfiles, this will be replaced with a 4 digit random number.
This way you can prevent already saved files from being overwritten for example when specifiyng filenames for SAVEing or File-Caches.
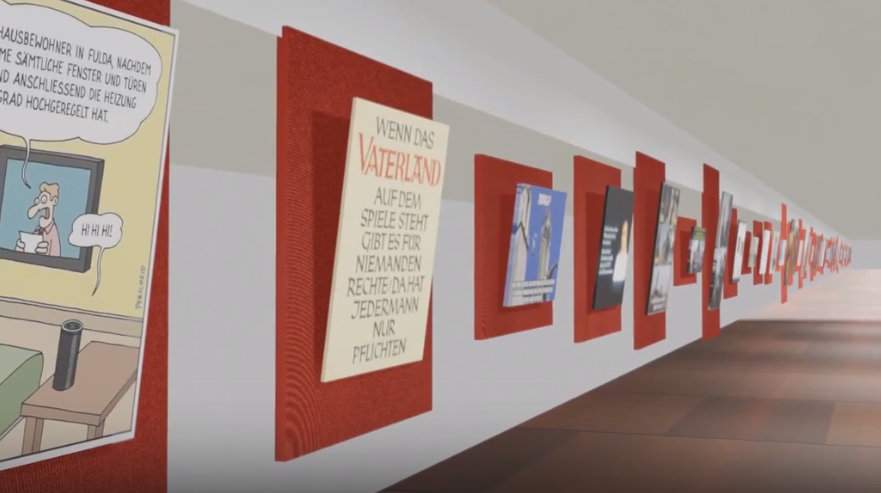
The Museum-Script in the Library.
The Museum-Script will generate a Museum-Galery like Animation in Blender (see picture).
The pictures will be generated from the pictures in the "Pics"-Folder.
The number of pictures can be changed in the Script (NumPics-Variable).
You have to:
1. Add the Library to the Blender Library Path using the Addon-Button "Add Library"
2. You have to provide the pictures with the proper Names in one folder (use picture-renamer?)
3. You have to change the script that it knows your picture folder (see below)
4. run this Script from within the Blender-Text-Editor.
########################################################
# Pictures must be named "PXC_1.jpg","PXC_2.jpg" etc.
########################################################
# Change these variables to your needs
#########################################
NumPics=23
PicPath="F:\\00_MR\\PB_MiniRobots-Editoren\\SPRE 02\\Source\\Sample Scripts\\Blender-AddOn\\AddOn Pro\\Library\\Museum\\Pictures\\"
print(PicPath)
You need to change this that it fits to your system where the Folder with the pictures for the museum is.
All pictures that shall be used must be in the Picture-Folder and must be named "PXC_(number).jpg"
For example: "PXC_1.jpg","PXC_2.jpg" etc.*
Once you start the Script the Script runs for a while.
At then end you get the ready Scene, you will just need to add some material to the Walls and the Floor.
##########################
*see here in the script:
# You have to correct this path to your system
# Pictures must be named "PXC_1.pg","PXC_2.pg" etc.
pat=PicPath+"PXC_"+str(picn)+".jpg"
Video 1 Blender-Bar: This is an more actual Video that shows the current version of the Blenderbar.
https://youtu.be/Z2O6r5L-xR0
See this Video about the first version of the Buttonbar. Note that the video is not perfectly "Up to date" because in the time between the recording and now there have been several Improvements.
Video 2 Blenderbar
https://youtu.be/A9Ogl0gWS2A
Yet the Video shows the concepts and most of the buttons are still where they are in the video.

Included is our "Desktop-Manager" that will enable you to run multiple Instances of Blender on multiple real Desktops. and of course with multiple Buttonbars.
Is one of my favourite tools. You can organize your work on several desktops, and just switch to see how far a rendering currently is. Or work on one desktop, render on another.
Please note that through technical limitation, the windows explorer does not support all features on „Private Desktops“. The Startmenu may not open there, and also VM-Ware and few other programms may not work as expected on „Private Desktops“. This is due to limitations of those programms. You will see, which programms work and which not.
Blender works perfect on „Private Desktops“.
© 2020 Theo Gottwald, www.smart-package.com
Using real Desktops in our Tests, Blender renders more stable if you have multiple Blender running on their own "Private Desktop".
Note that our Desktops are REAL Desktops, not the "virtual Desktops" that come with Windows 10. Real Desktops have their own Window structure. Therefore moving Windows between „Private Desktops“ is impossible. They are isolated from each other (which improves stability).
Delete only Desktops that are newly (accidentally?) created. If you delete „older“ Desktops, you may end up with a „Black hole“ Desktop. Without Explorer and anything.
If you accidentally get stuck on such an desktop, the only way out is starting the Task-Manager (ctrl-ALT-ESC) and then running the Desktops-Manager from there.
Take a bit of time to explore this tool, it may bring a new dimension into your Workflow.
Note that Screen-Recorders do NOT record „real Desktops“, and mostly only the Default Desktop. Unless they get started there explicitly.
Discover more products like this
bfcm24 bfcm23 spring24 code summer24 spring25 bpy custom buttons spring23 Select Similar Size bfcm25 summer25 Python Scripts summer23 Blender external Buttonbar Buttonbar