Annotate Plus - Additional Annotations Tools
Annotate Plus - User manual
Version 1.1
Introduction
Thank you for purchasing "Annotate Plus."
"Annotate Plus" is an add-on for Blender that enhances the standard annotate tools by adding figure and text drawing capabilities. With "Annotate Plus," you can draw rectangles, circles, text, and outline mesh elements.

How to install Annotate Plus
In the shop you can find two versions of Annotate Plus.
If you use Blender 4.2 or earlier, install version 1.0.2 of “Annotate plus” for Blender 4.3 or later, install the version 1.1 or later.
ATTENTION: if you have accidentally installed the wrong version of Annotate Plus, uninstall Annotate Plus before repeating the installation with the correct version.
“Annotate Plus” must be installed like any other Add-ons.
First, save the .zip file downloaded from the store in a folder of your choice.
Then open blender and open the preferences window. Go to the Add-ons section, open the drop down menu on the top right corner and press the “Install from Disk…” button.
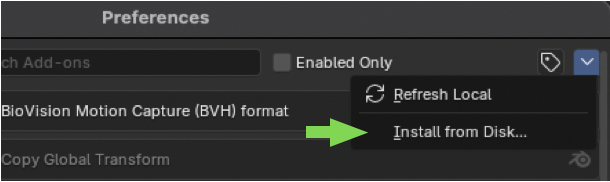
Browse the files on your computer, choose the downloaded Annotate Plus .zip file and press the “Install From Disk” button.
You're done
NB: The procedure described refers to Blender 4.3, for other versions of Blender it may differ slightly.
Overview
"Annotate Plus" enhances the standard annotation tools by adding several new features. These include tools for creating basic shapes (rectangles and circles), a tool for annotating text, and three tools for highlighting mesh elements (faces, edges, and vertices).
Once "Annotate Plus" is installed, you will find eight additional tools in the annotation tools section of the toolbar, after the standard tools.

All tools work similarly to the standard tools, allowing you to draw within the 3D view, on the "view surface," in the plane defined by the 3D cursor, or on the surface of an object.
These tools also works in the image editor, the UV editor, and all the node editors, including the compositor, the shader editor, and the geometry node editor.
As with the standard annotation tools, notes will be created on the active layer within the currently selected annotation data block, each with its own color, opacity, and stroke weight settings.
In the example below, the annotation data block is named "Annotations" and the layer is named "Note".

When annotation tools are used in the 3D editor, you can choose between three possible placements:
- View: The drawing is placed on the "screen" in a layer that remains superimposed on the 3D content.
- 3D Cursor: The drawing is positioned within the 3D scene on a plane determined by the current position of the 3D cursor.
- Surface: The drawing is positioned within the 3D scene on the surface of an object in the scene.
The type of placement can be selected from the "Placement" drop-down menu in the tool settings bar (at the top of the editor) or in the "Tool" tab inside the side panel (the N-Panel).

In all other editors (image, UV, node editor, etc.), you can choose between two placements for drawing:
- View: The drawing will be done "on the screen" and will remain in a fixed position even when the canvas content is zoomed or moved.
- Image: The drawing is made inside the canvas and moves coherently with it when a pan or zoom is performed.

Let's now review the different tools with a brief explanation of the options and parameters used.
Annotate Rectangle tool
Allows you to draw rectangles in the main area.

If the Draw from Center option is activated, the rectangle will be drawn based on its central point. Click the mouse at the point that should be the center of the rectangle and drag the mouse to set its size. If "Draw from Center" is not active, the rectangle will be drawn starting from a corner. Click on the point that will be one of the corners of the rectangle and drag the mouse to set its size.
When the rectangle is drawn within 3D space (over the surface of an object or on the 3D cursor plane), it is possible to adjust its orientation. To do this, after dragging and setting the dimensions of the rectangle, hold down the Ctrl key and move the mouse to change its orientation.
Annotate Circle tool
Allows you to draw circles in the main area.

The circle is drawn starting from the center. Click the mouse at the point that will be the center and drag the mouse to set the radius.
By adjusting the Subdivisions parameter, you can create other types of regular polygons. For instance, setting Subdivisions = 3 will create an equilateral triangle, 5 will create a pentagon, 6 a hexagon, and so forth.
Similar to the rectangle tool, you can change the orientation of the shape by holding down the Ctrl key and moving the mouse (applicable only when drawing in 3D space over a surface).
Annotate Text tool
Allows you to draw text in the main area.

Before drawing on the screen, first of all you must specify the text string in the "Text" box found inside the tool's settings panel. Use the \n sequence if necessary to separate lines of text.
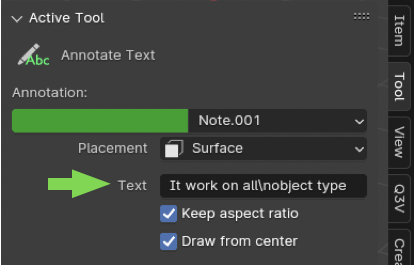
Drawing occurs as for all the other tools, i.e. by clicking on a point that defines one of the corners or click in the center of the box that will contain the text and dragging to specify the size, or (if the Draw from center option is active) by indicating the center and dragging to specify the size.
After setting the size of the text you can change its orientation by pressing the ctrl key and moving the mouse (only if you draw within 3D space)
Other parameters and options used by the tool are:
- Keep aspect ratio: maintains the original ratio between height and width of the text. If the option is deactivated, you can lengthen or shrink the text as you wish.
- Text Font: font used to draw text.
- Alignment: horizontal alignment of the text Obviously it only makes sense when the text is made up of multiple lines.
- Shear: is the italic angle of characters.
- Character Spacing: distance between characters.
- Word Spacing: distance between the words of the text.
- Line Spacing: distance between lines of text.
Annotate Face/Edge/Vertex tools
They allow you to highlight the elements of a mesh such as faces, edges and vertices.

Obviously they are only present in the 3D editor and only work with mesh type objects.
They work simply by clicking on the mesh element you want to highlight.
The “Annotate vertex” tool is the only one that has the Radius parameter to set the radius of the circles used to highlight the vertices of the mesh.
How disable or remove Annotate Plus
If you just want to deactivate “Annotate Plus” (without uninstalling), open the blender preferences window, go to the Add-ons section and search for “Annotate Plus” in the list. Once this is done, press the checkbox to the left of the name to deactivate “Annotate Plus”.
However, if you want to completely remove the plug-in you must press the “Remove” button (If you don't see it, press the triangle button to expand the entry).
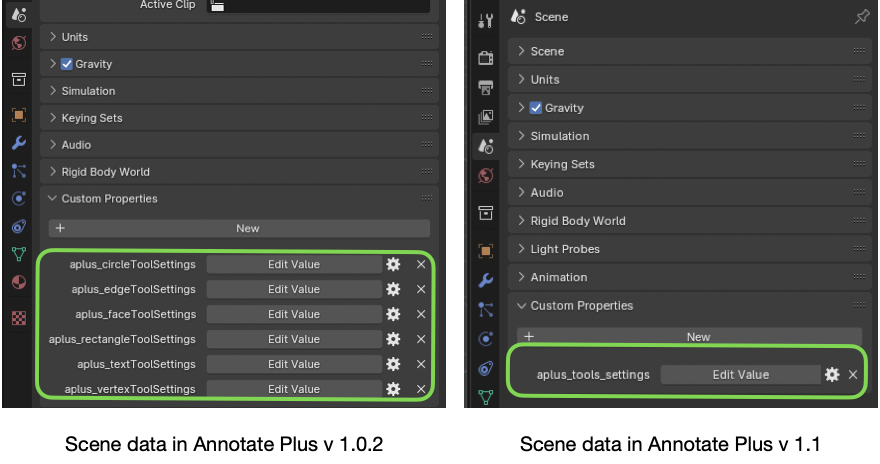
NOTE: "Annotate Plus" stores the data necessary for its operation in scene properties. This uses a very small amount of memory.
However, if you wish to completely clean the .blend file after installing "Annotate Plus," navigate to the Scene tab in the “Properties Editor”. Open the "Custom Properties" section and delete all entries with name that begin with "aplus_" by clicking the 'x' next to each item.
Limitation and known issues
The tools are not implemented in the “Movie clip editor”.
Discover more products like this
Custom Annotations Draw Annotations Annotation Tools Annotate Edge Vertex Highlighting Node Editor Annotations UV Editor Annotations Rectangles Drawing Tools Annotate Annotate Vertex Compositor Annotations 3D Annotations Geometry Nodes Annotations note Face Highlighting Shader Editor Annotations text Viewport Annotations Image Editor Annotations Mesh Annotation Object Annotations Surface Annotations circles Annotate Circle Annotate Rectangle stroke notes Annotations Annotation Overlay Edge Highlighting annotation Annotate Text Annotate Face