Animtoolbox
TEMP CONTROLS
World Space Ctrls
Bakes your selected bones/controls into a new temporary control rig with new controls which control the original selected controls in the original rig.

Display Type - Select the shape of the control, If you have custom shapes in your original rig then you can use their original shape, otherwise you can select a custom shape.
Display Size - The size of the control. When using Original, then value of 1 will be the same size of the original rig custom shape
Frame Range - The frame range of the animation you want to bake into the new controls, the default value will use all the selected controls keyframes range.
Bake Location - Choose if you want to create the controls at the Head(base) of the bone, or the tail of the bone. Adding temp controls to the bones Head Location will assign transform constraints to the original selections, and adding temp controls to the tails position will assign track constraints to the original selections.
Constraint bones to Ctrls - contstrain the original bone selection back to the Temporary controls, or not.
 Filter - Filter specific attributes that you want the temp ctrls to control.
Add Extra Child Ctrls - adds another controller as a child of the baked controls. This gives an extra layered control over the temp controls baked animation.
Add Root Ctrl - Adding an extra root bone for all the controls. It can be based on an object position or another bone. When using a bone the parent control will also bake the animation from the sampled bone.If no bone nor object is selected, then the parent will be added at the 3D cursor position.
TempIk
Bakes the selected bones or controls to a new temporary IK Chain with the animation applied to it. This usefull for doing a quick mocap cleanup. Locking specific limbs in space - for example an elbow leaning on a table. Or anything that requires IK but is not available at your current rig.
When using the operator it will give the best fitting options as a default option.

Add an IK Control - Adds an extra IK bone controller to the tip of the chain. When this option is turned off, it will use the last selected bone in the chain as the ik controller. The last selected bone will also get the rotation values from the ik controller. This option is turned on by default when selecting only one or two bones in a chain.
Add Pole Target - Adds an extra pole target bone controller for the knees or elbows. If this option is turned off then the base bone rotation will be used to adjust the knee/elbow vector. The pole target is still not completly precise. You can get better precision when baking to tempIK using the base bone, however better precision will be applied soon with the new bake.
Keep Seperated Hierarchies - Can create multiple IK chains from a selection. If the selected bones are part of different chains of hierarchies, it will create a new IK ctrls for each chain of bones separatly.
Add Extra Child Ctrls - adds another controller as a child of the baked controls. This gives an extra layered control over the temp controls baked animation.
Add Root Ctrl - Adding an extra root bone for all the controls. It can be based on an object position or another bone. When using a bone the parent control will also bake the animation from the sampled bone.If no bone nor object is selected, then the parent will be added at the 3D cursor position.
Temp FK
Create Temp FK chain with a new Hierarchy based on the selection order, from parent to child. It is recommended to choose the bones / original controls one by one to get the correct hierarchy. It is using similiar settings to World Space.

Link Temp Chains
Connects different Temp ctrls chain setups. Select any bone on a chain and press Link. The parent chain will be the chain with the active bone. This allows a basic modular rigging, while keeping the animation on the original rig intact. You can always smartbake and change to a new setup.
Using Link to Active Chain Tip or Base option will link the chains to the Begining (Top Parent) or tip (Last child) of the chain.
Using Link from Chain Tip or Base option will link the chains from the Begining (Top Parent) or tip (Last child) of the chain.

Parent Ctrl on Cursor is not available since version 0.0.1.7 - However It is possible to achieve the same result with world space ctrls when using a root control based on the cursor position, when adding root ctrl without selecting an object and a bone, then the root will be created in the cursor location.
Quick Bake
Bakes the current temp controls back into the original rig and removes the temprorary setup.
It is now using a new bake method designed for temp controls.

Smart Bake - Will keep the keyframe count on the original bones, and recalculate the curve handles to get the closest result to the values coming from the temp controls. If it is turned off or an fcurve channel has less then 3 keyframes, then it will bake on every frame within each bone's channel frame range.
Bake From: Use keyframes positions from original bone or/and from the temp ctrls keyframes
Clean: Choose if to clean constraints and remove the Temp ctrls after baking.
 Bake To - selections filter:
is used for baking, cleaning and changing visual properties
All Ctrl Rigs bake and remove either all the ctrl rigs that are available in the scene.
Selected Chains bake and remove only the chains that are connected to the current selection. It will remove the ctrl rig only after all chains are removed
Relative Ctrl Rigs in case of muliple ctrl rigs, it will bake and remove only the ctrl rigs that are related to the current selection.
Bake From - Can use either the frame count of the original bone, or the keyframes from the temp control, or both. By default it's using the original keyframes from the original bones.
Clean - Remove temp controls and the constraints. If it is unchecked the temp controls and constraints on the original bones will not be removed.
Cleanup - If you are not happy from the results you can always quickly remove the temporary rig setup. when using multiple setups choose relative to remove only the current setup or All to remove all setups. This applies also to Quick Bake.Select

Selects all the bones that are constrained to a temporary rig control or the controls of the temporary rig.
If the constrained (original) bones are already selected, then when using Relative Ctrls, only the controls related to those constrained bones will be selected, and vice versa for constrained bones. Use All to select all the Controls or All constrained bones.
ANIM TOOLS
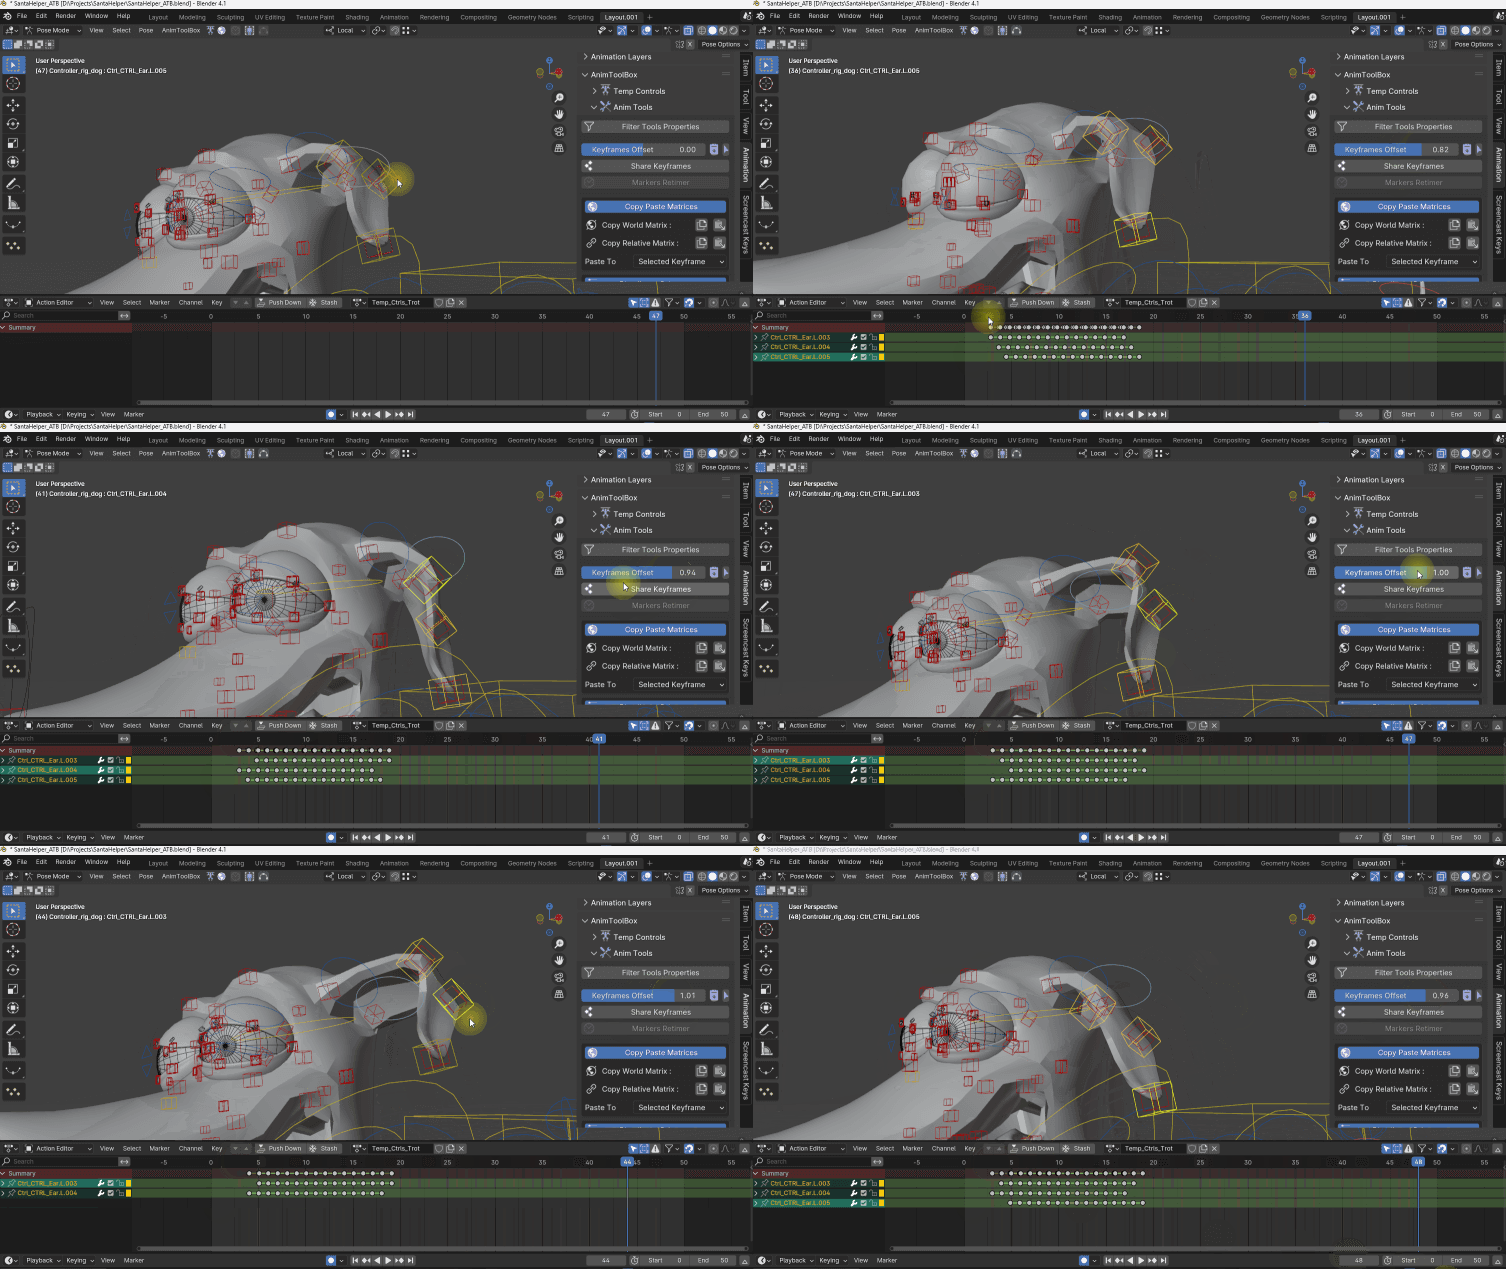
Offset Keyframes
Offsets all the keyframes of the selected bones. very usefull together with World Space Ctrls. it is also interactive so you can use a slider back and forth to try different offset amounts before applying, value 0 will reset the keyframes to their original frame. Offset Keyframes uses selection order since version 0.0.4.5 That means it will offset gradually from the First selection to the last. - selects all the controls that have an offset.
 - Applies the offset, will use the current frames as the initial frames.
Offseting the keyframes in different selection orders. The active bone is always the last bone and has the biggest offset

Sharekeys - select multiple bones or objects, with keyframes on different frames in the timeline. press Sharekeys and keyframes will be added to all controls across the timeline, so now they share the same amount of keyframes at the same frames. This also can be usefull during blocking phase.
Markers Retimer - Use Markers to move keyframes in the dopesheet/timeline. It will scale the keyframes between each two markers. This operator is available only if at least two markers are created
Copy Paste Matrices

Copy World Matrix -Copy and paste the world matrix of an object or a bone. It recalculates also child of constraints, so it will always go back to the same position in world space.Examples for Useful cases:
- Fix sliding legs for cyclic animation that move with a root bone
- When switching between different setups, and things start to jump around
- align object with bones
Copy Relative Matrix -Works only with two selected bones or objects.Copy the distance between the selected object or bone to the active object/bone.go to a different frame or transformation of the active bone, select the first selected bone and paste.The object/bone will move into the same distance from the active object.This can be used instead of pareing, especially during animation blocking phase.
You can copy and paste matrices, at the current frame, over selected frames or using Frame Range, including Frame Range Marker Widgets 
Blendings / Inbetweens
Inbetween World Matrix - Calculates the value between the next and previous keyframes, but in world space values. Useful to lock sliding legs in space, or for creating an offset in world space.
Inbetween Keyframes - adds a keyframe and calculates the value between the next and previous keyframes, but for each layer or an nla track separatly. This slider is taken from animation layers tools.
Blend Mirror - Blends the current pose to the mirrored pose. Useful when mirroring a pose but doesn't want to have a complete symmetry.
DISPLAY
Add to gizmo size - Animtoolbox is using the hotkey ALT and + or - to change the transform gizmo size. with this option you can decide how much value is added every time. Or use the + and - buttons instead of the hotkey.
Isolate Pose Mode - Isolates the rig from other rigs when going into pose mode. It is very useful when working with mutiple rigs in the same scene.
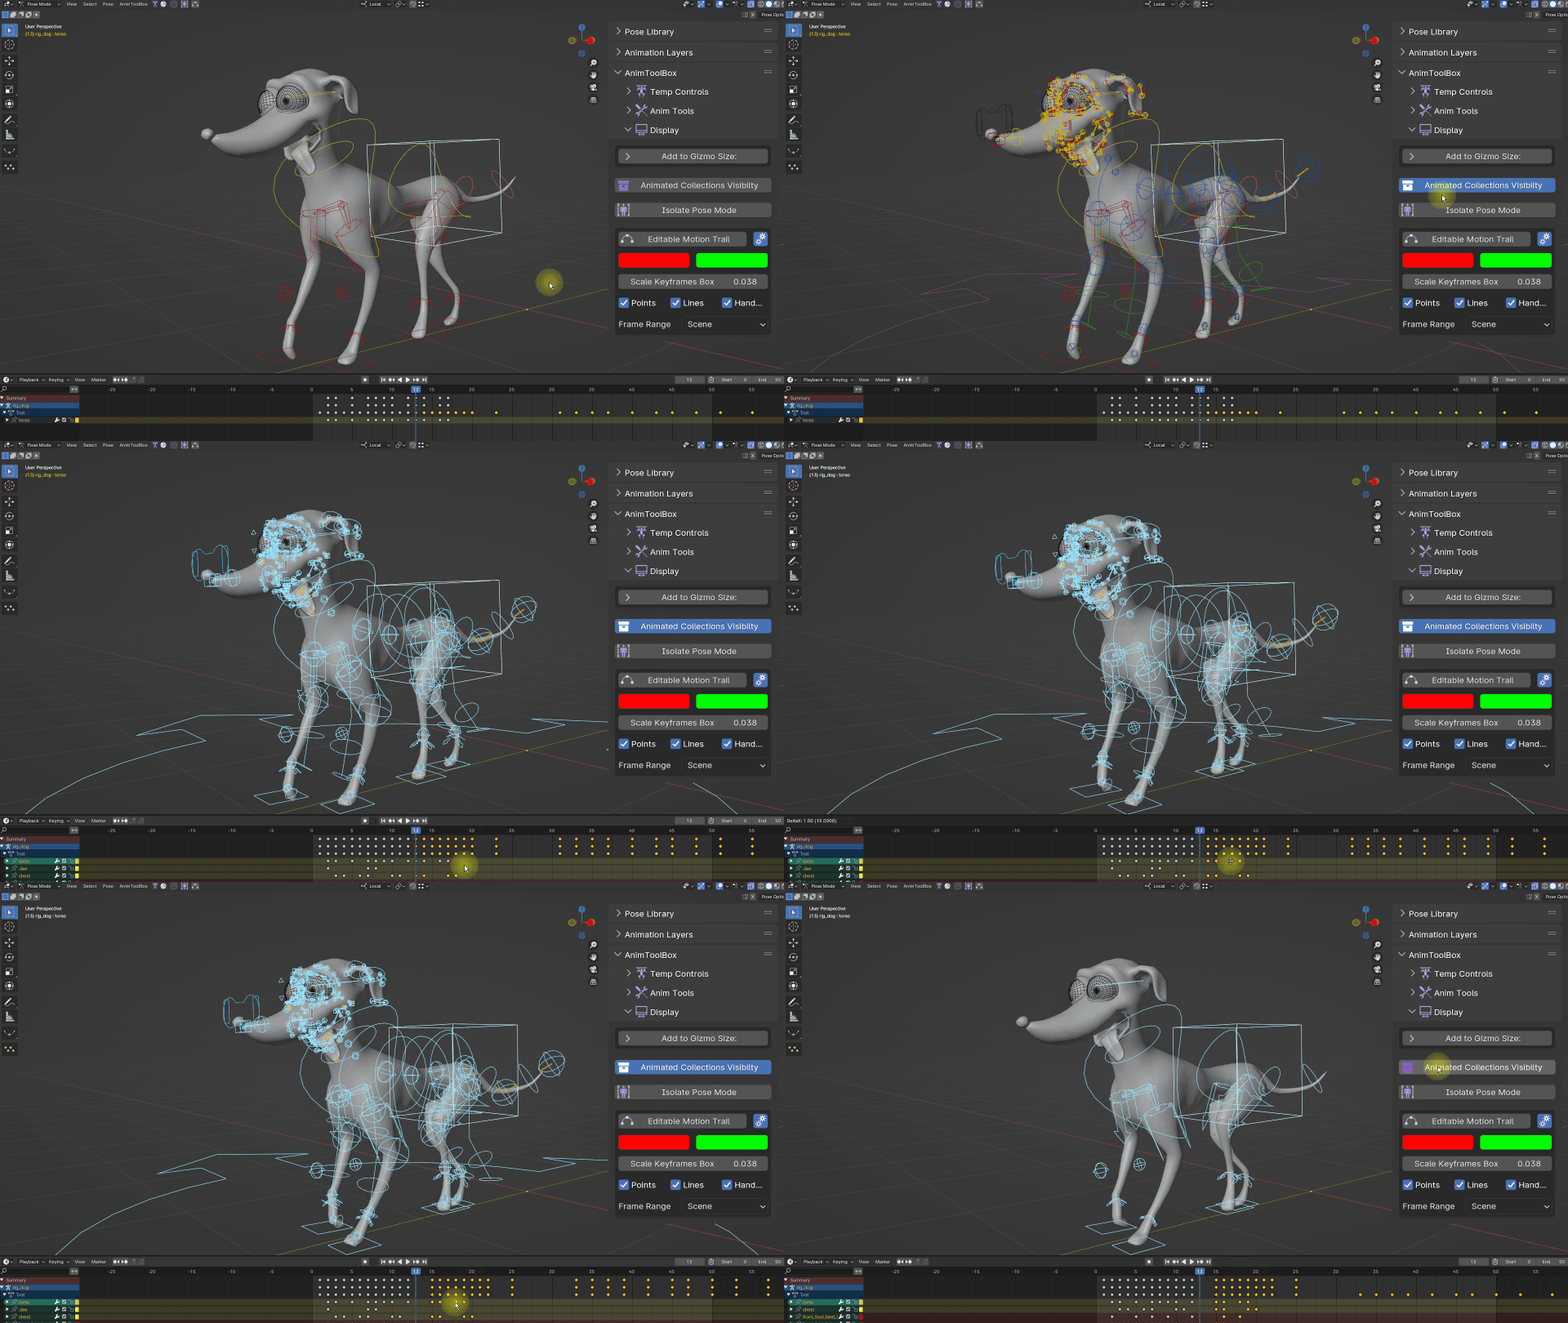
Animated collections Visibility - Turns on all the collections that have bones with animation data on them, When clicking again on this operator it will switch back to the previous collections visiblity.
This is used when switching to view all the ctrls for example when retiming a whole blocked animation.

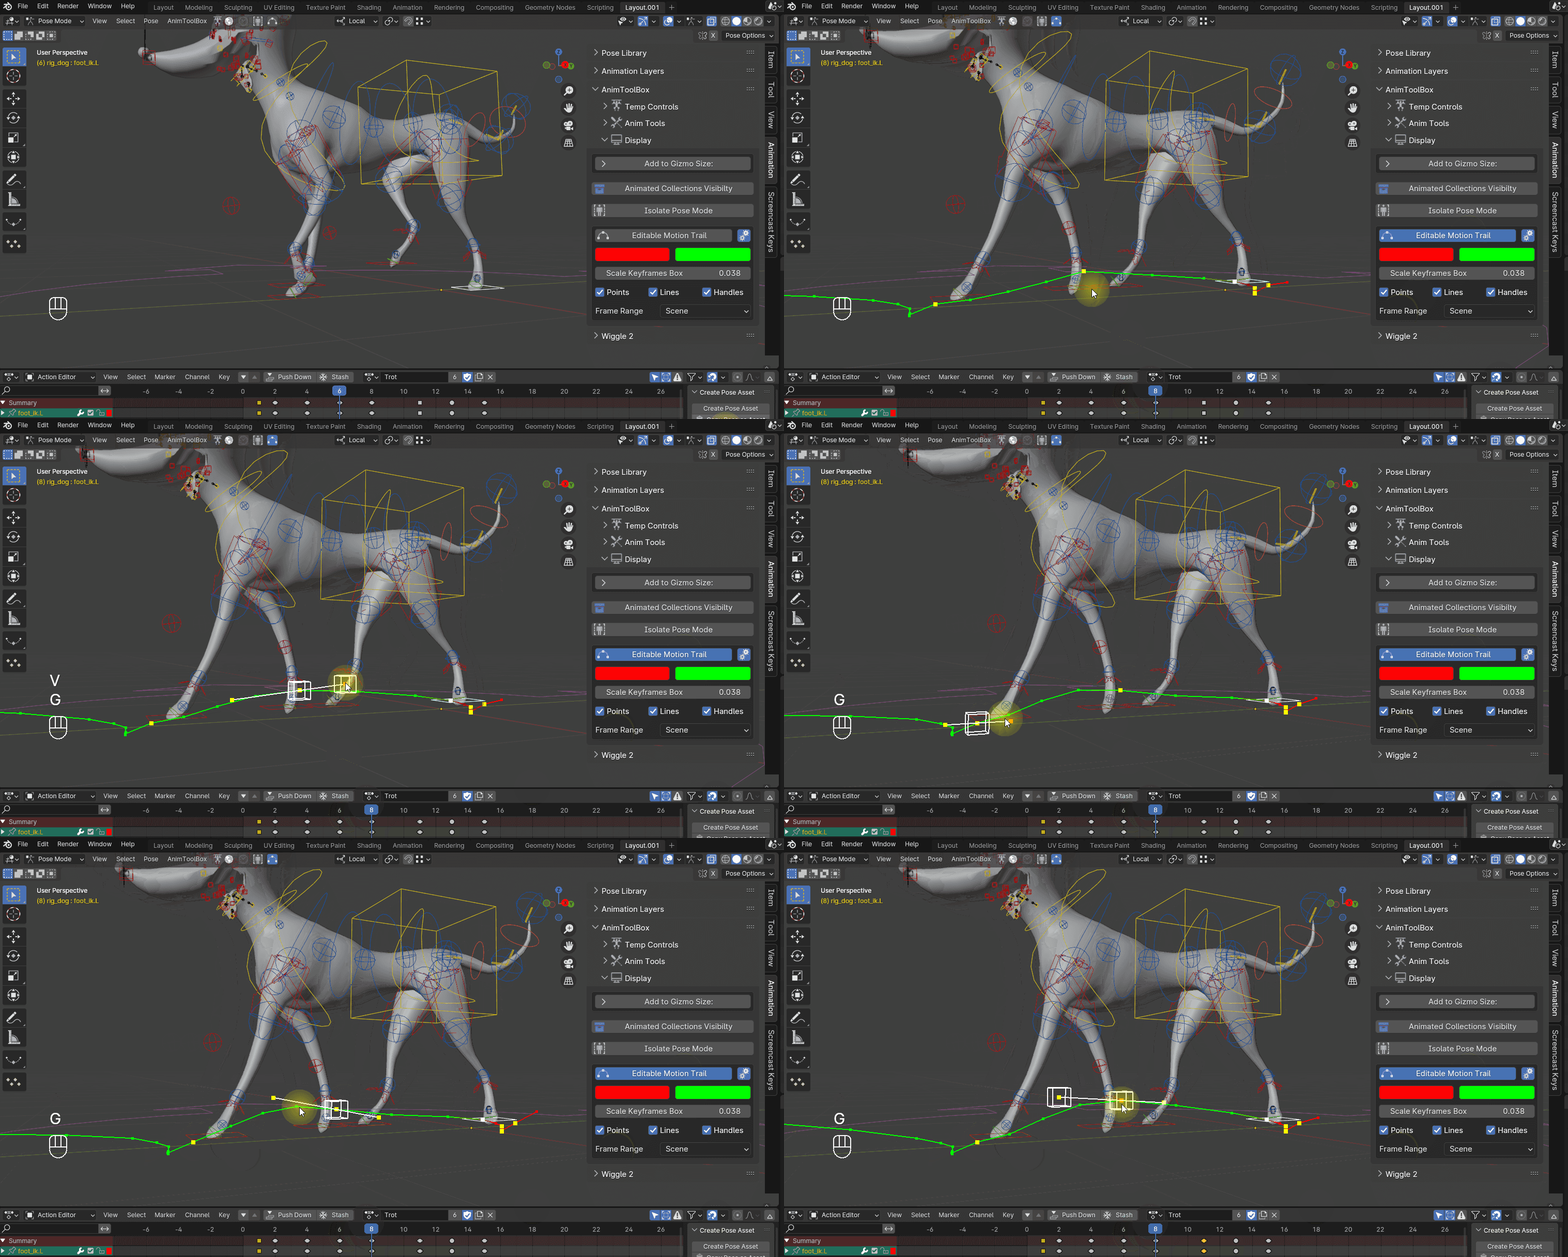
Editable Motion Trails - Edits the motion trails directly in the viewport. select and move keyframe points with left mouse click and add or remove selection using shift.
hange the colors for before a after the current frame separatly.

Scale Keyframes Box - Scale the keyframe control box to adjust visualization.
hide and unhide points, lines and handles.
Frame range of the motion path can use either scene frame range, all the keyframes, or a custom frame range.
adjust manuel frame range with the Marker widgets 
Hotkeys that are currently available in 3d viewport are:
G or Left mouse click for grabbing and moving
Shift to add or remove from selection.
Numpad . for zooming, available only while hovering on a selected keyframe
V to change handle types
Ctrl + Left Mouse Click - Add or remove keyframes


