Modeler Pro 1.5 - Toolkit Addon
Documentation (work in progress)
Install
Install like any other addon in the preferences panel:
Edit -> Preferences -> Add-ons -> Install
In 4.2+:
Bevel Weight Gradients Tutorial
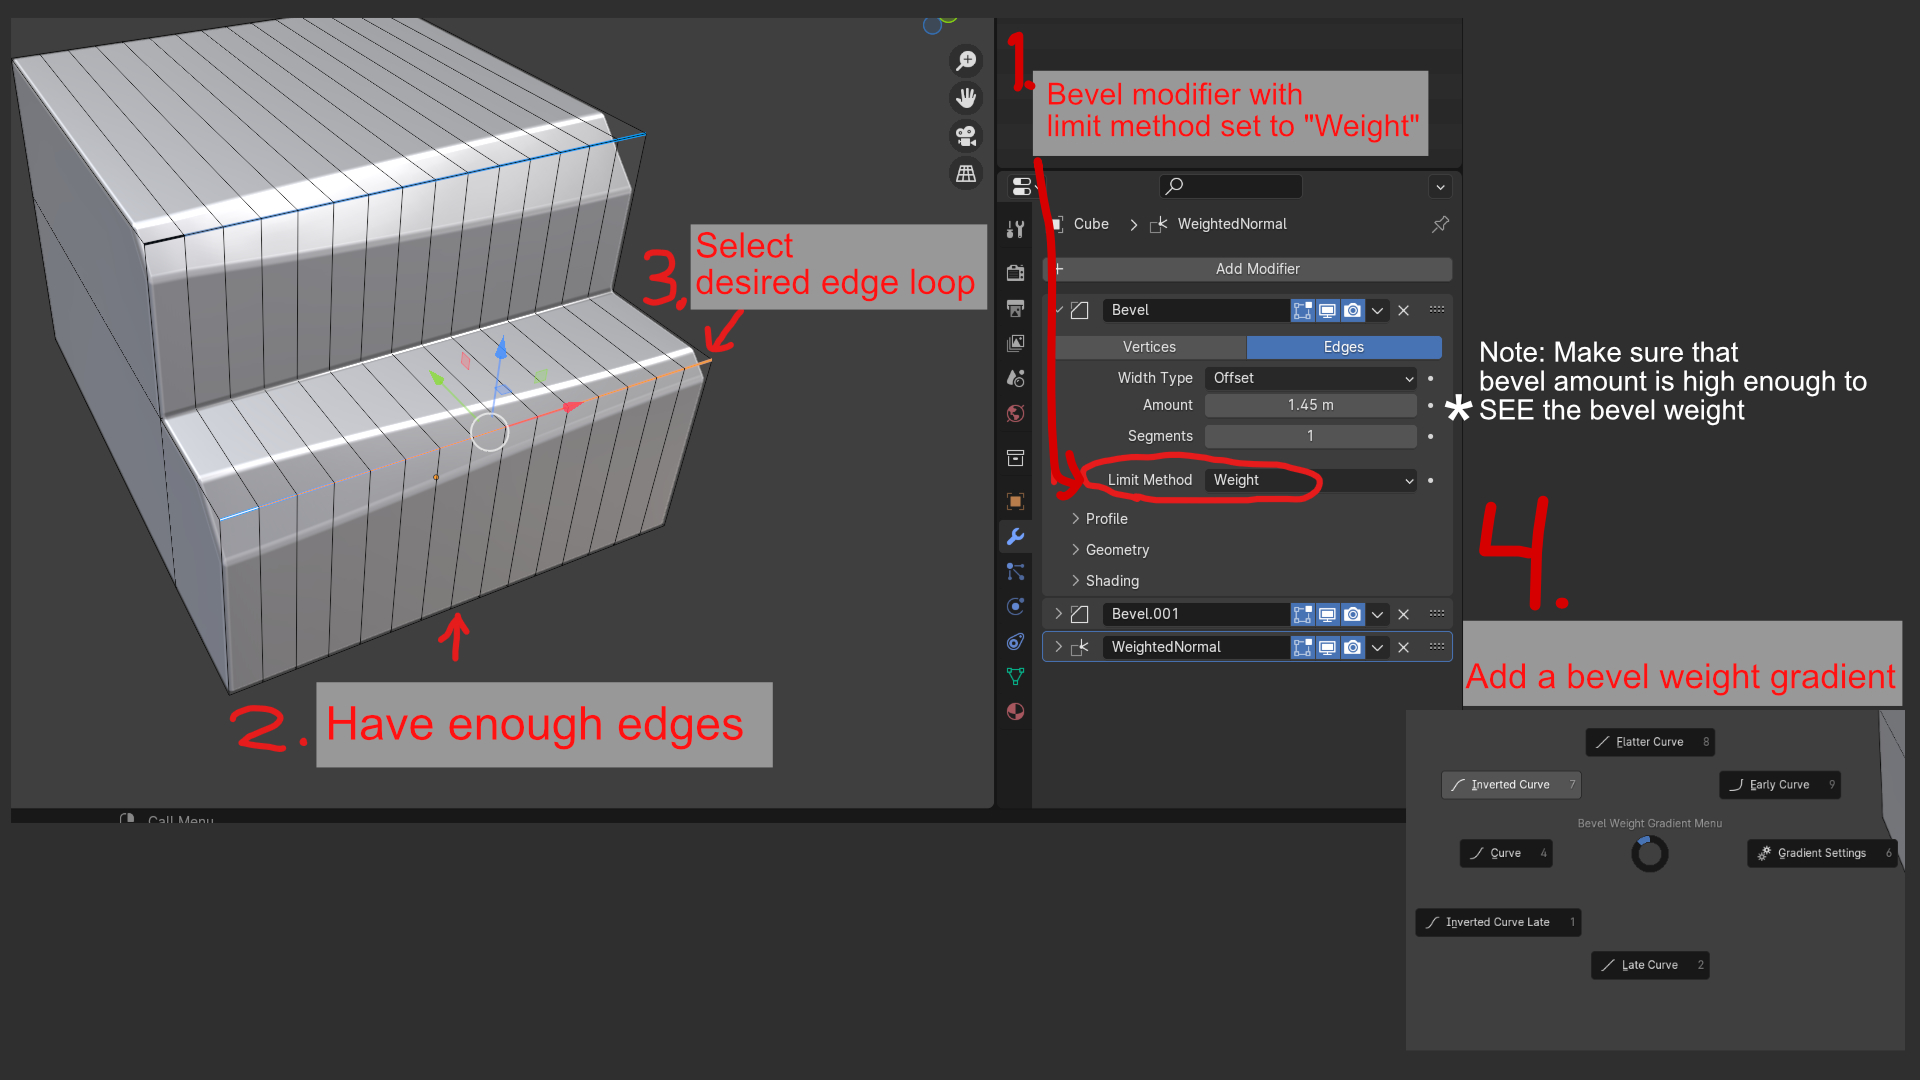
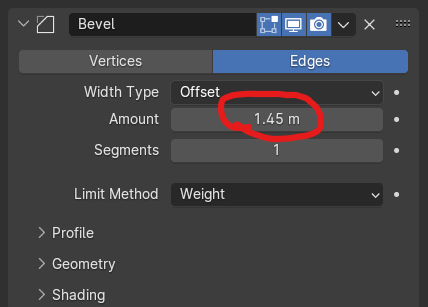
1. Make sure first that you have a Bevel Modifier set to limit method: Weight.
2. Make sure that where the edge you want to add a bevel weight to has enough edge loops or subdivisions (as pictured in example image below). A mesh with no subdivisions or not enough edges won't have enough edges to add bevel weights to.

3. Select the edge loop that you'd like to add bevel weight gradients to. Remember that you must have an active edge in your selection.
An active edge is a "last selected" edge. The tool requires this in order to figure out where to start the gradient from. Picking a different active edge will give your gradient a different starting point for different results in your gradient.
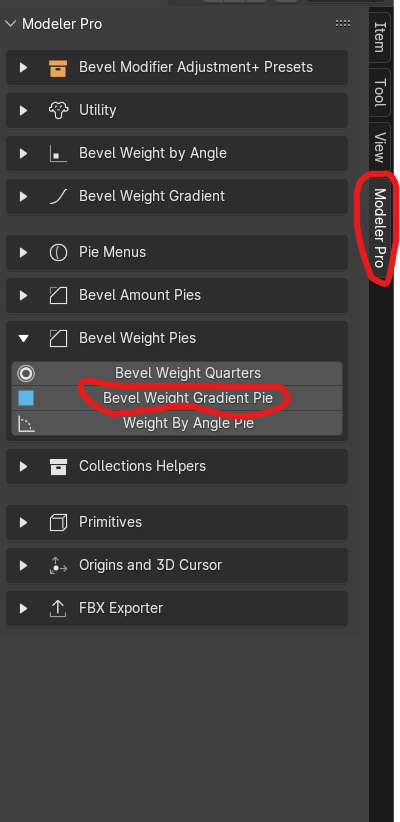
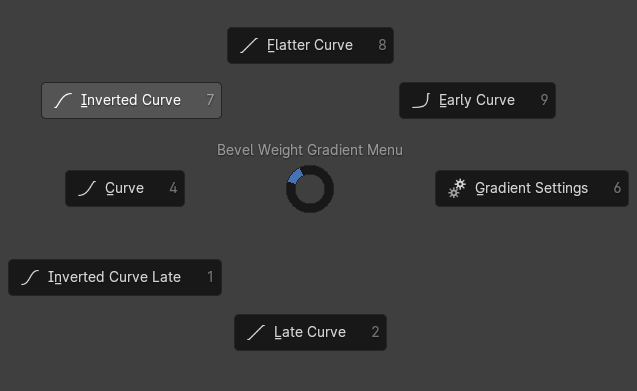
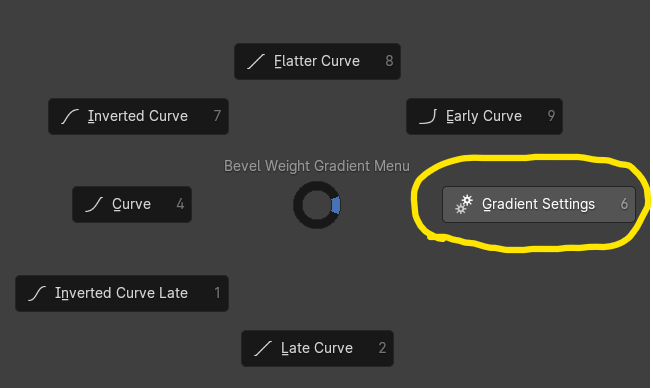
4. Go into Modeler Pro's "Bevel Weight Pies" tab and use the Bevel weight gradient pie button. Ideally, right click on this button and assign a shortcut. Now pick the bevel weight type of curve you wish to assign and watch the magic happen.
Note: Make sure to have a big enough bevel to see the effects, so play with the amount slider in the bevel modifier of your mesh.
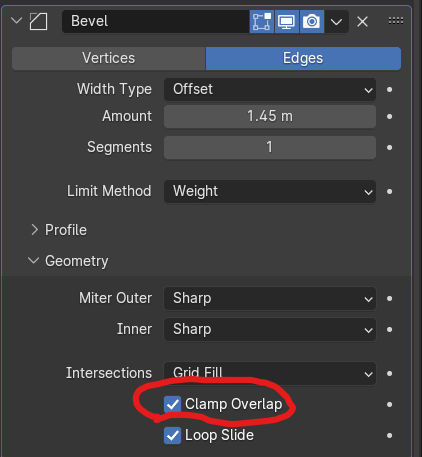
Note 2: If you are still not seeing anything, it could be because there might be issues in your mesh where a bevel is being restricted or clamped. You can turn off clamp overlap in your bevel modifier to make sure your bevel isn't getting clamped.
And again, here in action:
Bevel Weight Gradient Settings Explained
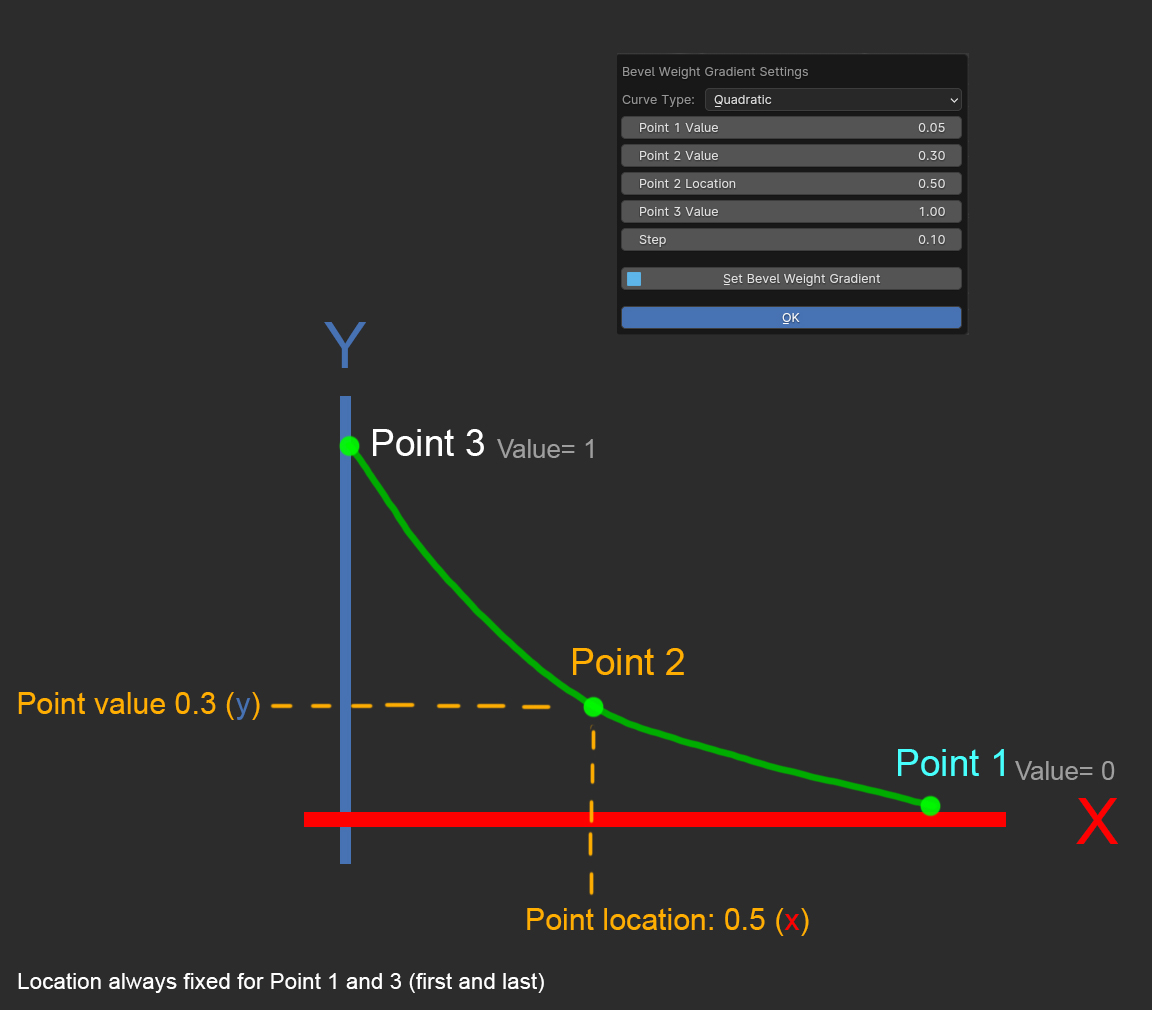
The image below roughly translates what each setting in the bevel weight gradient does:
- Point 1 and Point 3 will always have a fixed location being the last edge selected and the first edge selected. Point 3 is the only point where you can shift the X axis location.
- All points have a "Value" setting. The value setting determines the Y axis location of the point.
- Set Bevel weight gradients sets the bevel weight gradient to the edges. The OK button closes the window.
- Curve Type determines the type of curve used for bevel weight gradients. For more noticeable effects, pick noise or smoothstep.
- Smoothstep has a "Sharpness" setting determining how sharp or curved the curve will be.
- Noisy has a "Noise intensity" setting, determining how much noise to add to the curve.
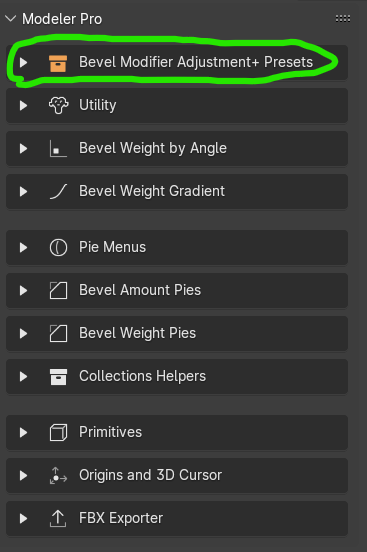
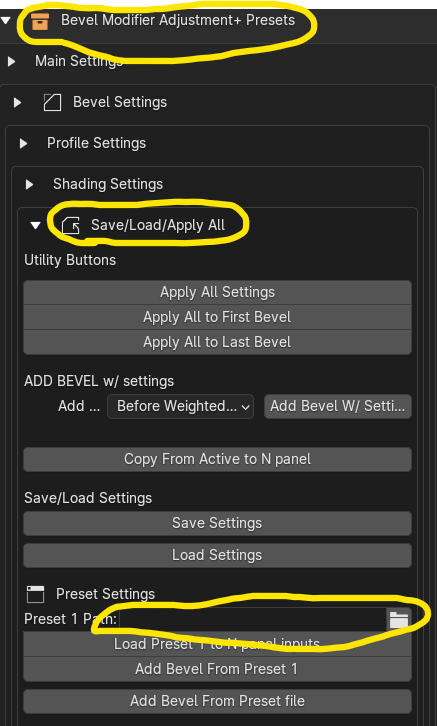
Bevel Modifier Adjustments + Presets
This works across multiple meshes selected. You can add bevel modifiers with specific settings to multiple meshes or change different settings across all selected meshes.
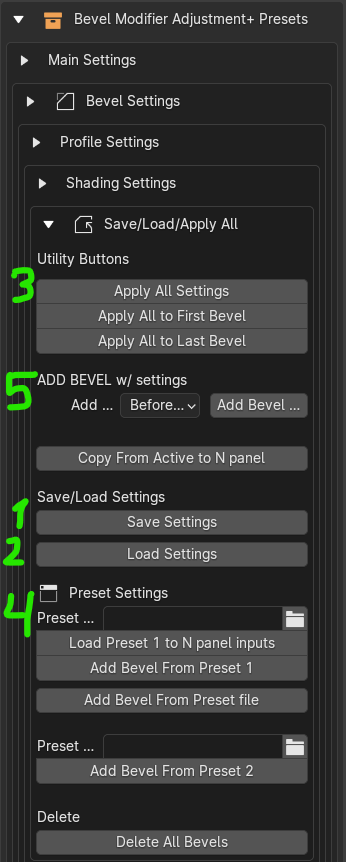
1. Save Settings: Saves current bevel modifier settings in the N panel as a json file.
2. Load Settings: Opens a browser to load settings from a json file.
3. Apply all settings: Applies settings to the currently selected mesh's bevel modifier.
4. Preset Settings: Add a file path to set your preset. Press "add bevel from preset" to apply settings.
5. Order in stack to add bevel modifier:
6. Bevel Profile from Hard Ops: This tool is compatible with the Hard Ops bevel weight profile save feature (tutorial on that here). You can plug in your bevel profile from Hard Ops here:

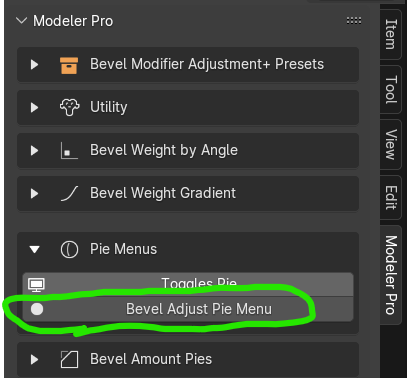
Bevel Adjust Pie Menu
A general extension of the above bevel modifiers, but in an easy-to-use sleek pie menu.
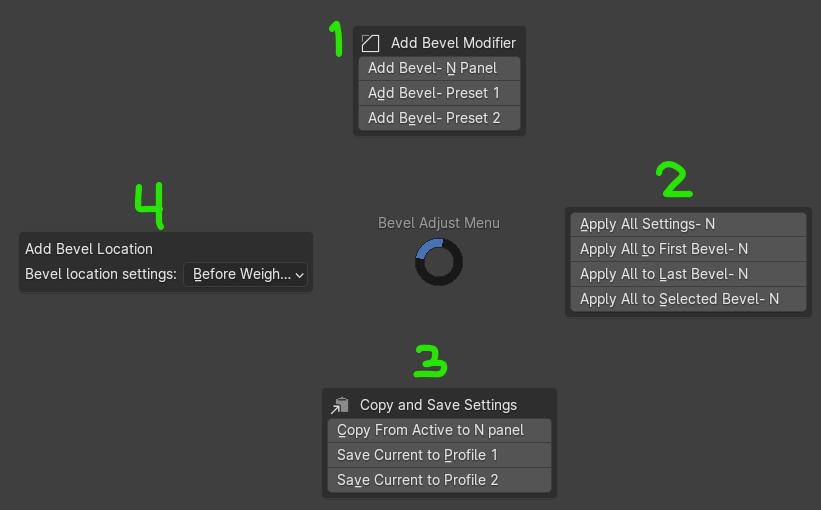
1.Add Bevel Modifier
- Add Bevel - N Panel: Adds a bevel modifier with N panel settings.
- Add Bevel - Preset 1: Adds a bevel modifier with the settings from the Preset 1 json file set in the N panel
- Add Bevel - Preset 2: Same as above but preset 2
2. Apply all settings: Applies all settings from the N panel to bevel modifiers: Either all of them (first option), First Bevel in the stack, Last Bevel in the stack, or selected bevel in the stack (click on the bevel modifier in the modifiers panel).
3. Copy and Save Settings:
First button: Copies bevel modifier settings of currently selected bevel modifier to the N panel.
Two buttons below that: Same as above but saves them as a json file and sets it to Profile 1 or 2
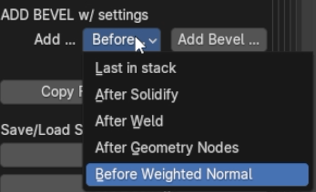
4. Bevel location in modifier stack
. Various options such as last in stack, before bevel weight, after weld, after geometry nodes, after solidify, and last in stackToggles PieWorks across ALL selected meshes.
Pie menu for toggling very common modifiers such as the "last" mirror in your stack, arrays, toggling all "union" booleans, all "difference" booleans, toggling bevel modifier + bevel weight (if there are any), etc.
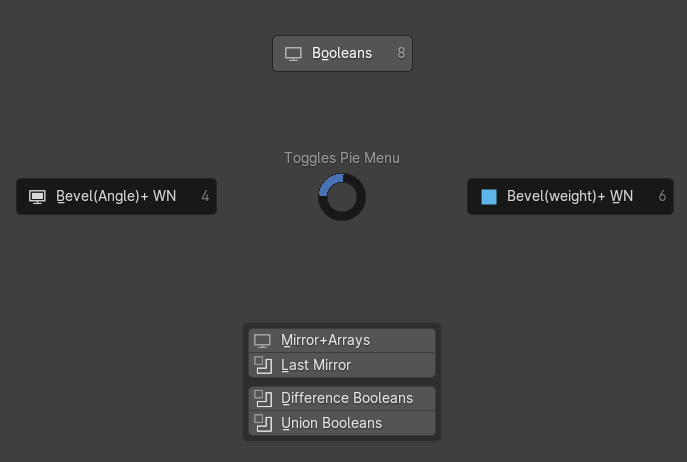
Bevel (Angle) + WN: Toggles on and off the bevel modifier set to limit method Angle AND the weighted normal modifier (only if there is one so you can use this even if you dont work with a weighted normal modifier).
Bevel (Weight) + WN: Same as above but toggles bevel modifiers set to limit method: Weight.
Opt Out: You have the ability to "opt out" of the toggle of a specific modifier by adding a suffix of "_off". Adding this makes it so that if for example you toggle all booleans, it will toggle all booleans except for boolean modifiers with a suffix of _off (example name: "booltool_off"). You can do this with the mirror and array modifiers as well. This way you have control over what to toggle on/off.
Primitive Creation
BETTER Primitive geo creation: Create primitives based on bounds of currently selected object or edit mode selection.
Mini Tutorial
Have selected either in edit mode or object mode what you want your primitive's size to be (look at gif for example).
Then pick what primitive you want to create from the pie menu (example: cube).
X key to change orientation and mouse wheel to scroll through the number of sides. Option to either consider or not consider mirror/array modifiers as part of the bounds via N panel checkbox.

More tooltip help at the to of Blender window here:
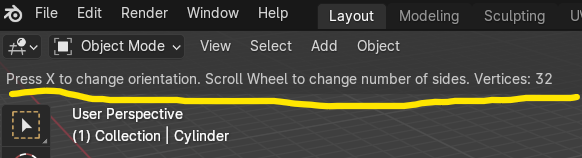
- After you are happy with the primitive. Left click to accept the primitive.
- After creating the primitive an F9 menu will appear here to change settings after accepting settings:

Bevel Weight Trimming
1. Load the provided json file with the addon to preset 1 (or 2).
2. Add bevel modifier with preset 1 (using the pie menu).

3. Make sure your mesh has two different materials applied with different colors.
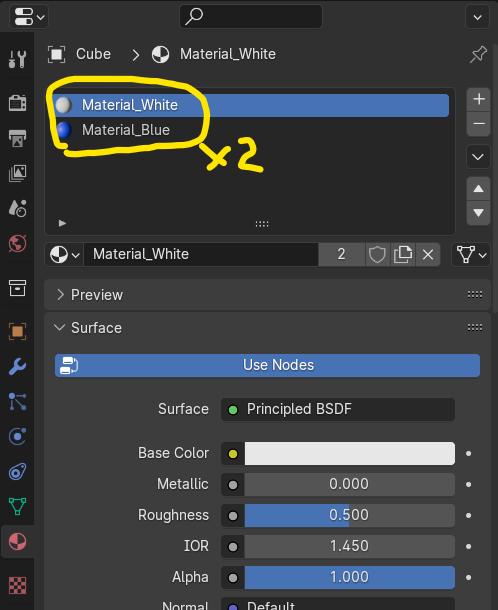
4. Mark bevel weight 1 (or anything other than 0) the edge you want to add a trim to. Can do something less than 1 for a smaller trim.
In essence: