10 Tips to Improve Your FLIP Fluids Workflow in Blender
-
 Written by Pavla Karon

Ryan and Dennis from the FLIP Fluids development team show you how to quickly improve your workflow with their bestselling Blender add-on. By the way, if you prefer watching to reading, scroll all the way down for a video of Ryan and Dennis talking you through these top tips!
1. Simulation debugging in FLIP Fluids
Did you know that the debug features in FLIP Fluids can be used to diagnose and resolve issues in your simulation setup?
Let's take a common problem as an example: you have modeled a fantastic looking bottle or the most perfect mug Blender has ever seen but when you try to fill it up with your favorite liquid, you find that your fluid just leaks all over the place. What a mess!
So...why is the fluid leaking?
The reason is likely that your model is too thin for your simulation resolution. The FLIP Fluids add-on is a grid-based simulator where physics equations are solved on a 3D grid and the resolution value controls how detailed the grid is. Let's visualize the grid by turning on the Display Grid option in the debug panel.
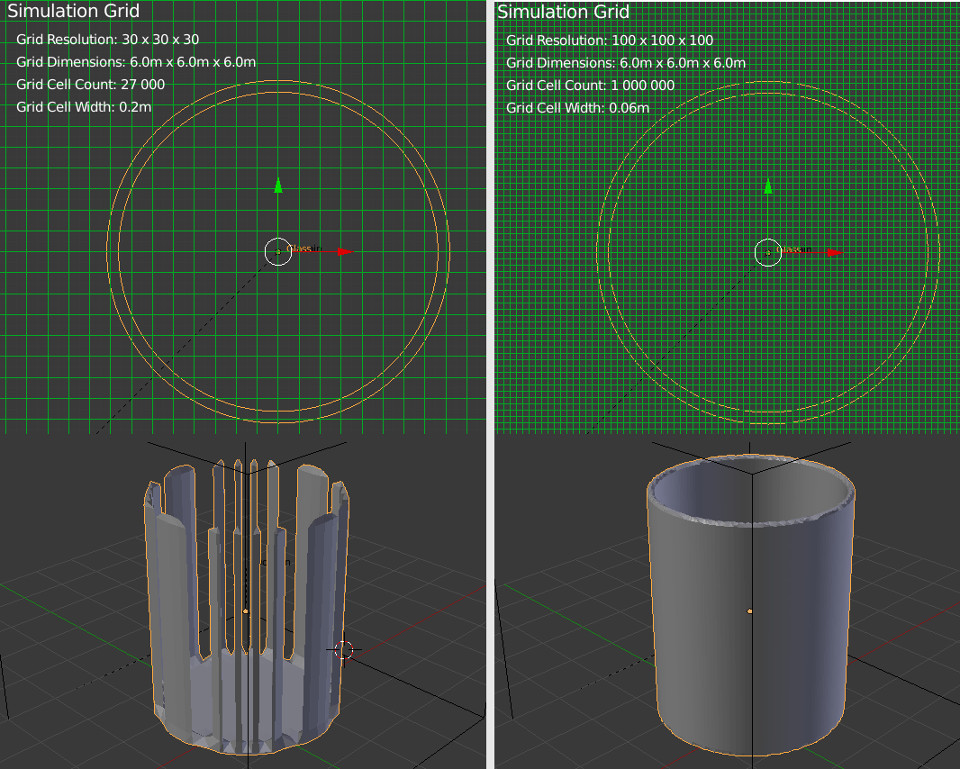
Left: a grid resolution that is too low, resulting in cracks in the debug mesh.
Right: after increasing grid resolution, the debug mesh is now fully resolved.
After enabling the Display Grid option, you will see a visualization of the simulation grid and how the grid is divided into cells. The size of a grid cell can be understood as the smallest amount of detail that will show up in your fluid simulation.
Example: the smallest droplets, the thinnest splashes, and the minimum thickness of an obstacle. The grid display mode is interactive - try adjusting the domain resolution or scaling and resizing the domain to get a better understanding of how the grid changes.
To prevent thin obstacles from leaking, the thinnest parts of the obstacle should be at least one grid cell thick. You can make sure that your obstacle is thick enough by either re-modeling your object walls to be thicker or by increasing simulation resolution.
Another way to check that your obstacle will work well in your simulation is to set the Enable Obstacle Debugging checkbox. This option will output a debug mesh that will show you how the add-on converts the obstacle and how it 'sees' the obstacle within the simulation. After enabling this option, you will need to begin baking the simulation to generate this debug mesh. If your obstacle is not animated, you can stop baking after the first frame is completed and reload the frame to display the debug mesh. If your obstacle object is too thin, you will see holes, cracks, or other errors in the debug mesh where the fluid will leak out.
Documentation: FLIP Fluid Debug Panel
2. Surface tension and sheeting
Are you trying to create a realistic small-scale fluid effect but your fluid just keeps breaking apart? Is your liquid behaving more like a large ocean rather than a small cup? You might want to try enabling the surface tension and sheeting features in the world panel!
Surface tension forces help create realistic small-scale effects by simulating the natural cohesion of surface molecules that cause fluids to form into beads, drip, and add an elastic look to splashes. These forces play a more dominant role and are more noticeably seen in small-scale fluid behavior. In large-scale fluids such as oceans, surface tension forces are less visually noticeable and can be ignored when simulating.
Enabling the sheeting feature can also help with realism in small-scale effects by preventing fluid splashes from breaking apart into tiny droplets as the splash grows. Adding some sheeting gives a 'stretchier' look to the fluid. The fluid sheeting feature works by filling in gaps between separating fluid to help preserve thin fluid sheets and splashes.
Combining surface tension with the sheeting feature can help you create beautiful liquid effects!

Left: without sheeting, holes form in the growing splash.
Right: with sheeting, holes are filled to prevent splashes from breaking apart.
Documentation: FLIP Fluid World Panel
3. Test your simulation at lower resolutions
Never bake at your final resolution without making some tests first!
We recommend first testing your scene at a lower resolution before running the final simulation. Lower resolution simulations will bake much quicker and you might notice some problems with your simulation setup. For example, maybe your fluid is moving too slow or too fast for your liking, or maybe you have noticed that you forgot to set an object as an obstacle. You wouldn't want to run a simulation overnight only to wake up and find out it is all a waste due to a silly mistake!
4. Disable foam, bubble, or spray particles
In our lighthouse demonstration, we use the whitewater simulator to generate all those foam and spray particles, as well as the many bubble particles that you can see under the water.

But all of these particles need to be simulated and rendered which adds to the baking time and will also increase the size of your simulation cache files. However, if you are creating a scene where the bubbles or spray particles will not be visible in the render, you can disable them from being simulated! Settings for disabling particles can be found in the Whitewater Panel. Just click on the Advanced View Mode and you will see checkboxes for simulating foam/bubble/spray particles in the Whitewater Simulation Particles section.
Be aware that disabling a particle will affect the result of the simulation, so we recommend first testing your simulation as in the previous tip!
Documentation: FLIP Fluid Whitewater Panel
5. Speed up the viewport
You have finished baking a massive scene and you find that the viewport is crazy slow from all of the simulation data that is being imported. Here we have some tips for how to increase the speed and playback of the viewport!
Our first tip is to use the preview meshes. The simplest way to do this is to open the FLIP Fluid toolbox menu, click the Preview button under the Quick Viewport Display section, and then reload the frame. By doing this, smaller and less detailed meshes will be imported and now Blender has less data to deal with.
If you are simulating whitewater in your scene, we have another tip for speeding up the viewport, and that is to decrease the percentage of displayed particles. You can find these settings in the fluid display panel under the Whitewater Display Settings section. For best viewport performance when viewing particles, set the whitewater preview percentage to 1%. This is often enough to get a good idea of how the particles flow. And if you don't need to view the particles at all, you can just set this value to 0%!

In this example, we preview the whitewater by setting foam and spray to 1% and disable bubbles from displaying by setting it to 0%.
Documentation: FLIP Fluid Display Panel
6. Managing cache files
Sometimes you may want to try out different simulation settings, but without also overwriting your finished simulation. And good news: there is a quick and easy trick to do this! Just change the name of the Current Cache Directory in the cache settings panel and start baking. You can switch easily between bakes by just changing the directory name. We recommend writing down some notes about which settings you have changed so that you can remember which cache directory is which.
Documentation: FLIP Fluid Cache Panel
7. Slow-motion effects
If you would like to slow down your animation in post-processing, you can get perfect quality results by simulating at a higher frame rate! This can be done by setting the Frame Rate parameter in the fluid simulation settings panel. Try out using a high framerate such as 100fps. Of course, this will take longer to simulate and render, but when finished, you will not be required to use any slow-motion interpolation plugins that produce artifacts.
8. Easy way to use inverted obstacles
In this tip, we will show you the importance of working with inverted obstacles!
Let's say you want to simulate fluid inside of some text or any other object shape. You might try to do this by modeling a hollow object with thin walls to keep the fluid inside the object, but this takes time and can be difficult if you need to change the object shape or resize it. This is more work than is required.
The trick is to turn your obstacle 'inside out' within the simulator by enabling the Invert checkbox in the obstacle settings. This option makes everything inside your object hollow and everything outside your obstacle solid. How cool is that?

In our 'Fluid in an Invisible Box' demonstration, we used the Invert option to simulate fluid within the tumbling box.
Documentation: FLIP Fluid Obstacle Settings
9. Modifiers
You can use modifiers on your fluid by selecting the surface and adding a modifier. So simple to do, but many do not know that they can be applied to the fluid surface! For example, add a smooth modifier to the fluid surface to smooth out bumps and artifacts. This will make your surface look perfect!
There are many modifiers to play with in Blender and you can get creative when using them with the fluid surface. Try adding an ocean modifier and set the Geometry setting to Displace. This can be used to create the illusion of ripples and waves on the simulated surface for ocean effects. We will have a FLIP Fluids ocean tutorial for you in a future video!

The ocean modifier can be used to add extra waves and motion after the fluid has been simulated.
Documentation: Modifiers in Blender
10. Viewport Render
If you want to see your final simulation in real-time but do not want to waste render time or disk space, you can make a viewport render. Of course, this will be far away from a production-ready rendering, but it gives you all of the required information to make sure you're ready to start with the final rendering.
In the viewport render, you will only want to show the objects that will be visible in the final render. Press the N key in the viewport to open the Viewport Properties menu. Under the Display panel, enable the Only Render section.
To start the viewport render, select Render > OpenGL Render Animation. Make sure you set your render resolution and output directory!
Documentation: Viewport Render || OpenGL Render
These tips were prepared by Ryan and Dennis, the creators of FLIP Fluids. To check out other learning resources videos, visit their Blender Physics YouTube channel or take a look at the FLIP Fluids Documentation and Wiki. Also, check out an interview with Ryan and Dennis about how they made FLIP Fluids, their favorite add-ons and what they expect from Blender 2.8.