Auto Bake: Texture Baker & Exporter

Before reading the documentation, please note that the content of this documentation is also available in Blender with the buttons/properties descriptions. To see these, hover your cursor over a button/property. If nothing appears, make sure the 'User Tooltips' is enabled in the preferences.
Bake Queue
The main panel holds all the bake control buttons along with the bake queue list. At its default state, it has two buttons:
Auto Bake: Starts the baking process.
Export: Exports the unsaved textures from the previous bakes.

Next to the “Export” button there is a checkbox, if it’s checked in the baked textures will automatically exported to the set export path.
*The “Export” button can only be used when there is unsaved baked texture.
Bake
After clicking on the “Auto Bake” button, it will be replaced by a “Pause“ and a “Cancel“ button along with the “Export” button and its checkbox.
A bake queue list will also be added below the new buttons with a queue status bar. The status bar shows the amount of items has been completed.
*The queue list and its items are independent of the bake list. Modifying the bake list won’t make any changes to the queue list.
The textures will be baked one by one. Their status will change depending on their current state.

Bake Status
Pending: On queue, waiting to be baked (default state).
Baking: Currently baked.
Baked: Successfully baked.
Exported: Successfully baked and exported.
Failed: Failed to bake.
Canceled: Canceled by the user.
Pause
The bake queue can be paused anytime with the “Pause” button. If there is an active bake at the time of the pause, the current bake will be finished and won’t be canceled (it will also be also exported if it's set to).

Resume
Resume the bakes from the pause anytime by clicking on the “Resume“ button. The bake queue will continue right where it was stopped.

Cancel
Items in the queue list can be canceled using the “Cancel“ button. Their status will change from “Pending“ to “Canceled”. If there is a current bake in progress (an item with the “Baking“ status) it won’t be canceled, only the items with a status of “Pending“.
Results
The bake queue is finished when there is no item left with a “Pending“ status. The queue status bar will disappear and a “Confirm“ button will appear below the list. On click this button will hide itself along with the list, restoring the initial state of the panel.

Disable Items
Items in the queue list with a status of “Pending“ can be disabled. The status will change to “Canceled”. This means it won’t bake. Until the canceled item is not passed in the queue list, it can be re-enabled, the status will change back to “Pending“.

Export
After the bake queue is finished and the textures are not set to export automatically, they can still be exported with the “Export“ button. When the button is clicked on, a popup window will appear.

In this window all the unsaved baked textures are listed with the folder's name next to them. They can also be renamed, both the textures and the folders. Textures can be excluded from the export with the checkbox next to their name.
Bake List
Bake List is the panel where you make the list of what to bake.
*Enabled bake item count is displayed in the panel name: “Bake List (4)”

Bake Items
The main component is the list. Each item in the list has three basic properties:
-
Type: Define what to bake. Types can be separated into three main groups:

Principled BSDF: All the input sockets of the Principled BSDF node.
- Miscellaneous: Special bake types, including material displacement, color attribute and composite (combination of 3 selected gray Principled BSDF sockets).
Multiresolution: Normal and Displacement data from the Multiresolution modifier.
Standard: The default Blender bake types.
Size: Scale of the texture, with a range between 1 and 65536.
-
Gate: Items can be disabled, which means they will be ignored in the bake queue without deleting the item itself.

*Items that share the same type and scale are marked as duplicated and displayed in a reddish color.

Type Specific
Other than the three main item components (type, scale, gate), there are type specific settings. The first, that every type has is the name. This is an editable text property, which will be used when creating and exporting the texture.
Additionally some items have more settings related to their type. Such as: ambient occlusion, displacement, combined, normal, composite, etc.

List Operators
Use the + button to add an item to the list. Hold CTRL to add multiple items at once using the pop-up window.

Use the - button to remove an item from the list. Hold CTRL to remove multiple items at once using the pop-up window. Choose from removing all, the duplicated, or the disabled items.

Use the Up and Down buttons to move the items. Hold CTRL to move the active item to the top or to the bottom of the list.
Use the dropdown menu to access additional list modifier operators.

-
Load by Linked: Load items from the selected source material. From the material’s Principled BSDF node’s connected input sockets items will be added with the sockets corresponding type to the list with the set scale value.
- Source Method: Select material or object as source method. List items will be imported from the selected source, if material is selected items will be imported from the set material, if object is selected, all the object's materials will be used as source.
- Texture Scale: Texture size of the new items.
- Placement: How to place the new items in the list.

Selected to Top: Move the active item to the top of the list.
Selected to Bottom: Move the active item to the bottom of the list.
Enable All: Enable every item in the list.
Disable All: Disable every item in the list.
Invert All: Invert the Gate value for every item in the list.
Clear List: Remove every item from the list.
Remove Duplicated: Remove all the duplicated items from the list.
Remove Disabled: Remove all the disabled items from the list.
Item Details: Visibility of additional type specific details (read more below)
Sort Items: Sort the items in the list. Frist by type, and then by scale in ascending order.
UDIM Bake: Switch between UDIM and Single texture bakes.
UDIM
When working in UDIM mode, almost everything in the Bake List works the same and looks the same. The only difference is in the Bake List items' scale value. More about in the “Bake List” section below_._
Also, there is an additional sub-panel for the UDIM tiles, right below the main list, this is only visible when the “UDIM Bake” option is checked in.

Bake List
The only change in this list is the items' size. Instead of setting the texture’s scale for each item, here it’s multiplier value for the UDIM tile sizes. If a multiplier value set to 2 instead of the default 1, each tile will be created at double the size of the set in the Tile List (original tile size * type multiplier).

Tile List
Make a list of UDIM tiles that will be used for every item in the Bake List, hence every baked texture.

*Duplicated tiles are marked with a reddish color.

Each UDIM Tile item has two main properties:
Tile Number: UDIM tile number.
Tile Scale: Image tile size.
Additionally tile labels can be turned on, so each tile can be named in the list, helping keep track of them.

Tile List Operators
Use the + button to add an item to the list. Hold CTRL to add multiple items at once using the pop-up window.

Use the - button to remove an item from the list. Hold CTRL to remove multiple items at once using the pop-up window. Choose from removing all, the duplicated, or the disabled items.

Use the Up and Down buttons to move the items. Hold CTRL to move the active item to the top or to the bottom of the list.
Use the dropdown menu to access additional list modifier operators.

-
Load Tiles: Load the UDIM tiles from the selected UDIM image.

Selected to Top: Move the active item to the top of the list.
Selected to Bottom: Move the active item to the bottom of the list.
Enable All: Enable every item in the list.
Disable All: Disable every item in the list.
Invert All: Invert the Gate value for every item in the list.
Clear List: Remove every item from the list.
Remove Duplicated: Remove all the duplicated items from the list.
Remove Disabled: Remove all the disabled items from the list.
Tile Label: Enable labels for the UDIM tiles.
Sort Items: Sort the items in the list by UDIM tile number in ascending order.
Image
The Image panel is where you can customize how your image textures will be named and exported.

Name
Every texture creation begins with setting the name. This panel allows you to control how your textures will be named.
This panel provides a very easy way to control how your images are name.

Prefix: This field allows you to add custom text before the texture type. If left empty, the prefix will be the active object’s name. For no prefix, use double apostrophes ('') or double quotation marks ("").
Bridge: Custom text to be placed between the texture type and scale. Leave it empty for no bridge text.
Suffix: Custom suffix to be added after the texture scale. Leave it empty for no suffix.
You also have the option to further modify how the textures are named. This can be done by clicking on the pen icon in the panel name. It will open a new window, where you can change the order of the elements used for creating the final name, you can also remove these elements. You can also add simple texts before, between, or after the elements.

Format
Image file format settings for creating and exporting the image textures.

-
File Format: File extension to use when saving the image.

Use Float: Create images with 32-bit floating-point bit depth.
Color Depth: Bit depth per channel.
Compression: Compression amount to use when saving the image.
*Based on the selected file format, other corresponding default Blender image settings may appear or disappear.
Export
Set the path where textures will be exported. At the set file path a new folder will be created, based on the prefix, if set any, or based on the object's name.

- Subfolders: Create additional subfolders for each bake type inside the main folder .
The color management settings can be changed for the exported images. By default this option is disabled.

Settings
Adjust all the bake related settings that are commonly applied to all bake types. This panel includes the margin, selected to active, and sampling settings.

Margin
Margin settings, adjust the size and the margin type.

- Auto Adjust: Automatically adjust the margin size based on the baked texture's size. When this options is true, the margin size is set for 1024x1024 texture scales, and it will be adjusted correspondingly.
Selected to Active
Source to target object bake related settings. All the default settings such as the cage settings, extrusion, and ray distance.

- Active as Final: Use the target object as the final object. If true
Selection Helper
The selection helper panel is a collection of properties for helping in the object selection for the selected to active bakes. This panel is only optional to use, and if the objects are selected manually in the viewport, and not a single property is set in this panel, the bakes will work the same.

The select objects button, selects the objects in the 3D viewport based on the set properties in the panel. All the set source objects will be selected, and the set target object will become the active object.
Sampling
Bake sampling settings, mostly the same but still different. Auto Bake by default uses two sampling settings, Low & High profile. Both have their own panels and both sampling profiles have the same options available, but both are used for different bake types. The high sampling settings are used for bake types like the Ambient Occlusion or Combined, and all the bake types that require a high sampling rate for good bake results. The low sampling profile is for mostly shader or multires bake types. Which bake type uses which is detailed in the auto select's tooltip.
For anyone who wants to use one render sampling for all the bake types, it can be done by either turning the auto select off or by using the render sampling option.

- Render Sampling: Use the default sampling settings instead of the split low and high profile sampling settings. These settings are the same as Blender uses for rendering.

- Auto Select: Pick the sampling profile automatically based on the baked texture type. When this is off, the low sampling settings profile will be used for all the bakes. This could be useful when you want to bake all the textures with the same sampling settings but not with the render sampling settings.
Addon
Control various aspects of the addon's functionality.

Textures
Texture anti-aliasing, color space, image packing, etc.

- Pack Images: Pack the bake textures into the .blend file.
- Fake User: Add fake user to the baked texture images.
-
Anti-aliasing: Apply scaled anti-aliasing to the baked textures.
-
Off: No anti-aliasing will be applied.
-
Upscaled: Textures will be created and baked at a higher resolution (original texture size * upscale value). Using 200% upscale value is equivalent to 2x anti-aliasing.

-
Downscaled: After the bake has completed, the textures will be scaled down to the set downscale value, and then back to their original texture size. This process can be repeated by changing the Iteration value.

-
Off: No anti-aliasing will be applied.

- Color Space: Set the color space the different type of textures should be baked in.

- Shared Textures: Bake all the objects from the bake session onto the same textures. Same as if multiple objects are merged into a single one, and then baked.
Materials
Create a final, baked version material or control how the Image Texture nodes are placed in the materials.

- Image Textures: Set whether to keep or remove the created image texture nodes from the materials after the bake.
- Final Material: Create a final material which can be applied to the final object. For this material the image texture nodes are always kept, regardless if the Image Textures are set to be kept or not.
- Material Shader: Choose what shader to use for the final material

-
Apply Textures: Apply the baked textures to the final material. The textures will be connected to the corresponding socket of the shader node.
False: Textures won't be applied.
First: The firstly baked texture will be connected from a bake type. To which will be the first depends on the Bake List's item order.
Last: The lastly baked texture will be connected from a bake type. To which will be the last depends on the Bake List's item order.
Highest: The texture with the highest resolution from a bake type will be connected.
Lowest: The texture with the lowest resolution from a bake type will be connected.

-
Node Tiling: Select how to place the image texture nodes in the materials.
- Off: All of them at the same location.
- Grid: Placing them into a grid tile system
- Single Row: All of them will be placed next to each other in a single horizontal row.
- Row By Type: Each bake type (Base Color, Metallic, etc.) will be placed into its own row.
- Row By Type +: Each bake type (Base Color, Metallic, etc.) will be placed into its own row. Additionally, if a type has only one item, those single items will be combined into an additional row instead of using different rows.

-
Node Labels: Add labels automatically to the Image Texture nodes.
- Off: No label will be applied.
- Name: The baked item's custom name will be applied.
- Type: The baked item's type name (Base Color, Metallic, etc.) will be applied.

Objects
Final object settings, and object export settings.

-
Final Object: Create a final, baked object from the original object. If set to the final material will be automatically applied to the final object.
- Collection: A collection to put the final object(s). If left empty the final object will be placed in the same collection(s) as the original object is in. The collection's color can also be set.

-
Keep Name: Choose which object should have the name of the original object. If set to Final, the final object will take the original object's name, and the differentiator will be added to the original object's name. If set to Original the opposite will happen.

- Differentiator: A text that will be added to the end of the set (Keep Name) object's name. This is used to avoid name conflicts, and shouldn't be none.
- Location: The location to set the final object to. Can set to copy the original object's location, or to reset the final object's location.
- Location Offset: When the location is set to copy the original object's, an offset can be applied to the final object's location on the set axis.

Export Object
The final object can set to be exported automatically as all the bakes are finished for that object.

- Export When: Select when to export the objects. Either only when all bakes were successful, or always.

- Final Object: Whether to keep or remove the final object after it's exported.
- Clear Transform: Clear object's transform before exporting. The location, rotation, and scale can be controlled individually.
- Restore Transform: If the object's is not set to be deleted after the export, and it's transform were reset, it can be set back to its original transform.
- Export As: objects can be exported as .fbx, .obj, or .gltf/.glb. *Explore the available export settings for each file type by clicking on the file extensions.

Bake Items
Control how new items are added to the lists, and how can they be edited.

-
Add New: Choose how many items are added to the list.
- Simple: Only one item is added at once.
- Advanced: Multiply items can be added at once.
-
Dynamic Scale: Dynamically set the new item's scale.
- Disabled: The new item will copy the previous item's scale.
- Enabled: New items' scale will be adjusted based on the previous two item's scale values.
- Enabled+: New item's scale will be adjusted based on the previous three item's scale values.

- Bake List: Choose how and where the list items can be edited.
- Type (In-Line): Edit the item's type directly from the list.
- Scale (In-Line): Edit the item's scale directly from the list.
- Type & Scale (Default): Edit the item's scale and type values from below the list.

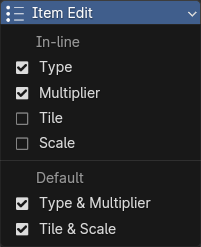
- UDIM List: Choose how and where the list items can be edited in the UDIM lists.
- Type (In-Line): Edit the item's type directly from the list.
- Multiplier (In-Line): Edit the item's tile multiplier directly from the list.
- Tile (In-Line): Edit the item's tile number directly from the list.
- Scale (In-Line): Edit the item's tile scale directly from the list.
- Type & Multiplier (Default): Edit the item's type and tile multiplier values from below the list.
- Tile & Scale (Default): Edit the item's tile number and tile scale from below the list.
Bake Queue
Control the behavior of the bake queue.

Default queue behavior when both Active Bake and Finished Bake are off.

- Finished Bake: Automatically move the finished bake queue item to the bottom of the list.

- Active Bake: Automatically move the active bake queue item to the top of the list.

- Next Object: Choose when should the next object in the queue start baking.
- On-Success: Automatically continue with the next object, unless there was an error with a bake.
- On-Click: The queue won't be continued until the 'Next Object' button is pressed.
- Always: Always continue the bake with the next object in the queue.

- Confirm Results: Choose when should be the bake results confirmed.
- On-Success: Automatically confirm the bake results, unless there was an error with a bake.
- On-Click: Won't confirm automatically, always waits for manual confirmation.
- Always: Always confirm the bake results, ignoring any errors.

Miscellaneous
This panel holds different types of control properties, including for alerts, confirmation popup windows, list padding, etc.

- Confirm Popups: Popup windows to confirm certain actions on button press, such as bake start, cancel, etc. These settings can be turned off here to skip the confirm windows. Alternatively CTRL+Click can also be used to skip confirm windows.

- Start Popup: A collection of the main Auto Bake settings, all in the popup window of the bake start button. Each setting can be turned off either individually, or collectively. The turned off settings won't be visible in the popup window.

This is how the window looks like, with all the settings kept enabled. From this popup the same settings can be controlled, as from the panels, but with a quicker access to them. When a setting is turned off it won't be visible at all in the popup.

-
Export List: When starting a new bake session, determine how to handle non-exported images from the previous sessions.

- List Layout: Control the padding level for the lists and the buttons around them.

1. Compact: Minimal padding, buttons are merged, and the list also has no padding.

2. Moderate: Moderate padding, small gaps between buttons, and padding around the list itself.

3. Spacious: Maximum padding, with more spaced out buttons.

-
Text Alerts: Turn off text alerts at certain parts of the addon. This includes red explanatory texts that indicate when something is not set up correctly, or a bake fails.

-
Reports: Auto Bake sends reports of certain actions during a bake session, like when a texture starts baking, or when it's finished. These reports can be completely turned off here.

- Subfolder Name: Control the subfolders' names. Enabling this setting will include the prefix in the subfolders' names. Otherwise, the subfolder will be named using only the type of the bake.
Choose a product version:
| Sales | 100+ |
| Customer Ratings | 4 |
| Average Rating | |
| Dev Fund Contributor | |
| Published | 3 months ago |
| Blender Version | 4.1, 4.0, 3.6, 3.5, 3.4, 3.3 |
| License | GPL |
Have questions before purchasing?
Contact the Creator with your questions right now.
Login to Message